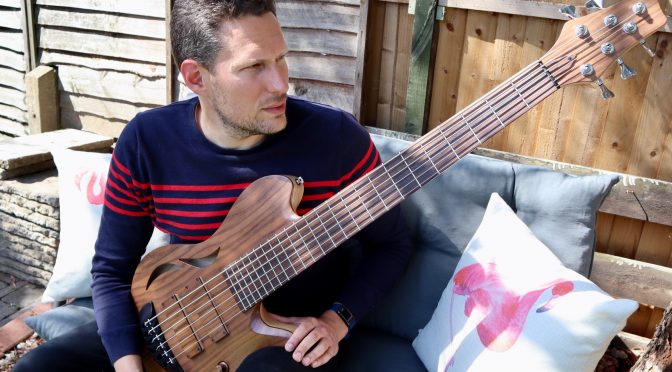
Here’s a finger style demo of my new Overwater Hollowbody Thinline fretted 6-string bass. I’ve owned the bass for a couple of weeks now and I wanted to get a demo out because a lot of people have asked for one. In the video, I’m playing only through the bridge pickup and the low end and the mids are slightly boosted and the treble slightly dipped. This is a tremendously versatile instrument, and this demo only really demonstrates one aspect of its personality. So I will be recording more demos in order to show off its full range of characteristics.
Changes in Rhythm (based on Rhythm Changes) by Johnny Cox
I’m currently writing compositions specifically to be played on this bass. And “Changes in Rhythm” is the first one that I’ve completed. The piece is based on the jazz chord progression known as Rhythm Changes. Rhythm Changes is probably the second most popular jazz chord progression (after the 12-bar blues) and it’s almost always played with a medium fast or fast swing feel. My idea was to take the Rhythm Changes progression but completely change the feel to a slowish 16th note Latin feel. Hence the title “Changes in Rhythm”.
I wanted to record this with a percussionist as a duo. Similar to the concept of Jaco Pastorius and Don Alias playing Donna Lee. But unfortunately the lockdown put an end to those ideas. Hopefully I will record this tune again in the future as part of a duo.
Fretless Bass Line with Bass TAB – Bass Practice Diary – 30th June 2020
This is a fretless bass line that I wrote recently as part of a piece I’m working on. During the lockdown I’ve been trying to keep my creativity going by writing some music. The drums are provided by my good friend Lewis Davies who has appeared on my channel before.
The Bass Line
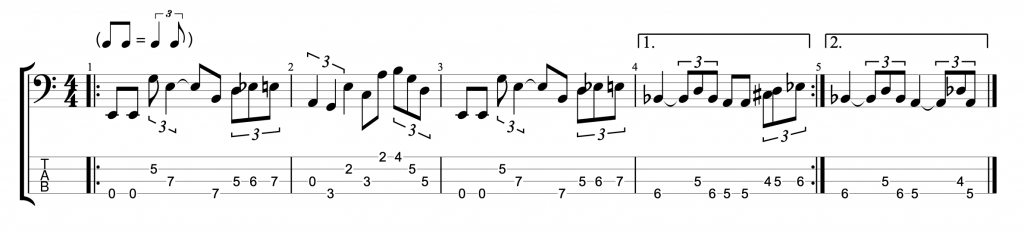
Fretless Bass Line
The bass line has a triplet feel. I’ve written it in 4/4 but I could have written it in 12/8. If you’ve read my book Electric Bass: Improve Your Groove then you’ll know that I like to count triplets with the syllables ta-ki-ta. Using those syllables, the two ta’s become the beat and off beat in a shuffle or swing feel. But I think it’s how and when you use the other syllable, ki, that can make a triplet feel really pop. Notice that I’ve placed a note on this subdivision after the second beat in every bar of this bass line. To my ears, that is what defines the character of this line.
If you’d like to check out another of my fretless bass lines with bass tab, then you can find one here.
My New Overwater Hollowbody 6-string Bass Guitar – Bass Practice Diary – 23rd June 2020
This week I received my custom made Overwater Hollowbody 6-string bass guitar. It’s taken just over a year to build. And this bass is currently unique. It’s the first fretted 6-string hollowbody that Overwater has made and the first with a 34″ scale length. I’ve only owned this bass for a few days, but my early impressions are very positive. It’s relatively light for a 6-string bass, but the low end it gives you is huge. And it has one of the best low B-strings of any bass I’ve played.
Chris May and Overwater Basses
Bass players outside the UK might not be familiar yet with Overwater basses. The company was founded in 1979 and is run by it’s founder Chris May. Many British professional bass players play Overwaters including Scott Devine of Scott’s Bass Lessons. Chris has featured in videos on Scott’s Bass Lessons and he has earned his reputation as one of the best bass builders in the business.
Over the last few years I’ve spoken to several companies about making me a lightweight 6-string. As you know, I’ve always played Warwick 6-string basses. They’re great, but they’re heavy. And it’s not always practical to take out a heavy 6-string bass. Especially when I know I’m going to be playing long sets. So, I’ve often found myself taking out lighter 4 or 5 string basses when I’d prefer to play 6.
I first spoke to Warwick about making me something lighter. Their position was, that if you make a bass too light, it won’t sound like a Warwick. Which is a very fair point, but it lead me to the conclusion that I needed to look elsewhere in order to find what I was looking for. So, I started by talking to UK based bass manufacturers like Status, Sei and Overwater. All of them make great instruments that I would be happy to play.
The reason that I opted for Overwater was down to Chris May. Out of all the companies that I spoke to. It’s not easy to build a good light 6-string bass. And I felt that all of the other companies I spoke to were slightly cautious about taking on the challenge. But Chris was exceptional in his enthusiasm and expertise and in taking a personal interest in what I needed.
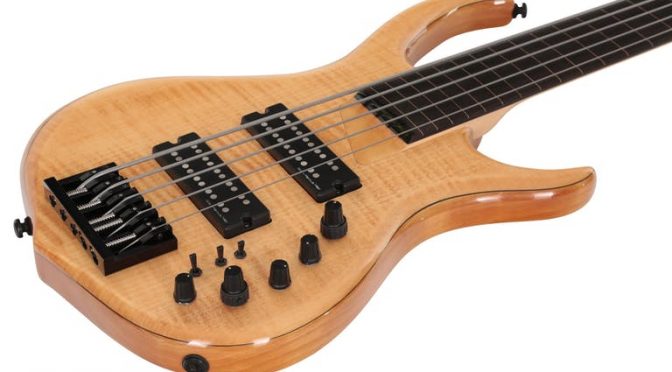
My Overwater Hollowbody 6-string bass
The bass has a Walnut top and a Swamp Ash body. It has a 3-piece maple neck and the neck joint is glued. The fretboard is Indian Rosewood. It’s a thinline body. I’ve played a fretless version of this model with a much thicker body shape and a 35″ scale. It sounded awesome but it was heavy!
Overwater have their own pickups and they match the wood on the pickup covers to the bass. They also do their own 3-band active eq with matching wood covers on the control knobs. The onboard preamp also includes a balanced XLR output, which effectively makes the bass itself an active DI box. With the two outputs you can route the jack output to your amp and send the balanced XLR output to the front of house.
I’ll do a proper demo of this bass in the next few weeks. The playing in this video was literally the first time I’d played this bass. And I was playing with all the EQ’s on the bass and amp set flat. I’ll be able to give a much better demonstration of what this bass is capable of when I’ve played her for a few weeks.
Learn G Major On the Entire Fretboard – 10 Minute Bass Practice Workout – Bass Practice Diary – 16th June 2020
This is the second 10 minute bass practice workout that I’ve posted. This one is specifically designed to help you learn your fretboard up and down by learning the key of G major in every position. These workouts are an example of the kind of practice workout that I often give to my students. The idea is, that if you use your time efficiently, like this, then you can achieve a lot more than you might think in 10 minutes.
The G Major 10 Minute Bass Practice Workout
After releasing the first fretboard workout in full, I got a lot of positive feedback from bass players. So, here is another one.
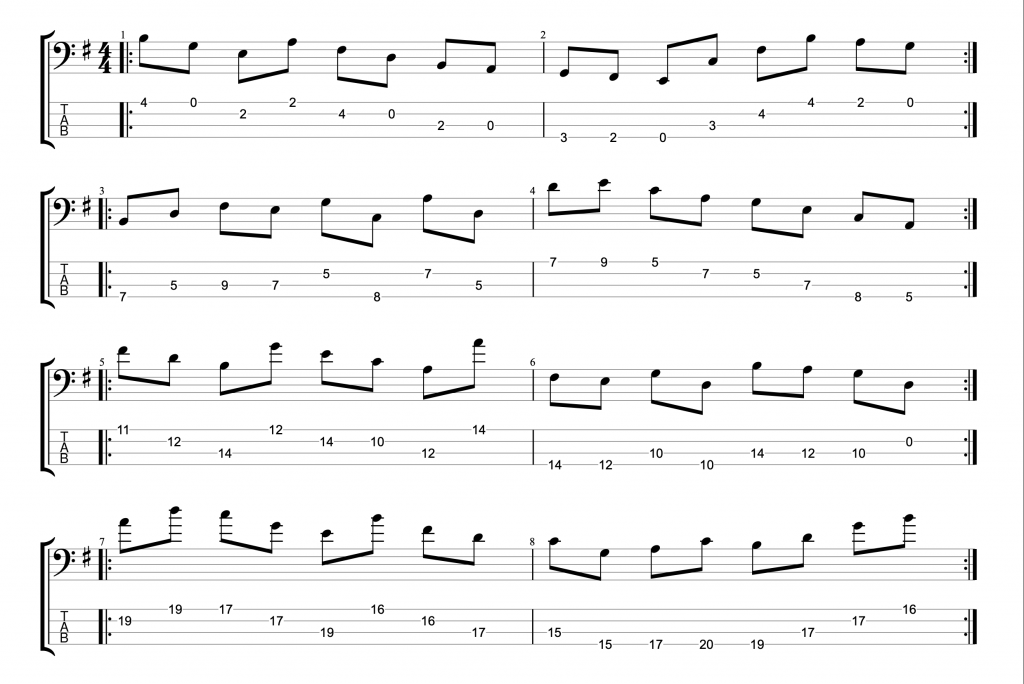
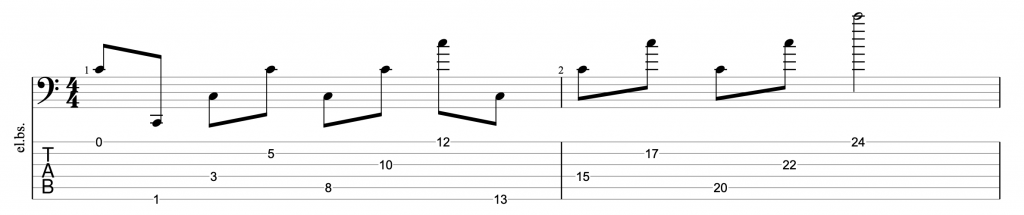
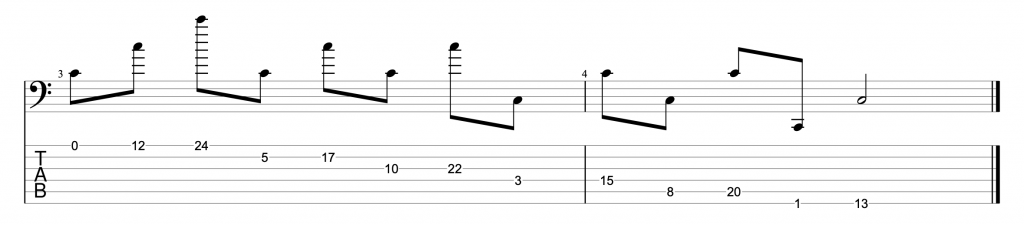
G Major 10 Minute Bass Practice Workout
The idea is that you practice each line for 2 minutes (roughly) and then the final 2 minutes is for playing the entire example all together. Each line contains all of the notes in the key of G major in a particular area of the fretboard. For example, the first line covers all of the notes between the open strings and the 4th fret. The second line covers the 5th fret to the 9th fret, and so it goes on up the fretboard until, at the end, I’ve played every possible note in the key of G major on my 20 fret fretboard in every possible position .
Each 2 minute section of the workout is divided into four tempos, with approximately 30 seconds spent on each tempo. I like to start at a very comfortable (meaning slow) tempo. And then work up to a tempo that challenges me. In this workout, I haven’t pushed the tempo up as high as I did previously. The reason is because my main goal here is to learn the notes and positions for G major. Speed is not necessary to achieve that. However I have still increased the tempo because there’s no harm in pushing my technique at the same time as learning my fretboard.
Learning Your Bass Fretboard
Learning the notes of every key all over your fretboard is huge. It will make a massive difference to your playing. It probably makes most sense to start with C major, but it doesn’t really matter which order you learn the keys in. You can think of this as learning modes as well as keys. When you’re learning the key go G major, you’re also learning A dorian, B phrygian, C lydian, D mixolydian, E aeolian and F# locrian. It helps if you can practice playing the notes against some kind of harmony, which is why I recorded some diatonic chords in the key of G major to go along with the workout.
A Quick Tip for Learning the Fretboard on 6-String Bass – Bass Practice Diary – 9th June 2020
How good are you at locating notes on the fretboard of your bass? There’s a big difference between being able to work out where a note is, and knowing it without having to think about it. Knowing all the notes in every part of the neck is fundamental, but a lot of musicians never fully get to that point.
The fretboard can look very intimidating when you don’t know it well. But I can tell you that it’s much easier to learn the entire fretboard than you might think. It does take an investment of your time, but perhaps not as much time as you think. If you take a methodical approach to learning it, you can learn the entire fretboard in weeks rather than months.
One Note at a Time, One String at a Time
I’m going to show you two exercises for learning where you can find the note C all over the fretboard of a 6-string bass with 24 frets. Most 6-string basses have 24 frets. Having said that, you can easily use this same process to learn the notes on any instrument. It will work equally well on 4 or 5-string basses or on a guitar.
The first exercise involves starting at the open string, and working your way up the neck from the 1st fret to the 24th. Play the note C on every string in every position. You’ll find that the fretboard of a 6-string bass with 24 frets contains the note C in five different octaves. You can play those five C’s in 13 different positions on the neck and I’ve written them out here.
All the C’s on a 24 fret 6-string bass
As you can see, the notes make a pattern in three’s going up the neck. But we’re trying to learn the notes, not just the pattern. So, for that reason, I would also recommend playing through this second exercise.
All the C’s played one string at a time
When you play the notes on one string at a time, it forces you to think about where each individual note is, rather than thinking about the pattern that the notes make on the fretboard.
Remember, that there are only twelve notes in the octave (chromatic scale). So if you set yourself a target of learning one note per day, using these two exercises. Then you’ll learn the entire fretboard in 12 days.
Altered Pentatonic Jazz Lick on Fretless Bass – Bass Practice Diary – 2nd June 2020
Last week I featured a pentatonic scale that you can create by altering just one note in a standard major or minor pentatonic scale. This week I’ve put that altered pentatonic scale into practice. I’ve come up with a jazz lick on fretless bass that features both the standard and altered versions of the pentatonic scale.
The Lick
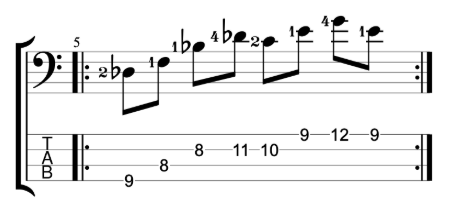
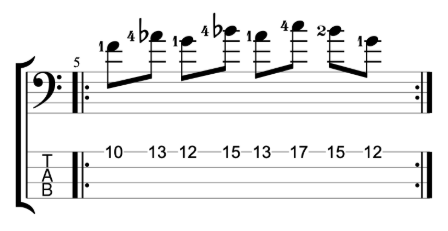
Jazz Lick using both Standard and Altered Pentatonic Scales
I’ve composed the line on a II-V-I-IV progression in the key of C major. I choose to use the IV chord rather than the more common VI7 chord in order to feature two different pentatonic approaches to playing on major 7th chords. On the Cmaj7 chord I’ve played an E minor pentatonic scale. It gives me the 3rd, 5th, 6th, 7th and 9th relative to the root note of the chord. On the Fmaj7 chord, I’ve used the altered version of the scale to create a lydian augmented sound. The notes are E, F, A, B & C#, 7th, root, 3rd, #4th, #5th relative to the F root note. It’s like an F# minor pentatonic scale, with an F natural root note instead of F#. It’s a sound that I featured in last week’s video.
On the II chord I’m using the obvious D minor pentatonic scale. I like to start my jazz lines inside the harmony and then take them outside. The altered version of the pentatonic scale does a really good job of spelling out the sound of an altered dominant chord. It helps me bring in some of those outside notes on the G7 chord V. The notes are G, Bb, B, Eb & F, which is root, #9, 3rd, b13 &7th. It’s like the notes an altered dominant arpeggio. You can think of it as C minor pentatonic scale with the root note lowered by a semitone to B.
Warwick Thumb Bass – 6-String Bolt-on Broad Neck – Bass Practice Diary – 19th May 2020
This week I was servicing my 6-string Warwick Thumb bass when I realised that I’ve never featured it in a Bass Practice Diary video. Recently I did a video in which I renovated my first childhood bass. But this Warwick Thumb bass has even more significance to me. It was my first 6-string bass, and I’ve played this bass more than any other instrument in my life. This is probably a slightly self indulgent Bass Practice Diary video, but I thought this might be interesting for my fellow Warwick bass enthusiasts.
A couple of times each year I take this bass out and service it. I change the strings, polish the frets, oil the fretboard with lemon oil and treat the natural oil finish with surface finishing wax. That’s what I was doing this week when I realised that I’ve never featured this bass before in one of my Bass Practice Diary videos. You’ll only recognise this bass if you’ve followed some of my old, old videos from before I started my practice diary.
How I Came to Own It
I’ve owned this bass since I was 19 years old and it was my first 6-string bass. I was at music college at the time and I had a teacher that played 6-string bass. At that time I was still playing mostly 4-string. I owned a cheap 5-string bass, but it wasn’t good and I rarely played it. My main basses were a fretless Mexican Fender Jazz Bass and a Gibson USA Les Paul Bass, both of which I’d picked up second hand.
It was a good time for buying second hand. I couldn’t afford a good new bass and at that time. And you could pick up second hand instruments for a fraction of their value new. These days, I look at the high prices of second hand instruments and I wonder why anybody buys them.
My dream bass in my late teens was a Warwick. I’d never played one up to that point. But they were very popular at that time among pro and semi-pro bassists. So I heard them a lot in the live music venues that I regularly visited. They had a very distinctive tone, and that tone, to me represented what a modern electric bass should sound like.
So I dreamed of buying a Warwick bass and, inspired by my teacher, dreamed of playing a 6-string bass. So, for months I scoured the internet for a second hand 6-string Warwick bass that I could potentially afford, assuming I sold all my other basses.
My Warwick Thumb Bass
It’s a difficult instrument to play. The neck is massive, both deep and wide. It has a 34 inch scale, which is standard on Warwick basses and it has 20mm spacing between the strings, which makes it a broad neck model. Over the years, I’ve seen many bass players try and play this bass and fail. This bass was built for tone not playability. It’s heavy and it doesn’t balance very well on the strap. It balances well on your lap when you sit down and play it which makes it a good bass for recording, but gigging is hard work.
The best way to get it to balance is to put weights on the strap, which adds to the weight of an already very heavy bass. I would always have a very stiff and aching shoulder the morning after any gig. It’s remarkable really that I used this as my number one bass for 10 years. I thought for a long time that this would be my number one bass for my entire career. It was so much a part of my sound and my playing style. But eventually, practical considerations took over, and using a bass that is as heavy and as distinctive sounding as this one is just not practical in many situations.
The bass is made from solid Ovankol, which is a heavy tone wood, similar in it’s tonal characteristics to Rosewood. The fretboard is made from Wenge. The pickups are MEC Soap-bar and the active circuitry features Bass and Treble controls and an active/passive push/pull control on the volume knob.
It’s a bass that really needs to be your number one. It’s hard to play, so if you’re going to master it, you need to spend lots of time with it. If you stop playing it regularly, it’s very hard to pick it up again which is why you don’t see me playing it very much any more. It’s a shame because it’s a bass that means a lot to me, and I learned so much with it.
10 Minute Bass Fretboard Workout – Play Along With Me – Bass Practice Diary – 12th May 2020
This week I’m posting a 10 minute bass practice workout that I prepared. You can join me by playing along with the video or you can do it at your own pace. Having done a video a few weeks ago talking about “how you should practice rather than what you should practice”. I wanted to post a practical demonstration of what I think is a really efficient method of practicing.
The Workout
First I came up with a line which goes like this.
Bass Practice Workout Line
When I was writing the line, I was trying to come up with four bars in which each bar tested something different. But all four bars put together still needed to play like a musical phrase. I wanted the finished line to involve moving both horizontally and vertically on the neck. Meaning position shifting up and down the neck as well as moving across the four strings.
The complete workout involves practicing each bar for two minutes. Then the final two minutes is spent practicing all four bars together. Each two minute section of the workout is divided into four tempos. Roughly 30 seconds each at 60, 90, 120 & 150 beats per minute.
Obviously, if you do this workout on your own, you can customise those tempos to suit you. The principle you should follow is that the first tempo should feel slow, and the last tempo should feel fast. You want to start by practicing really slowly, there’s no such thing as “too easy” at this point. There are many really important reasons why you should start at a slow speed. You want to use this time to really think about your timing, your technique, the tone and quality of each note you play, your fingering. And most importantly, you’re starting to build up some vital muscle memory which you’ll need when the tempo gets quicker.
The last 30 seconds of each two minute section is where you should be really pushing yourself. You want to be making mistakes at this point. If you’re not making mistakes at the fastest tempo, then your practice is too easy. It’s really important to get the tempos right for you. If you make the practice too easy, you won’t be improving as quickly as you could be. If you make the practice too hard you might not improve at all.
Having said that, my advice is to be cautious the first time you do it and make it easy by setting the tempos slower. If it’s too easy the first time you try it, you can always push the tempos up the second time you do it. However, if you start out too fast, you probably won’t achieve anything.
Four Finger Exercise
The first bar represents one of the most fundamental types of technical exercise on bass guitar. Four finger exercises, or what I call “one finger per fret”. These types of exercise are typically done on one string at a time. So I’ve added the additional element of taking the exercise across the strings and back again.
Bass Practice Workout – Bar 1 – Four Finger Exercise
Position Shifting
The second bar adds the element of position shifting up the neck. The bar starts in the 3rd position (meaning 1st finger on the 3rd fret) and then it moves up to 5th and then 6th position.
Bass Practice Workout – Bar 2 – Position Shifting
Triad Pairs
Bar 3 is a triad pair. I’ve done videos about them already this year. Funnily enough, I wasn’t even thinking about triad pairs when I came up with the line in my head. When I wrote it down, I realised that it was a Bb minor triad and a C major triad. It just goes to show that when you practice an idea enough, it will start to become instinctive.
Bass Practice Workout – Bar 3 – Bb minor and C major Triad Pair
Single String Exercise
The final bar is a single string exercise. I’m using it to practice shifting position up the first string by shifting between my index finger and little finger.
Bass Practice Workout – Bar 4 – Shifting Position on a Single String
What Should You Do if Your Fingers Hurt?
They probably will. There’s a reason that I’ve called this a workout. Playing the bass is like going to the gym for your fingers. When we’re practicing, we’re developing muscles in our hands, and discomfort will happen. When it does, it’s important to know what to do because over practicing can lead to injuries.
This fretboard workout involves a lot of work for your left hand, particularly your little finger, which might not be used to this much work. If your fingers are feeling very sore 24-48 hours after doing the workout, don’t panic. In the fitness world, there is a thing called DOMS (delayed onset muscle soreness). It happens when you work a muscle that isn’t yet conditioned to the work you’re requiring it to do. It’s usually at it’s worst 24-48 hours after a workout and it isn’t an injury, it will get better after 2-3 days.
If you experience this, it is important to take a break from intense practice, to help the muscles recover. When the soreness feels better, do the workout again. That way you will start to build the strength in your fingers. The DOMS will not be anywhere near as bad after the second time.
Don’t make the mistake of thinking “it hurt so I’m not going to do it again”. If you practice regularly, it will hurt less and less as your hands get stronger. If you take a break from practicing and then start again, the DOMS will probably come back again because you will have lost some of the conditioning you built up.
Fender Custom 62 Precision Bass Pickup on Vester P Bass Demo – Bass Practice Diary – 28th April 2020
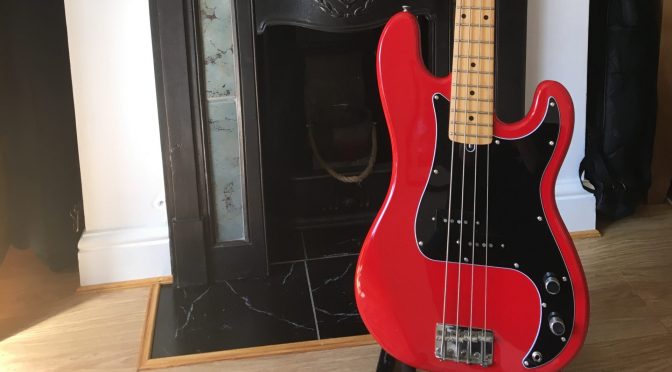
This is a quick demo I recorded this week for my Vester P Bass (Vester Stage Series). The bass sound is completely unedited. I wanted to try and give you the clearest idea of what the bass sounds like now that I’ve installed a Fender Custom 62 Precision bass pickup. The bass was recorded directly from the line out of my Markbass Little Mark III. All the EQ on the amp was set flat. I did no editing after recording and I didn’t add any EQ, effects, compression or anything else.
Last week I ripped all of the rusty old electronics out of this 26 year-old bass and I installed a new Fender Custom 62 Precision bass pickup on it. This week I’ve been playing this bass, the first bass I ever owned, for the first time in about 20 years. It’s bought back all kinds of memories of my childhood. And I’ve found myself remembering things that I used to try and play in those early days of learning to play the bass. That’s why I’ve recorded a shuffle blues here, because my abiding memory of this bass is playing shuffle 12-bar blues when I was 11, 12 & 13 years of age.
My First Childhood Bass
It’s funny, this was the first bass I ever owned, but it’s entirely different to any of the other basses that I’ve owned since. I’ve never owned a Fender Precision (or Squier) and I currently don’t own another bass that has a P style pickup on it. It’s also the only bass that I’ve ever owned that has a maple fretboard.
It’s easy to look back at your first instrument with a kind of misty eyed nostalgia, but the truth is, for me, this bass unconsciously became a kind of blueprint for how I didn’t want my future basses to be. Thinking back to my first ever bass teacher, he played a proper Fender USA made Jazz Bass. My Vester suffered in comparison, and I’m sure that unconsciously coloured my opinions of J and P style basses ever after. Later in my teens, as I started to hear modern style active basses like Warwicks. They became my blueprint for what I thought a great bass tone should be, and I moved further away from P style basses.
I remember that the electronics stopped working when I was in my late teens. I did try to get them working again, with some initial success. By that point, I already owned a newer 5-string bass. And when the electronics stopped working a second time, I didn’t have the money or the expertise to fix it. So, for about 20 years, the Vester Stage Series P Bass sat unused in a flight case in the loft. Only coming out when I moved house, or I needed the flight case to take a different bass on tour.
Vester Stage Series P Bass
What I didn’t appreciate as a child, is that there’s actually some really good things about this bass. The best thing about this bass, by far, is the neck. It’s a really good playable maple neck. I entirely failed to appreciate this as a child because I didn’t have enough experience of playing bass necks. The original bridge on the Vester is also an excellent copy of vintage style Fender P Bass Bridge. It’s still on the bass and in perfect working order, as are the Fender style tuners. It was such a good copy of a Fender P bass that Fender successfully sued them. The basses were no longer manufactured after that.
The biggest problem with the bass originally was that it wasn’t very inspiring to listen to. If only I’d known in the 90’s how easy it is to change the pickup on a P style bass.
Installing a Fender Custom 62 Precision Bass Pickup
Installing the Fender Custom 62 pickup couldn’t have been easier. It was actually much harder to get the old pickup out than it was to put the new pickup in. The screws holding the old pickup in place were so rusty that the screw heads had virtually disintegrated. Meaning that unscrewing them was impossible. I had to break the old pickups to remove them, and then remove the old screws with pliers.
Putting in the new pickup was as simple as, finding the position of the pickups using the old scratchplate, making new holes for the four screws and then soldering two wires. The Fender Custom 62 Pickup comes with a white wire and a black wire. And a diagram showing you where to solder them.
Apart from installing the pickup, the other work I did included changing all of the wiring, pots and input, cleaning and polishing the frets and the fretboard and installing a new scratchplate with access to the truss-rod. The video was shot just before the new scratchplate arrived, so here’s a picture of the finished bass.
Vester Stage Series P Bass with Fender Custom ’62 Precision Bass Pickup
The Guitar Solo
The guitar solo in the video is part of a transcription I’ve been working on this week from Frank Gambale. Here is a PDF of the transcription with guitar TAB.
Can a Cheap Bass Sound Great by Adding a Good Pickup (Fender Custom ’62 P Bass Pickup)? – Bass Practice Diary – 21st April 2020
Can you get a good P Bass tone out of a cheap bass with the addition of a good pickup? This week I’m doing something a bit different. I’m bringing a bass back to life that hasn’t worked for somewhere in the region of 15-20 years. I’m literally changing all of the electronics, including the pickup, jack input and volume and tone pots as well as all the wiring. But the star of this is the Fender Custom Shop Custom ’62 Precision Bass pickup.
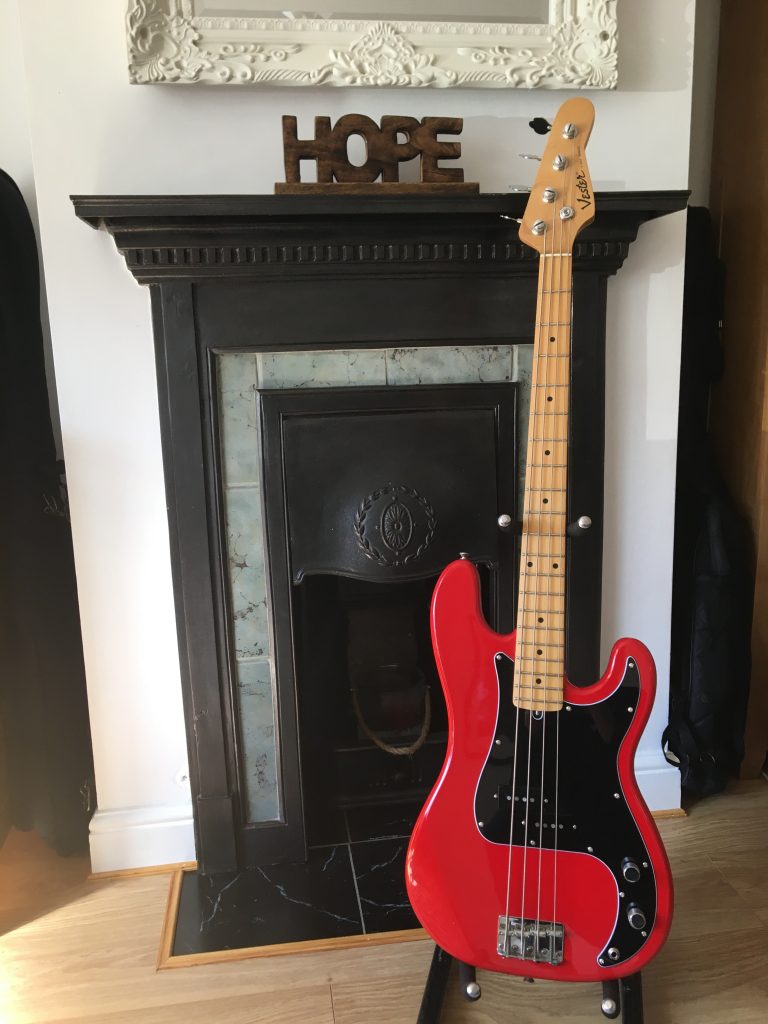
Vester Stage Series P Bass Copy
The bass in question is the first bass I ever owned. It’s a Korean made P Bass copy called a Vester Stage Series. My parents bought it for me in 1994 and it cost £150 when it was brand new. It’s actually quite a good copy of a Fender Precision. So good in fact that they were successfully sued by Fender in the 90’s and as a result, these basses didn’t last long.
There’s a lot on this bass that feels cheap. The original pickups are uninspiring sounding. The body is plywood, the scratchplate is cheap and flimsy and all the screws have gone rusty. But the main reason I say that it’s a good copy, is because the neck is really good. It’s very playable and it’s really in good shape for a cheap 26 year old bass. Other elements on the bass which are good are the tuners and the bridge. So there is the shell of a good bass, especially when you consider that the pickups, scratchplate and screws are all easy to replace. Would a solid wood body lead to a better tone than the plywood body? Probably a bit, but I personally don’t think that it would make a massive difference.
The Transformation
As I’ve already mentioned, the neck, bridge and tuners are in remarkably good shape for a cheap bass of this age, but the frets needed attention. So the first job, having removed the old strings was to clean the frets. A great trick for doing this is using 0000 grade wire wool. I would strongly recommend using electrical tape to protect the fretboard. You can get tools that go over the frets to protect the board, I have the tools but I don’t find that they work better than tape. In fact, I’ve found I can be more accurate with tape.
After cleaning the frets with wire wool, I polished them with Frine Fret Polishing Kit and I cleaned the fretboard with a normal guitar polish. I would normally use lemon oil but I wouldn’t recommend using lemon oil on a maple fingerboard.
Next I had to remove the scratchplate and the bridge. The bridge had to come off so I could remove the earth wire that runs through the body of the bass and attaches to the tone control pot. Having done that, the old input and volume and tone control pots were easy to remove. The old pickups were not easy to remove. The heads of the screws holding the old pickups in place were so rusted that no screw driver could turn them. It was very difficult getting the pickups out, I eventually had to break the old pickups to get the out of the bass and then get the screws out with pliers.
Installing the Fender Custom ’62 P Bass Pickup
By contrast, installing the new Fender Custom ’62 P Bass pickup couldn’t have been easier. I lined up the position by placing the old scratchplate in place. I made four new holes for the screws and then I fixed the pickup in place and soldered the two wires according to the instructions that came with the Fender Custom ’62 pickup. You really don’t need to be an electrician or even a DIY expert to do this. P style basses are really very simple to wire up.
If you want to do a similar transformation to your own P bass, you don’t need to change the pots or the input as I did. I changed mine because lots of the wires were rusty, which was why the bass didn’t work. And it’s cheap and easy to buy ready wired input, volume and tone setups from guitar shops. The only fiddley job is connecting the earth wire from the bridge to the tone control pot.
To complete the installation of the pickup, I would strongly recommend setting the pickup height individually for each string. This is to ensure that you get an even sound across each string. I set my pickup heights by measuring with a metal ruler and then adjusting the heights by either tightening or loosening the four screws. The measurements I was aiming for were E – 3.9mm, A – 3.8mm, D – 3.7mm and G – 3.6mm. Although I wasn’t trying to be too specific, I don’t think my measurements were perfectly accurate. Those measurements were just a guide to get the heights roughly right, and the rest is done by playing and listening.