Slap Bass Timing Exercises – Bass Practice Diary – 8th September 2020
If you’ve been following my recent series of videos about timing exercises, then you’ll know how these work by now. You take an odd number note grouping and play those groupings as continuous 16th notes. What I didn’t mention on any of my previous videos, was that these exercises are a great way to practice slap bass. This video feature three slap bass timing exercises. And you can take this concept and develop your own exercises.
The exercises
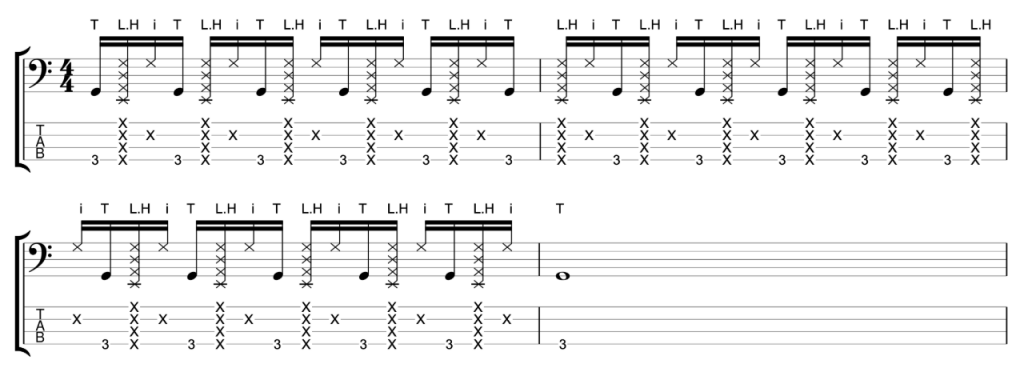
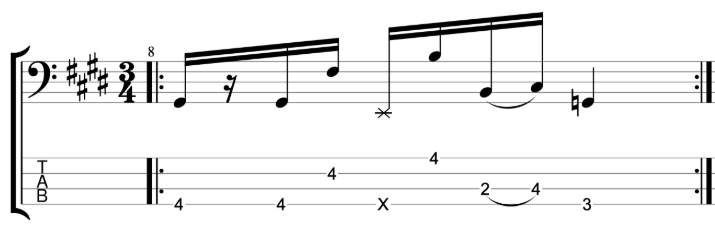
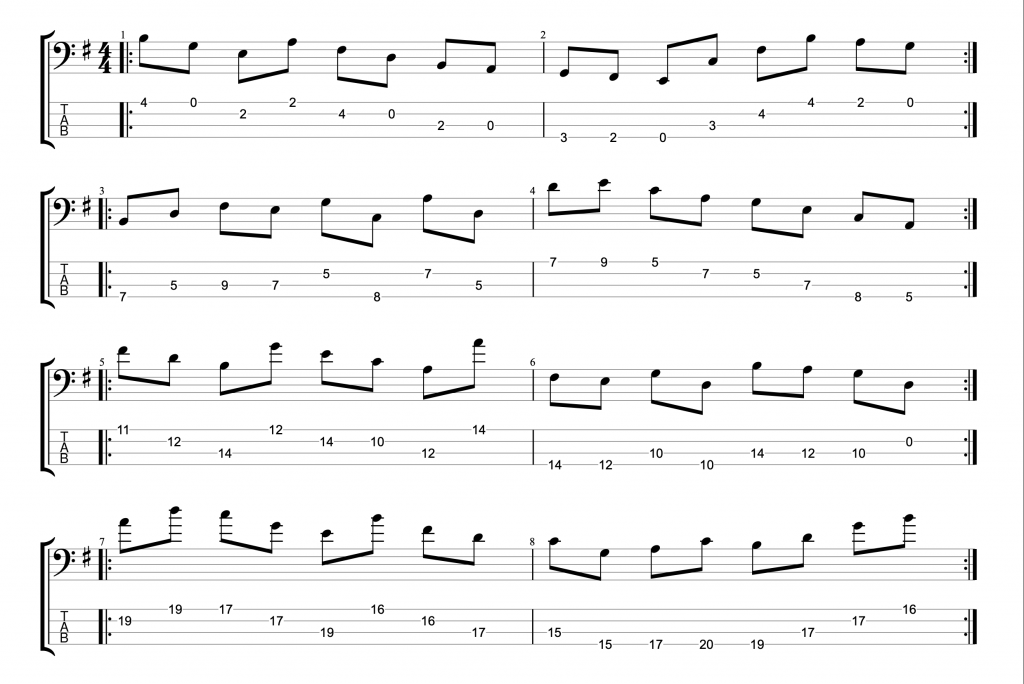
The first exercise is 16th notes played in three note groupings. The three note grouping consists of a note, G, thumped with the right hand thumb (T). A tap on the strings with the left hand, marked L.H on the notation. And finally a pull with the index finger of the right hand, which I’ve played as a dead note by muting the strings with my left hand.
Slap Bass Timing Exercises – 16th notes in Groupings of Three
The second of the three note sequence, the left hand tap, can be very soft. You don’t need to hit the strings hard, you just need to do it in time. Hitting the strings with the left hand has the effect of silencing the first note. So, even if you don’t here the tap, you will still feel the rhythm by hearing the note G go silent.
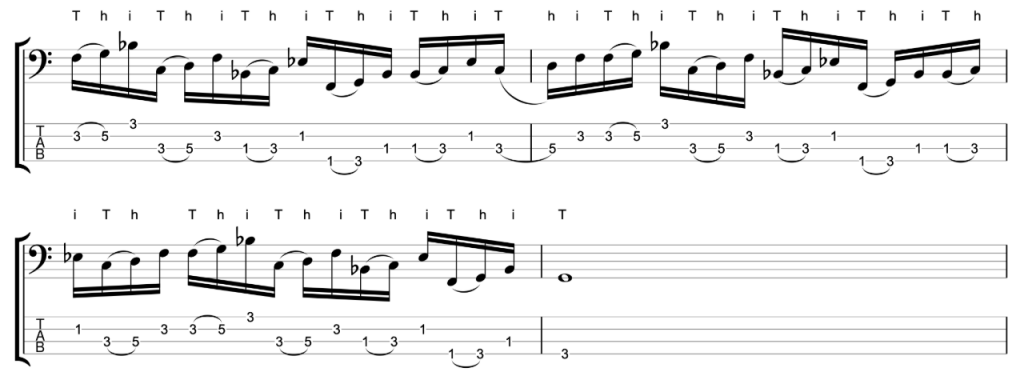
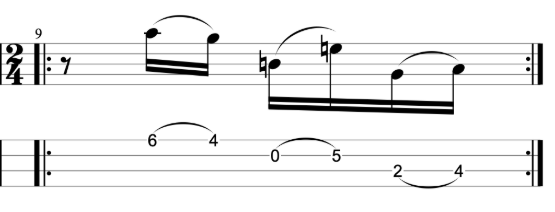
The second exercise is an extension of that idea. This time the three note grouping is made by thumb (right hand), hammer (left hand) and pluck (right hand index). And the notes are taken from a C minor pentatonic scale.
Slap Bass Timing Exercises – 16th notes in Groupings of Three – C minor Pentatonic
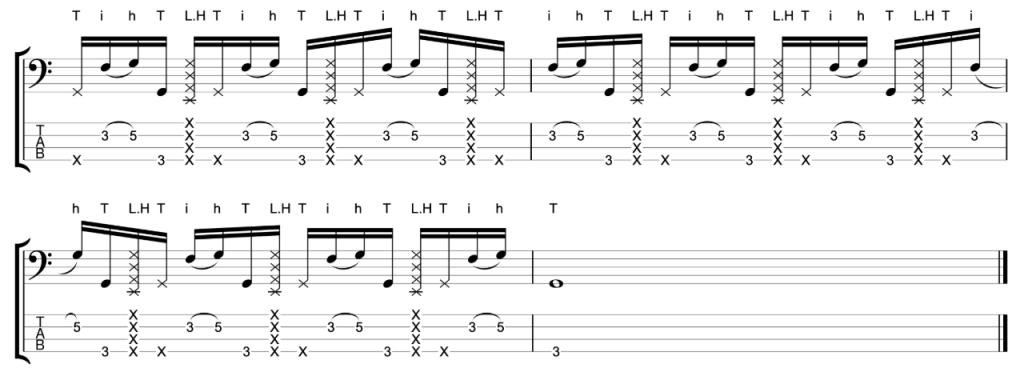
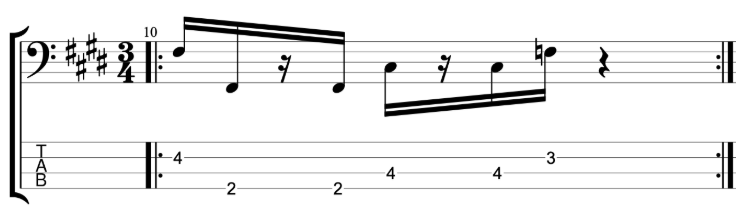
The final exercise features a five note grouping. The five notes are as follows. Thump the G and then tap with the left hand, exactly as in exercise 1. Then thump with the right hand thumb again, but this time as a dead note muted by the left hand. That’s three, the final two notes are F and G. Pluck the F on the D string and hammer onto the G on the fifth fret with your left hand.
Slap Bass Timing Exercises – 16th notes in Groupings of Five
Slap Bass 10 Minute Workout – Bass Practice Diary – 4th August 2020
This is the third 10 minute bass practice workout that I’ve released, but the first to feature slap bass techniques. There are a lot of videos on YouTube of bass players teaching and demonstrating slap techniques. They’re often fast and flashy and they almost always involve using lots of open strings. There’s nothing wrong with that, because those things are fun to play. But, in this video I’ve tried to zero in on what I think are the fundamental techniques that bass players should practice, so that they can use slap bass techniques in “real world” music situations.
What are the fundamentals of slap bass?
If you follow my Bass Practice Diary videos, then you probably know that slap bass is not my “main thing” on bass. The vast majority of what I do is played finger style, but I like to keep my slap bass chops ready for when they’re needed. This line, that I’ve written is typical of the kind of exercise that I’ll set for myself when I’m practicing slap bass.
I’ll start by asking myself the question, what do I need to be able to do in order to execute slap bass lines quickly and accurately when they’re put in front of me on a gig? Then I’ll come up with a line, like this one, that I feel tests me on the fundamental techniques that I need. So, I haven’t included any advanced techniques like double thumbing or machine gun triplets. Those are great techniques for playing slap bass solos, but I’m more interested in the fundamentals that I need to make my slap bass lines sound good.
For me, the fundamental techniques of slap bass are the thump with your thumb, the pull with your index finger, the hammer ons and pull offs with your left hand for playing legato lines and dead notes. When I’m practicing these fundamentals, I’m concentrating on trying to get my timing as well as my tone and dynamics even. So all the notes can be heard and nothing is coming out too loud.
Bass players often use compression on their slap bass lines to even out the dynamics. It’s ok to do that, but I would strongly recommend that you don’t use compression when you practice. You need to learn to control the dynamics with your hands. Using compression will subconsciously teach you that you don’t need to control the dynamics because the compression does it for you.
The 10 Minute Slap Bass Workout
If you’ve done one of my workouts before, you’ll know the format by now. I divide the 10 minutes up into four exercises, each practiced for 2 minutes (roughly). And then the last 2 minutes is for putting all four exercises together into one line. Each exercise is practiced at four different tempos, roughly 30 seconds at each tempo. The first tempo should be very slow to help get used to the notes in each new exercise. And the last tempo for each exercise should be pushing you to the edge of your comfort zone.
The last tempo should be challenging but not impossible. It’s a mistake to try and go too fast. You need to push yourself in the last 30 seconds but I think it’s a much bigger mistake to go too fast than too slow. I’ve set the tempos in this video at tempos that work for me, 40bpm, 55bpm, 70bpm and 85bpm. If those tempos don’t work for you, then do the workout in your own time at your own tempos. You only need a metronome or a drum beat, which you can find for free online.
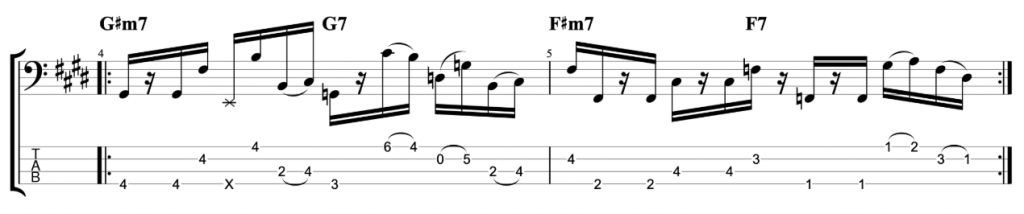
The line is based around a jazz III-VI-II-V in the key of E major. The line itself uses hardly any open strings. I’ve done this deliberately, because it’s harder to play slap bass without using open strings. Typically, when I’ve been asked to play slap bass on gigs, I’m very rarely required to play in keys like E and A where I can use lots of open strings. It’s more often in keys like F and Bb because those are popular keys for keyboard players and horn players.
My line is in the key of E. However, I’ve chosen the chords G#m7 – G7 – F#m7 – F7. Therefore, there isn’t much opportunity to use the open strings on the root notes. However, once you’ve learned the line, you can resolve it onto an E chord, which is fun because you can then bring in the open E string. Here’s the line.
Slap Bass 10 Minute Workout
The Exercises
The first exercise goes like this.
Exercise 1
I’m practicing it as a 3-beat repeating cycle. The chords at this point go from G#m7 to G7. I’ve included one dead note, which I’m playing by striking the string with my right-hand thumb while muting with my left hand. I haven’t included many dead notes, because I feel like I probably over use them when I improvise a slap bass part. I also put dead notes in instinctively on rest strokes. You can hear me doing it in the video. So feel free to improvise dead notes on any of the rests. You can play dead notes with your right hand and left hand, I usually use a combination of both.
After the dead note, there’s a hammer on from the 2nd to 4th fret on the A-string. In this exercise, I’m working on getting an even sound between the notes that I’m thumping, which are the notes on the A and E-strings. And the notes that I’m plucking on the G and D-strings.
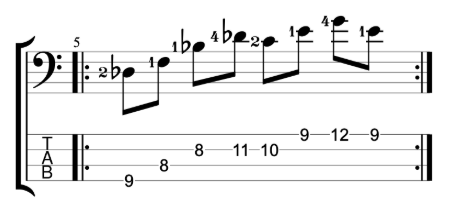
The second exercise is this.
Exercise 2
This is a bass fill played using a combination of hammer ons and pull offs with the left hand. While the right hand is using both index finger and thumb. It starts by plucking the 6th fret on the first string and pulling off to the 4th fret. Then the right-hand thumb plays the open string second string and the left hand hammers on the 5th fret. Then I use my thumb again to play the 2nd fret on the A-string and I hammer on to the 4th fret. Watch out for the rest on beat 1, and the goal is to make it sound like one smooth line.
Exercise 3 goes like this.
Exercise 3
Each note in this exercise is articulated using either the thumb or index finger on the right hand, with no written dead notes or legato phrasing. You can improvise dead notes on the rests. It’s a 3-beat cycle, like exercise 1. I could play exercise 3 as a 2-beat cycle, but it flows better with the quarter note rest on the end.
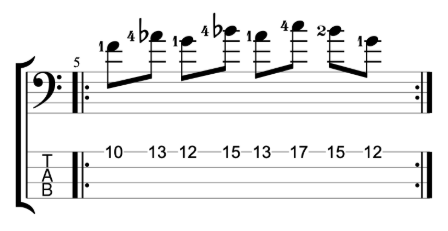
This is the fourth and final exercise.
Exercise 4
Another rest on beat 1. More combinations of thumping and plucking, hammer ons and pull offs. Good Luck!
Learn G Major On the Entire Fretboard – 10 Minute Bass Practice Workout – Bass Practice Diary – 16th June 2020
This is the second 10 minute bass practice workout that I’ve posted. This one is specifically designed to help you learn your fretboard up and down by learning the key of G major in every position. These workouts are an example of the kind of practice workout that I often give to my students. The idea is, that if you use your time efficiently, like this, then you can achieve a lot more than you might think in 10 minutes.
The G Major 10 Minute Bass Practice Workout
After releasing the first fretboard workout in full, I got a lot of positive feedback from bass players. So, here is another one.
G Major 10 Minute Bass Practice Workout
The idea is that you practice each line for 2 minutes (roughly) and then the final 2 minutes is for playing the entire example all together. Each line contains all of the notes in the key of G major in a particular area of the fretboard. For example, the first line covers all of the notes between the open strings and the 4th fret. The second line covers the 5th fret to the 9th fret, and so it goes on up the fretboard until, at the end, I’ve played every possible note in the key of G major on my 20 fret fretboard in every possible position .
Each 2 minute section of the workout is divided into four tempos, with approximately 30 seconds spent on each tempo. I like to start at a very comfortable (meaning slow) tempo. And then work up to a tempo that challenges me. In this workout, I haven’t pushed the tempo up as high as I did previously. The reason is because my main goal here is to learn the notes and positions for G major. Speed is not necessary to achieve that. However I have still increased the tempo because there’s no harm in pushing my technique at the same time as learning my fretboard.
Learning Your Bass Fretboard
Learning the notes of every key all over your fretboard is huge. It will make a massive difference to your playing. It probably makes most sense to start with C major, but it doesn’t really matter which order you learn the keys in. You can think of this as learning modes as well as keys. When you’re learning the key go G major, you’re also learning A dorian, B phrygian, C lydian, D mixolydian, E aeolian and F# locrian. It helps if you can practice playing the notes against some kind of harmony, which is why I recorded some diatonic chords in the key of G major to go along with the workout.
10 Minute Bass Fretboard Workout – Play Along With Me – Bass Practice Diary – 12th May 2020
This week I’m posting a 10 minute bass practice workout that I prepared. You can join me by playing along with the video or you can do it at your own pace. Having done a video a few weeks ago talking about “how you should practice rather than what you should practice”. I wanted to post a practical demonstration of what I think is a really efficient method of practicing.
The Workout
First I came up with a line which goes like this.
Bass Practice Workout Line
When I was writing the line, I was trying to come up with four bars in which each bar tested something different. But all four bars put together still needed to play like a musical phrase. I wanted the finished line to involve moving both horizontally and vertically on the neck. Meaning position shifting up and down the neck as well as moving across the four strings.
The complete workout involves practicing each bar for two minutes. Then the final two minutes is spent practicing all four bars together. Each two minute section of the workout is divided into four tempos. Roughly 30 seconds each at 60, 90, 120 & 150 beats per minute.
Obviously, if you do this workout on your own, you can customise those tempos to suit you. The principle you should follow is that the first tempo should feel slow, and the last tempo should feel fast. You want to start by practicing really slowly, there’s no such thing as “too easy” at this point. There are many really important reasons why you should start at a slow speed. You want to use this time to really think about your timing, your technique, the tone and quality of each note you play, your fingering. And most importantly, you’re starting to build up some vital muscle memory which you’ll need when the tempo gets quicker.
The last 30 seconds of each two minute section is where you should be really pushing yourself. You want to be making mistakes at this point. If you’re not making mistakes at the fastest tempo, then your practice is too easy. It’s really important to get the tempos right for you. If you make the practice too easy, you won’t be improving as quickly as you could be. If you make the practice too hard you might not improve at all.
Having said that, my advice is to be cautious the first time you do it and make it easy by setting the tempos slower. If it’s too easy the first time you try it, you can always push the tempos up the second time you do it. However, if you start out too fast, you probably won’t achieve anything.
Four Finger Exercise
The first bar represents one of the most fundamental types of technical exercise on bass guitar. Four finger exercises, or what I call “one finger per fret”. These types of exercise are typically done on one string at a time. So I’ve added the additional element of taking the exercise across the strings and back again.
Bass Practice Workout – Bar 1 – Four Finger Exercise
Position Shifting
The second bar adds the element of position shifting up the neck. The bar starts in the 3rd position (meaning 1st finger on the 3rd fret) and then it moves up to 5th and then 6th position.
Bass Practice Workout – Bar 2 – Position Shifting
Triad Pairs
Bar 3 is a triad pair. I’ve done videos about them already this year. Funnily enough, I wasn’t even thinking about triad pairs when I came up with the line in my head. When I wrote it down, I realised that it was a Bb minor triad and a C major triad. It just goes to show that when you practice an idea enough, it will start to become instinctive.
Bass Practice Workout – Bar 3 – Bb minor and C major Triad Pair
Single String Exercise
The final bar is a single string exercise. I’m using it to practice shifting position up the first string by shifting between my index finger and little finger.
Bass Practice Workout – Bar 4 – Shifting Position on a Single String
What Should You Do if Your Fingers Hurt?
They probably will. There’s a reason that I’ve called this a workout. Playing the bass is like going to the gym for your fingers. When we’re practicing, we’re developing muscles in our hands, and discomfort will happen. When it does, it’s important to know what to do because over practicing can lead to injuries.
This fretboard workout involves a lot of work for your left hand, particularly your little finger, which might not be used to this much work. If your fingers are feeling very sore 24-48 hours after doing the workout, don’t panic. In the fitness world, there is a thing called DOMS (delayed onset muscle soreness). It happens when you work a muscle that isn’t yet conditioned to the work you’re requiring it to do. It’s usually at it’s worst 24-48 hours after a workout and it isn’t an injury, it will get better after 2-3 days.
If you experience this, it is important to take a break from intense practice, to help the muscles recover. When the soreness feels better, do the workout again. That way you will start to build the strength in your fingers. The DOMS will not be anywhere near as bad after the second time.
Don’t make the mistake of thinking “it hurt so I’m not going to do it again”. If you practice regularly, it will hurt less and less as your hands get stronger. If you take a break from practicing and then start again, the DOMS will probably come back again because you will have lost some of the conditioning you built up.
Bass Practice Diary is One Year Old – 23rd April 2019
A year ago I decided to start documenting my bass practice by picking one thing that I was working each week and making a short video about it.
As a music teacher, I believe that if you want to keep improving your musicianship, then it’s essential that you keep finding new things to practice. It seems to me that a lot of people get stuck in the same practice routines, practicing the same things. And then they wonder why their playing isn’t progressing in the way that they want it to.
What I’m trying to show, is that there is an almost unlimited number of different things to practice. And many different ways that you can practice them.
I release the videos every Tuesday. And I haven’t missed a week in the whole year. So there are currently over 50 videos. All available for free without subscription.
If you would like to follow my free videos each week then you can always find them here on JohnnyCoxMusic.com. And if you subscribe to my Youtube channel and click on the bell icon, then you should be alerted each week when my videos are uploaded. You can also follow me on my Facebook page Johnny Cox Music. And you can find me on Instagram @johnny.cox.music
How to Use a Metronome or Click to Improve Your Timing on Bass Guitar – Bass Practice Diary 26th June 2018
In this video practice diary, I’m using a metronome to improve my timing. I learned this cool metronome trick from a great bass player called Michael Mondesir. I’m playing a simple eighth note bass groove from my book Electric Bass: Improve Your Groove. But, the trick is that I’m displacing the click by a sixteenth note.
Advanced Metronome Exercise
Most musicians practise with a metronome at some point. If you find it easy to play in time with a metronome, how can you continue to improve your timing. There is a huge leap from being able to play in time with a click to having perfect timing, and the exercise in this video is designed to bridge that gap.
The concept is, that the metronome doesn’t have to always count on the beat. The example that I’ve played in the video features me displacing the metronome onto a sixteenth note subdivision. But there are so many potential variations of this idea that one post or video couldn’t possibly feature all of them.
In order to play this exercise you need to start with a bass groove that has a fairly simple rhythm. Preferably one that you know very well. When Michael Mondesir demonstrated this to me he used the bass line from Michael Jackson’s Billie Jean. I’ve used an example from Chapter One of my book because it’s not dissimilar. Click here for more info. Here is the example.
Example 1i from Electric Bass: Improve Your Groove
Once you have your bass line, simply play it with a metronome as if the click is a sixteenth note off the beat. In the example in the video, the click is effectively playing this rhythm.
Click Displaced by a Sixteenth Note
You could also play with the click a sixteenth after the beat, meaning the rhythm would be like this.
Click Displaced by a Sixteenth Note
Another variation would be to play with the click playing once every three sixteenth notes. Like this.
Click Playing Every Third 16th Note
More Advanced Metronome Exercises
There are so many potential variations of this that I can’t list them all. But an obvious one would be to do the same thing with triplets rather than sixteenth notes. You could play with the click a triplet before or after the beat. Or you could play with the click counting triplets in groups of four.
If you practise in this way, your timing will improve. It’s so much harder to use a metronome like this rather than the conventional way.
The next step would be to slow down the metronome and play with fewer clicks. For example, If you’re playing a bass groove at 120BPM. You could set the metronome at half speed, 60BPM, so it would count two clicks per bar. Then, you could play as if the two clicks were playing a sixteenth after beat one and a sixteenth after beat three.
That’s just one more example and obviously there are so many variations. One step further would be to set the metronome to 30BPM and you would have just one click per bar. You could play with that one click on literally any beat or subdivision in the bar. If you can do that and still make it groove then you will have an incredibly advanced sense of time in music.
However, learning to keep such amazing time on any instrument is a lifetime’s work. Just like learning harmony or any of the other fundamental aspects of music. You need to start slow and gradually build it up over time.
How Long Does it Take to Get Perfect Timing?
Michael Mondesir first introduced these ideas to me about 10 years ago and I still practice them regularly. I don’t think I will ever stop practising like this because my timing isn’t perfect and it never will be. All we can do is try to keep improving each time we practice. Enjoy!