Tag Archives: warwick thumb

Diatonic 7th Arpeggios with Approach Notes Exercise – Bass Practice Diary 138

6-String Bass Exercise – Diatonic 7ths with Approach Notes – Bass Practice Diary – 15th December 2020

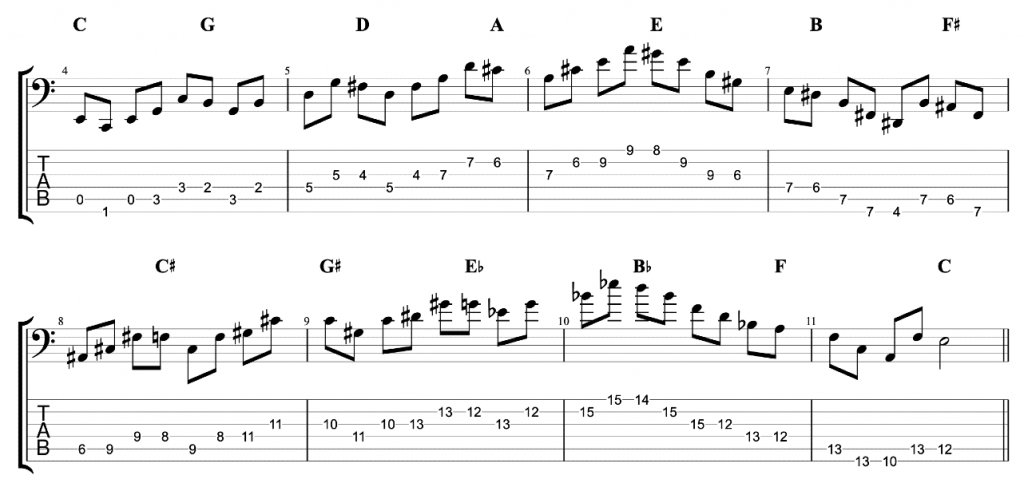
I’ve spoken recently in my Bass Practice Diary videos about how the addition of chromatic approach notes to diatonic exercises can immediately create a jazz sound in your lines. This “approach notes” exercise is a development of that idea. I’ve featured a few 6-string bass exercises in my videos this year. This one involves playing descending diatonic 7th arpeggios, with a chromatic approach note before the start of each four note arpeggio.

Diatonic 7th Arpeggios

I’ve demonstrated this idea in the key of C major. Because it’s always the easiest key to demonstrate an idea that relates to diatonic harmony. The idea of diatonic 7th chords is simply that you build four note chords by taking the 1st (root), 3rd, 5th & 7th notes of the major scale. You can then repeat this pattern of taking alternate notes, but starting on different degrees of the scale. There are seven different notes in a major scale, hence there are seven different diatonic 7th chords in any major key.

Diatonic 7th Arpeggios in the Key of C Major

In the example above I’m playing each arpeggio ascending, starting from the root. For the purposes of this exercise I’m playing the arpeggios descending, starting from the 7th and finishing on the root.

Descending Diatonic 7th Arpeggios in the Key of C Major

Chromatic Approach Notes

The term chromatic approach note simply means taking a note that is a semi-tone (half tone) away from your target note, either above or below. Then playing the chromatic approach note immediately before you play the target note.

In the case of this exercise, the target note is the 7th of each arpeggio, which is the first note that I’m playing for each one. I’m adding a chromatic approach note before the 7th each time.

Diatonic 7th Arpeggios in C Major with Chromatic Approach Notes

There are two reasons why I’ve done this. One is because the addition of chromatic approach notes creates the sound of a jazz line, as I already mentioned. And the second reason is that it creates an odd number grouping of notes. The four note arpeggios become a five note sequence with the addition of the approach notes. The odd number grouping creates a rhythmic variation that makes this sound less like an exercise and more like a musical line.

6-String Bass Exercise – Major Triads in 12 Keys – Bass Practice Diary 128

6-String Bass Exercise – Major Triads in 12 Keys – Bass Practice Diary – 6th October 2020

Last week I featured three exercises for 5-string bass, this week I’ve got an exercise for 6-string bass. In this exercise, I’m playing major arpeggios. It’s fairly typical, when practicing exercises like this, to go through 12 keys. However, I wanted to make this exercise a bit more interesting than just playing twelve major triads one after the other.

The Exercise

6-String Bass Exercise - Major Triads in 12 Keys
6-String Bass Exercise – Major Triads in 12 Keys

I’ve added an extra element by playing the triads as a five note grouping. Rather than playing root, 3rd, 5th, root, I’m playing 3rd, root, 3rd, 5th, root. The five note grouping adds a timing element, causing the chord changes to alternate between happening on and off the beat.

The triads move in fifths, but in the opposite direction to the conventional cycle of fifths. Rather than going from C to F, I’m going from C to G, up a fifth rather than down a fifth. The reason for this is that I’m playing the major 7th note at the end of each arpeggio, but that major 7th note is then being treated as the major 3rd of the next arpeggio. This leads to the sequence of fifths that you see in the exercise.

My 6-String Warwick Thumb Bass – Bass Practice Diary 108

Warwick Thumb Bass – 6-String Bolt-on Broad Neck – Bass Practice Diary – 19th May 2020

This week I was servicing my 6-string Warwick Thumb bass when I realised that I’ve never featured it in a Bass Practice Diary video. Recently I did a video in which I renovated my first childhood bass. But this Warwick Thumb bass has even more significance to me. It was my first 6-string bass, and I’ve played this bass more than any other instrument in my life. This is probably a slightly self indulgent Bass Practice Diary video, but I thought this might be interesting for my fellow Warwick bass enthusiasts.

A couple of times each year I take this bass out and service it. I change the strings, polish the frets, oil the fretboard with lemon oil and treat the natural oil finish with surface finishing wax. That’s what I was doing this week when I realised that I’ve never featured this bass before in one of my Bass Practice Diary videos. You’ll only recognise this bass if you’ve followed some of my old, old videos from before I started my practice diary.

How I Came to Own It

I’ve owned this bass since I was 19 years old and it was my first 6-string bass. I was at music college at the time and I had a teacher that played 6-string bass. At that time I was still playing mostly 4-string. I owned a cheap 5-string bass, but it wasn’t good and I rarely played it. My main basses were a fretless Mexican Fender Jazz Bass and a Gibson USA Les Paul Bass, both of which I’d picked up second hand.

It was a good time for buying second hand. I couldn’t afford a good new bass and at that time. And you could pick up second hand instruments for a fraction of their value new. These days, I look at the high prices of second hand instruments and I wonder why anybody buys them.

My dream bass in my late teens was a Warwick. I’d never played one up to that point. But they were very popular at that time among pro and semi-pro bassists. So I heard them a lot in the live music venues that I regularly visited. They had a very distinctive tone, and that tone, to me represented what a modern electric bass should sound like.

So I dreamed of buying a Warwick bass and, inspired by my teacher, dreamed of playing a 6-string bass. So, for months I scoured the internet for a second hand 6-string Warwick bass that I could potentially afford, assuming I sold all my other basses.

My Warwick Thumb Bass

It’s a difficult instrument to play. The neck is massive, both deep and wide. It has a 34 inch scale, which is standard on Warwick basses and it has 20mm spacing between the strings, which makes it a broad neck model. Over the years, I’ve seen many bass players try and play this bass and fail. This bass was built for tone not playability. It’s heavy and it doesn’t balance very well on the strap. It balances well on your lap when you sit down and play it which makes it a good bass for recording, but gigging is hard work.

The best way to get it to balance is to put weights on the strap, which adds to the weight of an already very heavy bass. I would always have a very stiff and aching shoulder the morning after any gig. It’s remarkable really that I used this as my number one bass for 10 years. I thought for a long time that this would be my number one bass for my entire career. It was so much a part of my sound and my playing style. But eventually, practical considerations took over, and using a bass that is as heavy and as distinctive sounding as this one is just not practical in many situations.

The bass is made from solid Ovankol, which is a heavy tone wood, similar in it’s tonal characteristics to Rosewood. The fretboard is made from Wenge. The pickups are MEC Soap-bar and the active circuitry features Bass and Treble controls and an active/passive push/pull control on the volume knob.

It’s a bass that really needs to be your number one. It’s hard to play, so if you’re going to master it, you need to spend lots of time with it. If you stop playing it regularly, it’s very hard to pick it up again which is why you don’t see me playing it very much any more. It’s a shame because it’s a bass that means a lot to me, and I learned so much with it.

How to Practice Sliding Notes on a Fretless Bass – Bass Practice Diary 40

Sliding Notes on a Fretless Bass – Bass Practice Diary – 22nd January 2019

Sliding between notes is an integral part of phrasing on a fretless bass. This video features an exercise to help you practice sliding accurately between notes by using the pentatonic scale.

When you slide between notes on a fretless bass, the first thing that you need to concentrate on, is keeping the notes in tune. When you slide, it’s very easy to slide too far and go sharp, or not quite far enough and the note will be flat. So my first advice is to start slowly and use a backing track.

Backing tracks are very easy to find for free on Youtube. Here is an example of a backing track in G major that you could use to help you practice this exercise. When you practice with a backing track it’s so much easier to hear when you go a little bit out of tune.

Use the Pentatonic Scale to Practice Sliding Notes on Fretless Bass

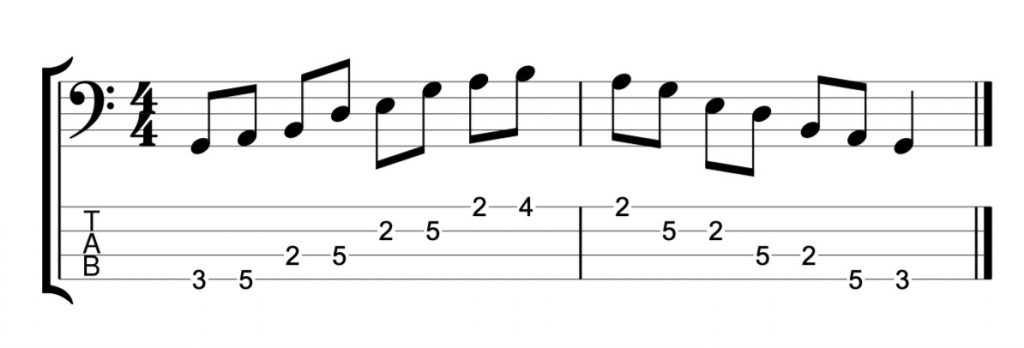
The easiest way to play a pentatonic scale is by playing two notes on each string like this.

G major pentatonic – two notes per string

The reason it’s easy is because it doesn’t involve any position shifts. But it offers very little opportunity to slide between notes.

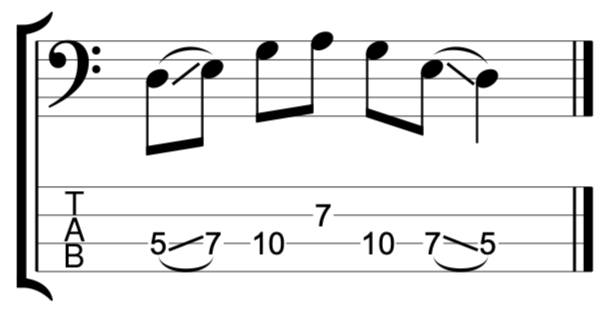
In order to incorporate slides, you need to keep shifting position, which involves playing at least three notes per string like this.

Sliding Notes with 1st Finger in G major Ascending
Sliding Notes with 1st Finger in G major Descending

You can also practice this on a fretted bass. It’s easier on a fretted bass because you don’t need to be as accurate. But position shifting is an important skill for any bass player to practice.

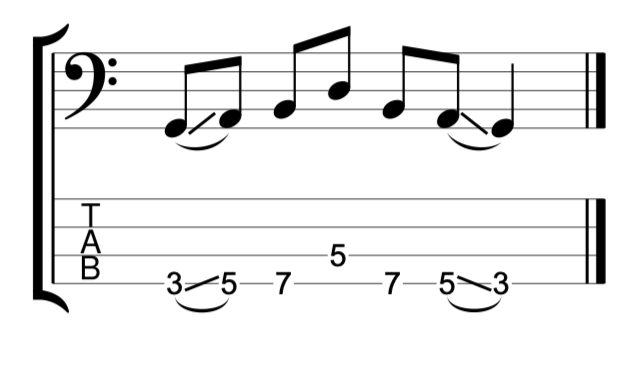
The idea of the exercise is that you always slide with your 1st finger (index finger). Playing three notes on each string, you play the first of the three notes with your 1st finger and then slide up to the second note. You can play the third note on each string with either your third finger or little finger.

Slide Notes With Any Finger

It’s easiest to use your 1st finger to slide. But you want to be able to slide accurately with all of the fingers on your left hand. So come up with your own variations of this exercise and use different fingers to play the slides. Here’s a variation that I demonstrated in the video which uses your 4th finger (little finger) to play the slides.

Sliding Notes with 4th Finger in G major Ascending

Another variation that I demonstrated in the video, is to break the exercise down into small sections. Don’t feel like you need to practice the whole scale all at once. Work on each position shift one at a time. Like this.

I think that practicing like this actually replicates what you will play in a real musical situation better than playing the whole scale all at once. You could use the example above as a fretless bass fill on a G major chord. And the example below which starts on a D could also be a fill when you’re playing in the key of G.

Just like any scale exercise, don’t forget to practice this exercise in different positions and different keys. And try to adapt the idea of sliding and position shifting to any other scales, arpeggios or technical exercises that you practice.