Bass Practice Diary is One Year Old – 23rd April 2019
A year ago I decided to start documenting my bass practice by picking one thing that I was working each week and making a short video about it.
As a music teacher, I believe that if you want to keep improving your musicianship, then it’s essential that you keep finding new things to practice. It seems to me that a lot of people get stuck in the same practice routines, practicing the same things. And then they wonder why their playing isn’t progressing in the way that they want it to.
What I’m trying to show, is that there is an almost unlimited number of different things to practice. And many different ways that you can practice them.
I release the videos every Tuesday. And I haven’t missed a week in the whole year. So there are currently over 50 videos. All available for free without subscription.
If you would like to follow my free videos each week then you can always find them here on JohnnyCoxMusic.com. And if you subscribe to my Youtube channel and click on the bell icon, then you should be alerted each week when my videos are uploaded. You can also follow me on my Facebook page Johnny Cox Music. And you can find me on Instagram @johnny.cox.music
The Altered Scale – Bass Practice Diary – 16th April 2019
Jazz musicians love to play on dominant 7th chords. And the altered scale is a really important scale to practice if you want to create a jazz sound when playing on these 7th chords. I think that using the altered scale is often perceived as “advanced” harmony. But, as with most things, it’s easy when you understand it. So, here’s my very quick guide to using the altered scale on bass.
What is the altered scale?
The altered scale is a mode of the melodic minor scale. Meaning that it contains all of the same intervals as a melodic minor scale. The altered scale is essentially what you get when you play a melodic minor scale starting finishing on the 7th note of the scale.
So, what’s a melodic minor scale? It’s basically only one note different from a major scale. If you take a major scale and change the major 3rd to a minor 3rd, you have a melodic minor scale.
Here’s the notes of an F major scale.
F major scale
And here are the notes of an F melodic minor scale.
F melodic minor scale
Notice that the only difference is the third note. It’s an A natural in the major scale and an Ab in the melodic minor.
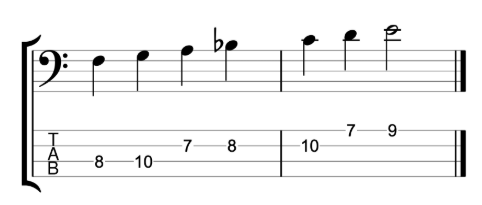
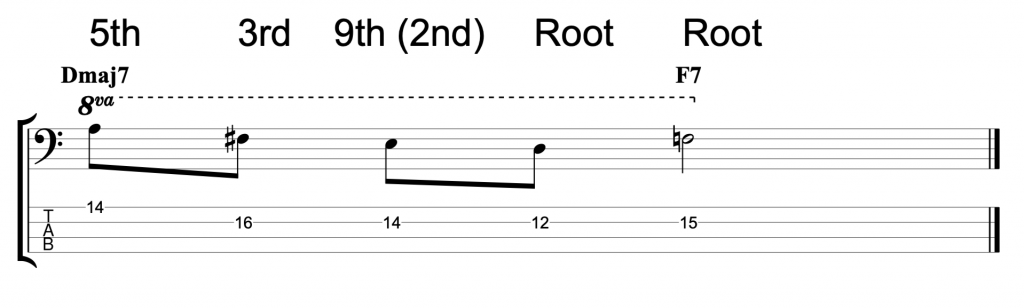
If you play the notes of an F melodic minor scale but use E (the 7th note) as the root note. You would be playing an E altered scale.
When you think about the notes of the F melodic minor with an E as the root note, it creates these interval relationships to the root note.
E altered scale
The 3rd of E7 would, of course, be written as G# not Ab. But the altered scale creates some interesting theoretical anomalies like that. Because the major 3rd note (Ab/G#) is actually the 4th note of the scale.
How do you use the altered scale?
As I mentioned at the start, the altered scale works really well on dominant 7th chords. You can think of the altered scale as being a kind of extended dominant 7th arpeggio with lots of chromatic alterations.
The scale includes the root, major 3rd and dominant 7th notes which are the fundamental ingredients of a dominant 7th arpeggio. But the other four notes are all chromatic alterations of some kind. Hence why it’s called the altered scale.
You can alter chord tones and extensions by moving them one semi-tone up or down. The 5th of E7 is B natural, but in the altered scale the 5th has been flattened to Bb. So the altered scale could be used on an E7b5 chord.
The 9th can be altered by sharpening or flattening it. The altered scale uses both alterations. So you could use it on an E7b9 or an E7#9 chord. The final alteration is a b13.
So you can use the altered scale to play on any of these altered dominant chord types. And you will sometimes see the chord symbol E7alt. Which implies a chord that could include any or all of these alterations.
So if you want to start using this altered dominant sound on your dominant 7th chords. Then start to think about using a melodic minor scale that starts one semi-tone above the root of the chord. So, if you’re playing on a D7 chord, think Eb melodic minor. For A7, thing Bb melodic minor, for G7 think Ab melodic minor, for B7 think C melodic minor etc.
Having said that, I don’t think that soloing on Giant Steps needs to be very difficult. As long as you start slowly and focus on internalising the sound of the chords before you increase the tempo.
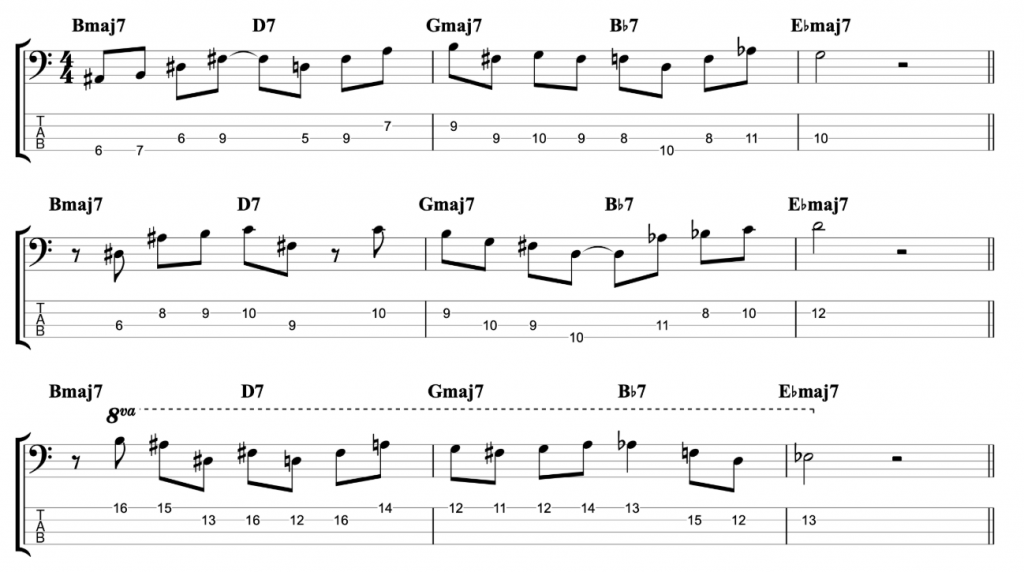
One of the reasons that John Coltrane’s Giant Steps has it’s fearsome reputation is because of the chord changes in the first two bars. The first bar starts on a Bmaj7 chord for two beats and immediately changes to a D7 chord on beat three. Which is a key change to G major. The second bar starts with a resolution to a Gmaj7 chord. Then it changes key again. This time to Bb7 on beat three which is the fifth of Eb major.
So the tune starts with three different keys in two bars. Needless to say, if you’re not prepared for it, it will catch you out. And many Giant Steps solos have failed before they’ve begun because musicians can’t negotiate these quick key changes quickly enough.
This chord movement in bars 1 and 2 repeats itself in bars 5 and 6 but transposed so that the progression starts on Gmaj7. And it’s this chord progression that defines Giant Steps. So if you want to improvise on Giant Steps you need to spend some time really working on this two bar chord progression.
Use the Chord Tones
My first piece of advice would be to come up with lines over this two bar progression using chord tones. The progression itself is already complex enough on it’s own that you don’t need to add lots of chromaticism or substitutions to make your lines sound interesting. It’s amazing how many interesting sounding jazz lines you can come up with on Giant Steps using nothing but roots, 3rds, 5ths and 7ths.
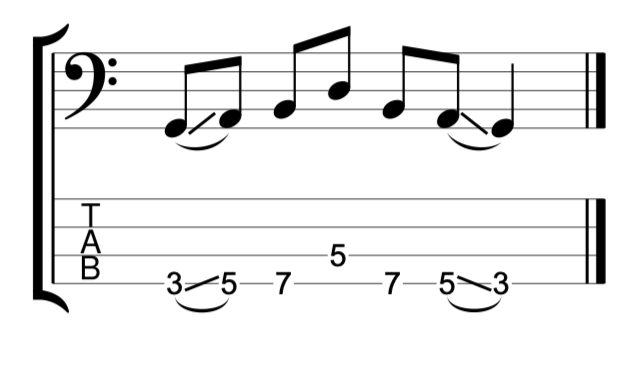
Here are three different lines that I came up with which use nothing but chord tones.
Giant Steps Licks for Bass Bars 1-3
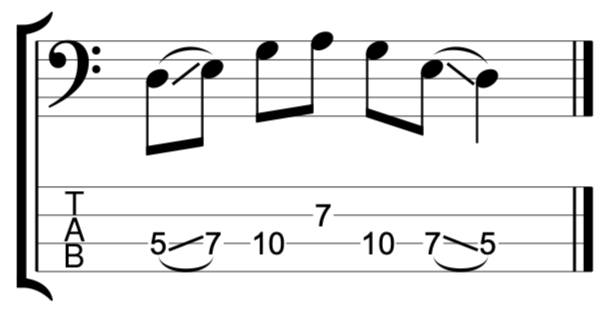
You can transpose each of these to work over bars 5 and 6. But here’s another one that I wrote specifically to be played over bars 5-7.
Giant Steps Lick for Bass Bars 5-7
I don’t work out these licks so that I can play them in a solo. I do it to help me get the sound of the chord changes into my ears. And the more lines like this that I work out, the more likely I’ll be to be able to improvise something like this in a solo. So feel free to play through my licks and practice them, but also come up with some of your own.
I honestly feel that this two-bar chord progression is the key to unlocking Giant Steps. Once you can improvise over this tricky chord sequence, the rest of the progression is easy, dare I say it. It’s just a sequence of II – V – I’s in three different keys. Eb major, G major and B major.
Playing on II – V – I’s is a jazz musicians bread and butter. There are hundreds of lessons and videos out there about playing on them.
Play Bass on Sus Chords (Suspended Chords) – Bass Practice Diary – 12th March 2019
Sus chords or suspended chords create a really cool modern sound. Last week I put out a video of a bassline I’d written on four sus chords. This week I want to explain a little bit of the theory behind my approach to playing on these types of chords.
What is a suspended chord?
I think there is often confusion over what the term suspended actually means when it relates to music. A suspended chord is simply a chord that doesn’t contain a third. A basic musical triad (three note chord) usually contains a root, a third and a fifth. And it’s the third that defines the chord as being either major or minor.
Suspended chords don’t use the third. The third is usually replaced by a fourth (sus4) or a second (sus2). Therefore they’re not major or minor chords. They need a different name, and that name is suspended. The name itself doesn’t really tell you anything important about the nature of the chords or how to play on them, so most musicians usually abbreviate and call them sus chords.
How do you play on sus chords?
Personally, I take a jazz approach to playing on sus chords. A basic sus4 or sus2 chord (like the kind you might find in a pop song) is all very well. But for me these chords get really interesting when you start extending them, creating richer fuller harmonies and chord voicings.
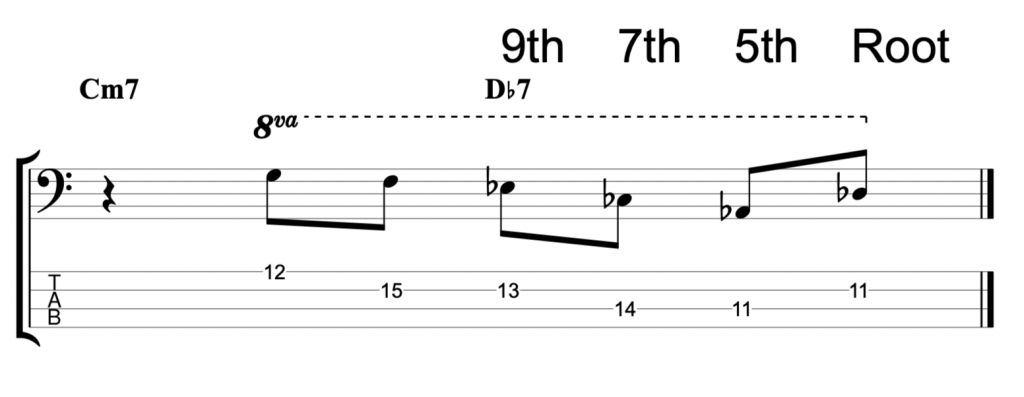
When I’m playing bass on sus chords, I like use the notes of a major 9th chord or arpeggio. But I think of the root note of the sus chord as being the 9th of the major arpeggio.
So, for example, G is the 9th of F major. So I can think of a Gsus chord as being an inverted Fmaj9 chord with the 9th becoming the root.
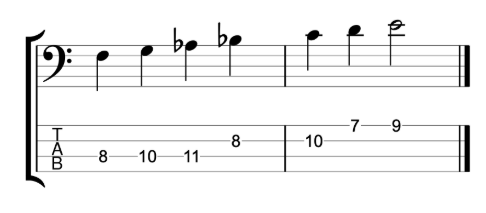
F major 9th arpeggio on G sus chord
If you think of the notes of an Fmaj9 chord with the root G, then the chord tones are root, 2nd (9th), 4th, 6th (13th) and b7th (dominant 7th). So you can think of my Gsus chord as being a G7sus4 chord with a 9th and a 13th added as chord extensions. However, I would simply think of it as Gsus and the chord extensions are there at the discretion of the musicians voicing the chords.
More sus chord arpeggios
These kind of extended sus chords create a really cool modern jazz sound. I think they’re cool because they aren’t major or minor, so the sound of them is always a bit of a question mark. Almost like you’re not really sure when you hear them, how they’re supposed to make you feel.
In the bassline I played in last week’s video, I used four sus chords Gsus, Bbsus, Dbsus and Esus. In each case I thought of the root note as being the ninth of a major 9th arpeggio.
Ab major 9th arpeggio on a Bbsus chord Cb major 9th arpeggio on a Dbsus chordD major 9th arpeggio on a Esus chord
John Coltrane Jazz Lick on Bass Guitar – Bass Practice Diary – 19th February 2019
This week I’m breaking down another jazz lick on bass guitar. And I wanted to take on one of the all time great jazz improvisers, John Coltrane.
So, I was reading through the bass clef John Coltrane Omnibook trying to choose where I should start. And I decided I should start by looking at how he played over what are know as the Coltrane Changes. Or the Coltrane Matrix as it was called when I was taught it at music college.
Coltrane Changes
The Coltrane changes are a sequence of chords that take you through three keys. Each key is a major third away from the previous key. So, the progression always resolves back into the original key. Because an octave divides perfectly into three major thirds.
John Coltrane used this progression as a substitution for a standard II – V – I progression. Coltrane used this substitution in his composition Countdown from the Giant Steps album. The Countdown chord progression is a reharmonisation of the jazz standard Tune Up.
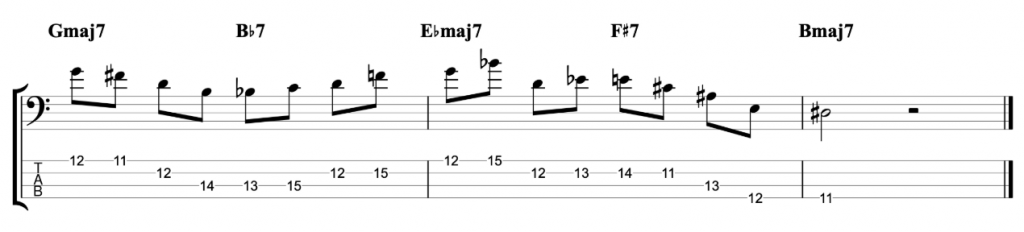
The Lick Arranged for Bass
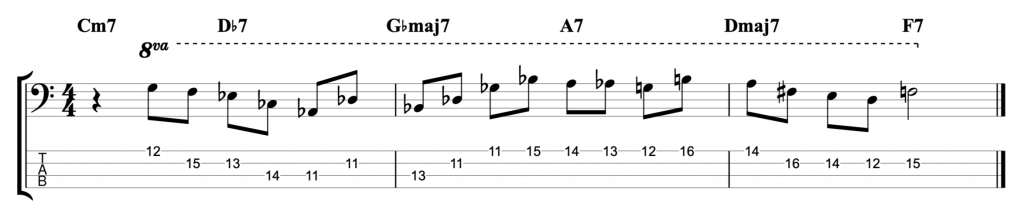
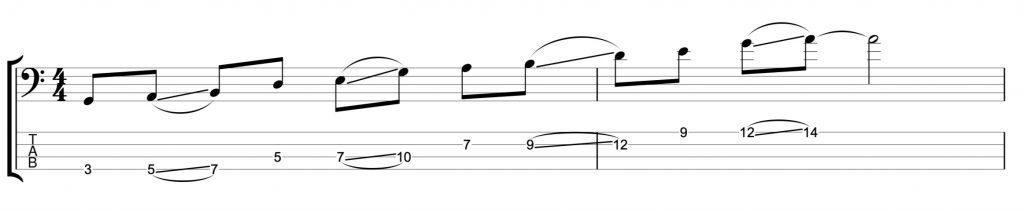
So, I’ve arranged one of John Coltrane’s licks from Countdown for bass guitar. The lick takes place over three bars and encompasses all three key changes. It starts like this.
Coltrane Jazz Lick Bar 1
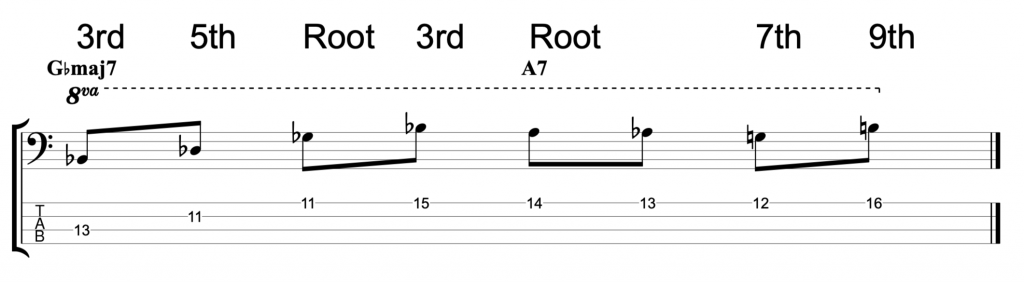
The first chord, Cm7, is chord II in the key of Bb major. If you’re going to analyse the first two notes in terms of their relationship to the chord then they would be 5th and 11th. But I feel like in this case, Coltrane was just using two notes from the key of Bb major to lead into the new key. Which is why I haven’t written 5th and 11th above the notes.
The Db7 chord is chord V in the new key, Gb major. From this point on, it’s really interesting to see how many chord tones John Coltrane uses in his line. So I’ve written the chord tone relationships above the notes. Here’s the second bar.
Coltrane Jazz Lick Bar 2
In this bar, the key changes from Gb major to D major (A7). You’ll notice that virtually every note he uses in this lick is either root, third, fifth, seventh or ninth. The only note that isn’t in this bar is the Ab passing note between the root and seventh of the A7 chord.
Using Chord Tones
His approach might seem quite simplistic on the face of it. It would certainly seem like a simplistic way of building lines if you were to apply it to the standard, unaltered II – V – I progression. But, if you look at it in context with the chord progression, it makes complete sense.
He’s using this incredibly cool substitution, which features constantly moving harmony. And he wants his line to reflect the substituted harmony. If he filled his line with chromatic alterations and extensions, then the underlying chord progression could quickly become unrecognisable. Here’s bar three.
Coltrane Jazz Lick Bar 3
In this bar the key returns to the original Bb major (F7). The pattern used on the Dmaj7 chord is very typical of the 1, 2, 3, 5 patterns that Coltrane loved to use around this period. Which is why I’ve put 2nd in brackets next to the 9th, E. Here is the full lick.
John Coltrane Jazz Lick
John Coltrane Improvisation Style
Analysing these licks is like getting a lesson in jazz improvisation from one of the masters. This lick is very typical off what John Coltrane was playing in the late 1950’s. But, during his career he went through several different stages. Each featuring a different approach to improvising. So I have no doubt that I will be analysing more Coltrane licks in the near future from different stages of his career.
Sliding Notes on a Fretless Bass – Bass Practice Diary – 22nd January 2019
Sliding between notes is an integral part of phrasing on a fretless bass. This video features an exercise to help you practice sliding accurately between notes by using the pentatonic scale.
When you slide between notes on a fretless bass, the first thing that you need to concentrate on, is keeping the notes in tune. When you slide, it’s very easy to slide too far and go sharp, or not quite far enough and the note will be flat. So my first advice is to start slowly and use a backing track.
Backing tracks are very easy to find for free on Youtube. Here is an example of a backing track in G major that you could use to help you practice this exercise. When you practice with a backing track it’s so much easier to hear when you go a little bit out of tune.
Use the Pentatonic Scale to Practice Sliding Notes on Fretless Bass
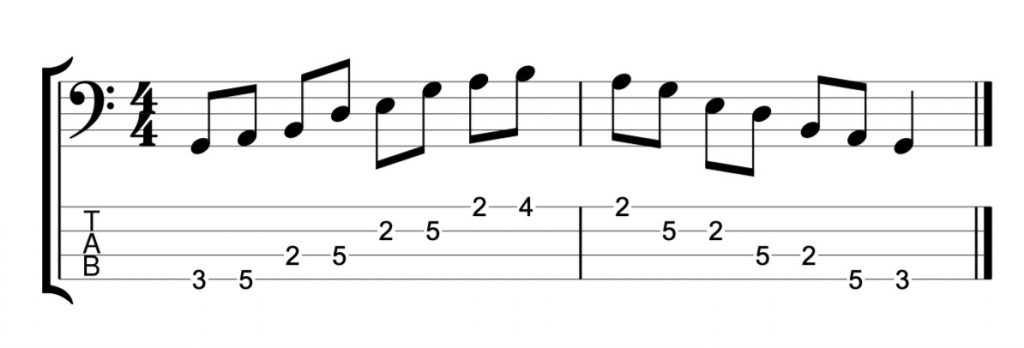
The easiest way to play a pentatonic scale is by playing two notes on each string like this.
G major pentatonic – two notes per string
The reason it’s easy is because it doesn’t involve any position shifts. But it offers very little opportunity to slide between notes.
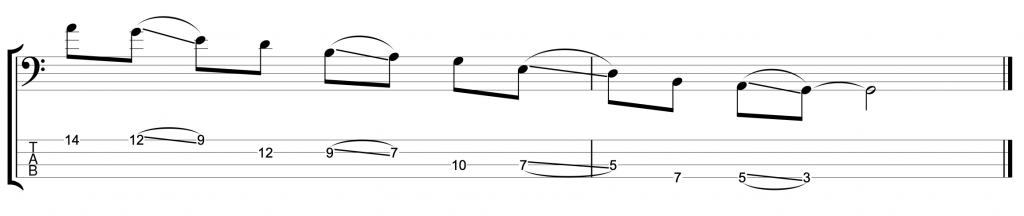
In order to incorporate slides, you need to keep shifting position, which involves playing at least three notes per string like this.
Sliding Notes with 1st Finger in G major AscendingSliding Notes with 1st Finger in G major Descending
You can also practice this on a fretted bass. It’s easier on a fretted bass because you don’t need to be as accurate. But position shifting is an important skill for any bass player to practice.
The idea of the exercise is that you always slide with your 1st finger (index finger). Playing three notes on each string, you play the first of the three notes with your 1st finger and then slide up to the second note. You can play the third note on each string with either your third finger or little finger.
Slide Notes With Any Finger
It’s easiest to use your 1st finger to slide. But you want to be able to slide accurately with all of the fingers on your left hand. So come up with your own variations of this exercise and use different fingers to play the slides. Here’s a variation that I demonstrated in the video which uses your 4th finger (little finger) to play the slides.
Sliding Notes with 4th Finger in G major Ascending
Another variation that I demonstrated in the video, is to break the exercise down into small sections. Don’t feel like you need to practice the whole scale all at once. Work on each position shift one at a time. Like this.
I think that practicing like this actually replicates what you will play in a real musical situation better than playing the whole scale all at once. You could use the example above as a fretless bass fill on a G major chord. And the example below which starts on a D could also be a fill when you’re playing in the key of G.
Just like any scale exercise, don’t forget to practice this exercise in different positions and different keys. And try to adapt the idea of sliding and position shifting to any other scales, arpeggios or technical exercises that you practice.
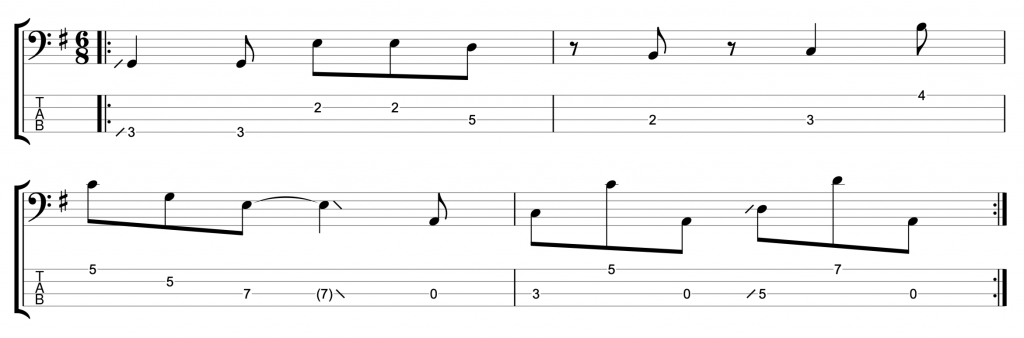
Fretless Bass Groove with Bass TAB – Bass Practice Diary – 15th January 2019
This week during my bass practice, I’ve been composing bass grooves in 6/8. This video features one fretless bass groove that I’ve written. I choose to feature this one because it fits nicely on 4, 5 or 6 string bass. So hopefully all bass players will be able to have a go at playing it.
Fretless Bass Groove
The bassline is in G major. I’ve written some phrasing, by marking some of the slides on the TAB. But my advice is to focus on the rhythm more than the phrasing.
Once you’ve got the rhythm of the groove, I think you’ll find that the phrasing comes quite naturally. And I don’t mind if you phrase it differently to me. I think phrasing is very personal and I rarely try to imitate another musicians phrasing too closely.
Start by practicing slowly. The full speed is 110BPM and I’ve included a slower version at 70BPM. But I would probably advise starting even slower than that. And make sure that the rhythm is accurate. The rhythm in bar two is particularly tricky. It’s like playing on all of the off beats in a bar of 3/4, but the feel is still 6/8.
Six Eight (6/8) Time Signature
I’ve written before that 6/8 is one of my favourite meters to play in. You can find my guide to playing 6/8 basslines here. I’ve also written about 6/8 in my upcoming book for Fundamental Changes which will be published this year.
In this video lesson, I’ll teach you the best and most efficient techniques for your left hand on the bass. I’ll explain the one finger per fret technique and how you can extend the range even further by changing how you use your left hand index finger.
Use the most efficient left hand technique possible
For me practicing techniques is all about learning to play in the most efficient way possible. Whether I’m working on my left or right hand technique, I’m always trying to find the simplest way to play the notes that involves the least amount of movement in my hands. As far as I’m concerned all unnecessary movement slows me down.
One finger per fret
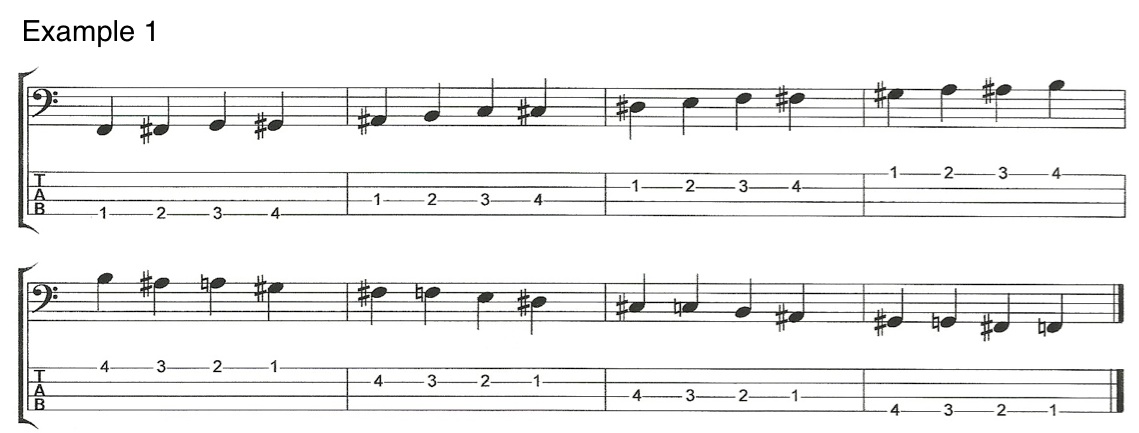
For my left hand I like to use the “one finger per fret” system. You can practise and master this technique by using the following exercise.
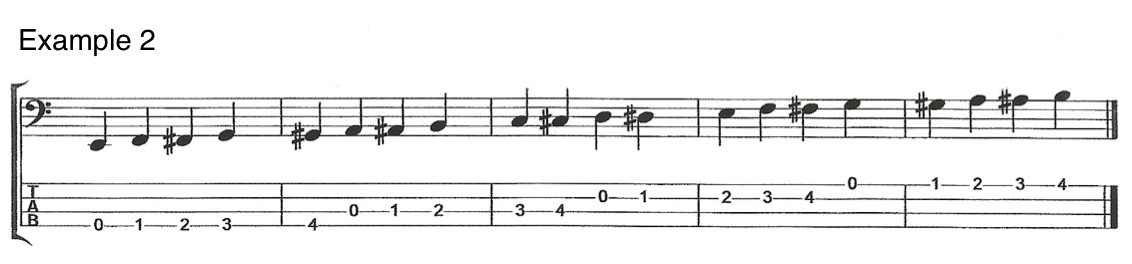
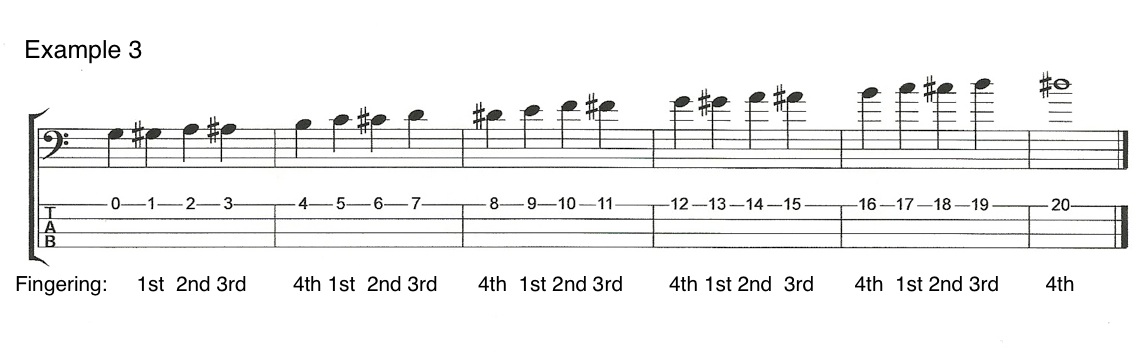
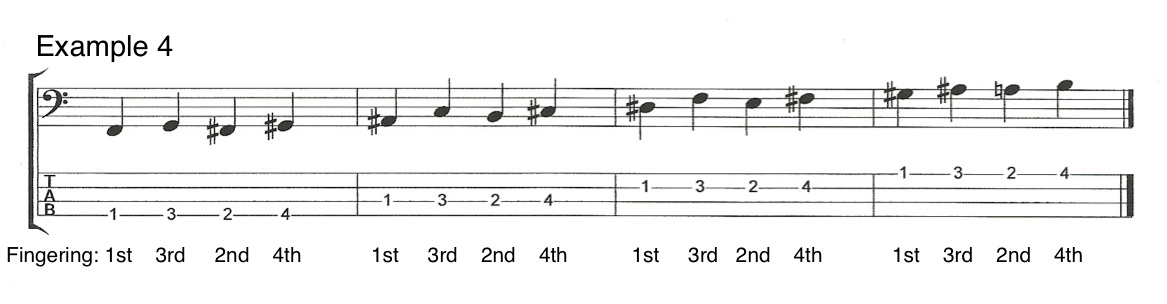
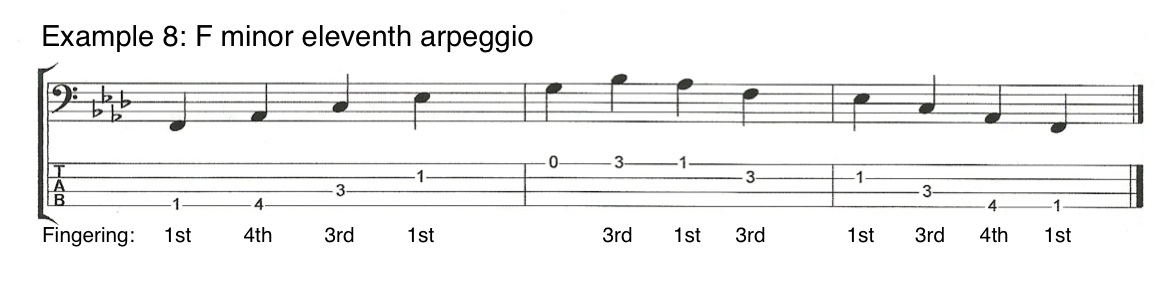
This is a very common exercise that bass players (and guitar players) have been using for decades. If you add the open strings to this exercise as shown in Example 2 then you can play the chromatic scale from the open E string to the B on the 4th fret of the G string without shifting position. Example 3 shows how to practice the “one finger per fret system” on a single string, and you can practice this way on each string individually. The benefit of this exercise is that it teaches us to shift positions up and down the neck whilst maintaining good technique in our left hand. You can alter this exercise by changing the order of the fingering. For example instead of playing 1st, 2nd, 3rd then 4th finger you could try 1st, 3rd, 2nd, 4th as in Example 4, or any other pattern you can come up with. Scales and arpeggios played using one finger per fret
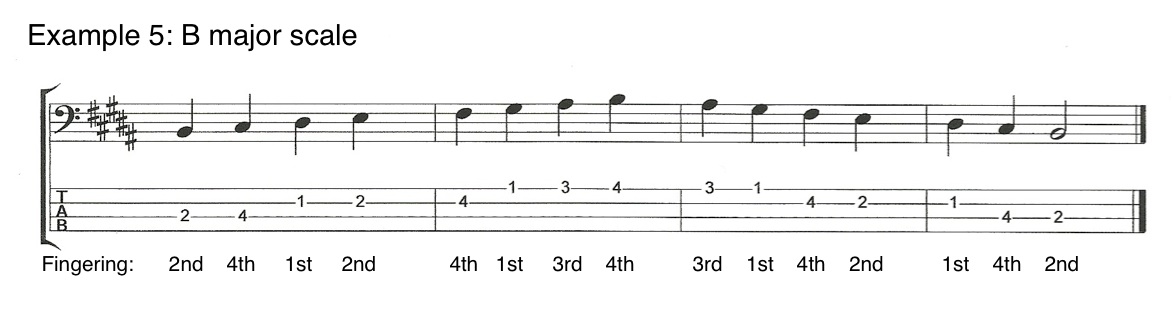
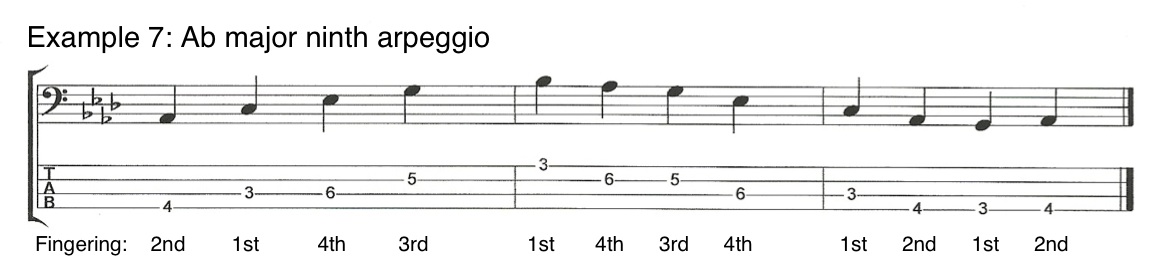
Spend some time working on the above examples until you get used to the “one finger per fret” system. Once you get used to the system, use it to practice some scales and arpeggios. They’re great for mastering left hand techniques. The following examples are just a few scales and arpeggios you can use.
Take your left hand technique a step further
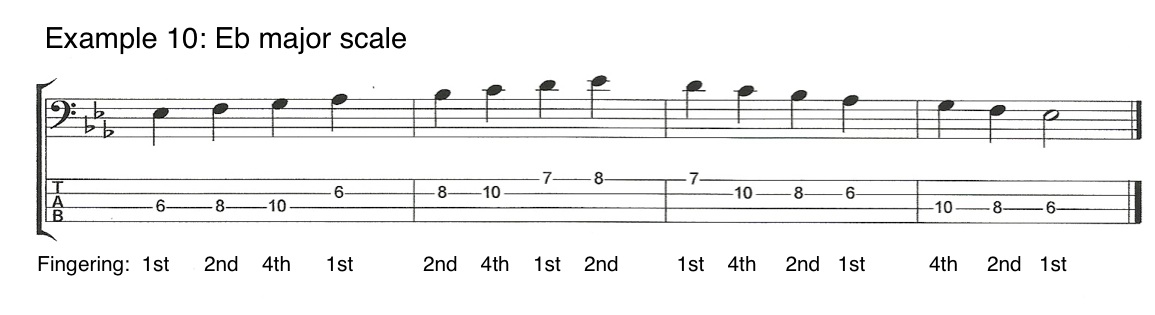
If you want to take your left hand technique a step further then there is another thing you can do. As you get further up the neck of the bass the frets get closer together. Which means that the stretches needed to play “one finger per fret” get smaller.
It occurred to me that I shouldn’t restrict myself to “one finger per fret” in areas of the fingerboard where my finger span could be much greater than 4 frets. So when I get above the 5th fret of the bass I use my 1st finger to cover 2 different frets while my 2nd, 3rd & 4th fingers still play “one finger per fret”. This allows me to cover 5 frets in a single position. Which gives me access to the entire chromatic scale without having to change position.
Example 9 demonstrates how I play a Eb major scale starting on the 6th fret of the A string. In this case my 1st finger can play the 6th or 7th frets. My 2nd finger plays the 8th fret, my 3rd finger the 9th fret and my 4th finger the 10th fret.