Tag Archives: learn

8th and 16th Note Bass Lines – Part 2 – Sixteenth Note Bass Grooves

Eighth and Sixteenth Note Bass Grooves

In this video lesson you’ll learn all about sixteenth note bass grooves. How they differ from eighth note grooves and some practical advice for practising them.

What’s the difference between eighth and sixteenth note feels?

I explained in Part 1 of this lesson that when you divide a beat into two, you get an eighth note feel. If you divide each beat and each off-beat into two, so that each beat is divided into four, then you will have a sixteenth note feel.

When you play eighth note grooves, you can place notes either on the beat or off the beat. On Ta or on Ka. When playing sixteenth note grooves you can still place notes on the beat, but there are now three different places where you can place notes off the beat.

There is still a conventional off-beat, as there was with eighth note grooves. This is the point in time exactly equally distant from the beat before and the beat after. However, there are now two other sub-divisions. The first comes between the beat and the off-beat, and the second comes after the off-beat. All four sixteenth note sub-divisions must be equal. None of them is longer or shorter than the others.

Learn to feel all four sixteenth note sub-divisions individually.

In Part 1 I explained that in order to groove in an eighth note feel,  you must feel the beats and the off-beats. So if you want to groove while playing a sixteenth note feel, then you must also feel the other two sixteenth note sub-divisions. And, to have great timing you should be able to accurately place a single note on any sixteenth note sub-divisions.

Each of the four sub-divisions has it’s own unique feel when you place a single note on it. Just as the beat has a very distinct feel from the off-beat. So the other two sixteenth note sub-divisions have their own distinct feel.

How do I improve my sixteenth note groove?

First you need four syllables to represent the four sixteenth note sub-divisions, Ta-Ka-Di-Mi. I used Ta-Ka to represent the beat and off-beat in eighth note grooves. For sixteenth note grooves Ta is the beat, Di is now the off-beat and Ka and Mi represent the additional sixteenth note sub-divisions.

As with eighth note grooves, the key to having great timing is the ability to place a single note very accurately onto a sub-division. If fact that is the key to having great timing no matter what the feel or style of music. So begin by trying the exercise demonstrated in the video. Say Ta-Ka-Di-Mi, making sure you say it in time, with every syllable equal in length. Use a metronome or drum beat to help if you need to. Then try playing a single note on each of the four syllables. First Ta, then Ka, then Di, then Mi. This should help you to experience the different feels of the four sub-division.

Once you’ve done that, try playing this sixteenth note example from the video slowly.

Sixteenth note bass groove
Sixteenth Note Bass Line for Electric Bass

Try reciting Ta-Ka-Di-Mi while you play it, as I’ve demonstrated in the video. Play it as slowly as you need to in order to place all of the notes accurately. Once you can do that, try gradually increasing the tempo. Don’t try playing the example fast until you’ve mastered it slowly.

Why you should always start by practising slowly

A good rule of thumb to remember is this. If you can’t play something in time slowly, your time feel won’t be good when you play faster. I’ve often heard students say that it’s harder to play something slow than fast. It can often feel that way. The reason is that playing something slowly makes all of the little errors of timing very obvious. They’re not so obvious when you play fast. However, if you want to improve your groove, you need to get rid of those little timing errors. Those notes that are placed slightly before or after the sub-division they were meant to be on. And that involves playing very accurately slowly, and then gradually speeding up while maintaining the same levels of accuracy. That’s how you improve your bass groove!

All of the examples in this series of videos come from my book Electric Bass – Improve Your Groove: The Essential Guide to Mastering Time and Feel on Bass Guitar.

3D Cover Image Improve Your Groove
Electric Bass – Improve Your Groove

Click on the link to find the book. https://geni.us/bassgroove.

The book contains over 140  audio examples featuring eighth and sixteenth note grooves in a variety of styles including rock, blues, jazz and latin. It also features sections on syncopation, shuffle feels, triplets and swing. It has practical advice for grooving with drums and sharing a collective time feel in a group. And it features five pieces with play along backing tracks to help you put these ideas into practice.

Happy practising!


Everything You Need to Know About Harmony on Bass Guitar

Everything you need to know about harmony on the bass 

Harmony is a lot simpler than most people think.

Like it or not the bass is a harmony instrument, bass lines have been around for centuries before the electric bass was invented and they’re the lowest harmony part. So Harmony and rhythm are our main functions as bass players. Rhythm is a much bigger and (in my opinion) much more interesting topic, but I wanted to make this video to show you exactly how simple harmony is.

Know the Chromatic Scale

The key to understanding harmony is first of all knowing that there are only 12 notes. Chromatic scale is simply a technical term for what you get when you play all 12 notes one after the other. If you’re not yet familiar with the chromatic scale, that is where you should start. It’s easier than learning the alphabet, there are more than twice as many letters in the alphabet than there are notes.

How Do You Avoid Playing Wrong Notes?

As bass players we usually play one note at a time. I know that you can play chords on the bass, I’ve made videos about it, but it isn’t our primary function. The term bass line implies one note at a time.

I am firmly of the opinion that there is no such thing as a wrong note. There are only 12 notes in total so if we start classifying some of these as wrong, we’re seriously limiting our options. There are inside notes and outside notes (I’ll explain these as I go on) and it’s our job as musicians to find ways of using them that makes sense musically.

Learn To Play Arpeggios!

So our job in terms of harmony is to choose which note out of the 12 we play at any one time. And the first thing that every bass player needs to know is chord tones or arpeggios. Arpeggio is just a classical term meaning all the notes of a chord played one at a time. Guitar players have chords and bass players have arpeggios. If you don’t know your arpeggios you will end up playing root notes all the time and your basslines will be boring.

How many notes in an arpeggio depends on the chord in question, but lets take an A7 chord for example. There are 4 notes (demonstrate). 4 out of 12. That’s already 1/3rd of all the notes and the chord tones are the strongest notes you can use in a harmonic situation.

What are Inside and Outside Notes?

Next is scale tones. Scales tend to have seven notes in them (not all I know, but standard major and minor scales and all their modes do). We’ve used four of them already in the arpeggio so there are three others that we can use as passing tones. These are the inside notes, notes that belong in the harmony. The remaining five notes that are not within the scale are the outside notes, you can think of these as chromatic passing notes.

So, Here’s Everything You Need to Know!

And that’s it, there are 12 notes, chord tones, scale tones and chromatic passing tones. It’s that simple. Your job is to learn what each of them sounds like, and the only way to do that is play them as much as you can. So cancel your application for that three year college course on advanced harmony and instead go forth and play your bass!

What Else is There?

Harmony and rhythm are the two biggest worlds in the language of music. And rhythm is much simpler than you might think as well, once you know how to sub-divide a beat into two, three and four. You know most of what you need to know about rhythm, but if you want more detail on rhythm you need to get my book Improve Your Groove. Here’s a link, https://geni.us/bassgroove

Enjoy!

Left Hand Techniques for Bass Guitar

Learn Left Hand Techniques on Bass Guitar

In this video lesson, I’ll teach you the best and most efficient techniques for your left hand on the bass. I’ll explain the one finger per fret technique and how you can extend the range even further by changing how you use your left hand index finger.

Use the most efficient left hand technique possible

For me practicing techniques is all about learning to play in the most efficient way possible. Whether I’m working on my left or right hand technique, I’m always trying to find the simplest way to play the notes that involves the least amount of movement in my hands. As far as I’m concerned all unnecessary movement slows me down.

One finger per fret

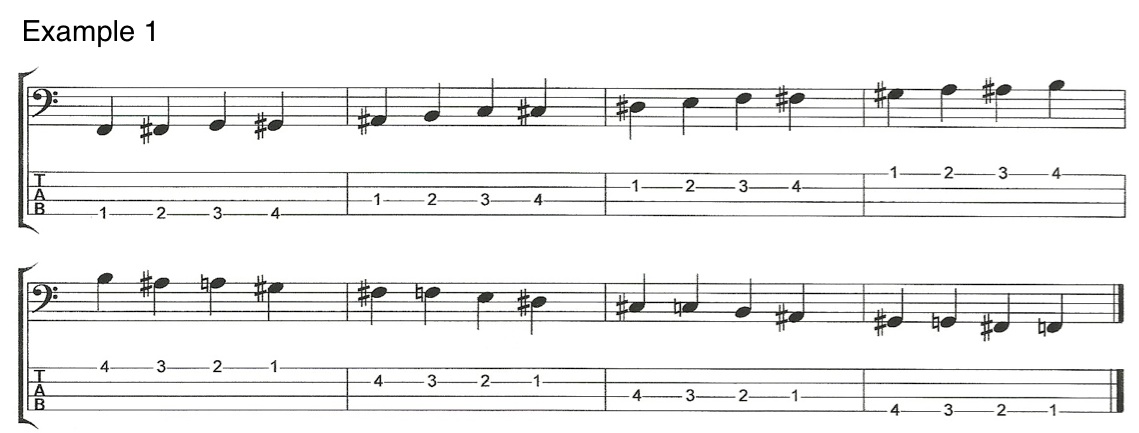
For my left hand I like to use the “one finger per fret” system. You can practise and master this technique by using the following exercise.

V5E1 Left Hand Techniques for BassThis is a very common exercise that bass players (and guitar players) have been using for decades. If you add the open strings to this exercise as shown in Example 2 then you can play the chromatic scale from the open E string to the B on the 4th fret of the G string without shifting position. V5E2 Left Hand Techniques for BassExample 3 shows how to practice the “one finger per fret system” on a single string, and you can practice this way on each string individually. The benefit of this exercise is that it teaches us to shift positions up and down the neck whilst maintaining good technique in our left hand. V5E3 Left Hand Techniques for BassYou can alter this exercise by changing the order of the fingering. For example instead of playing 1st, 2nd, 3rd then 4th finger you could try 1st, 3rd, 2nd, 4th as in Example 4, or any other pattern you can come up with. V5E4Scales and arpeggios played using one finger per fret

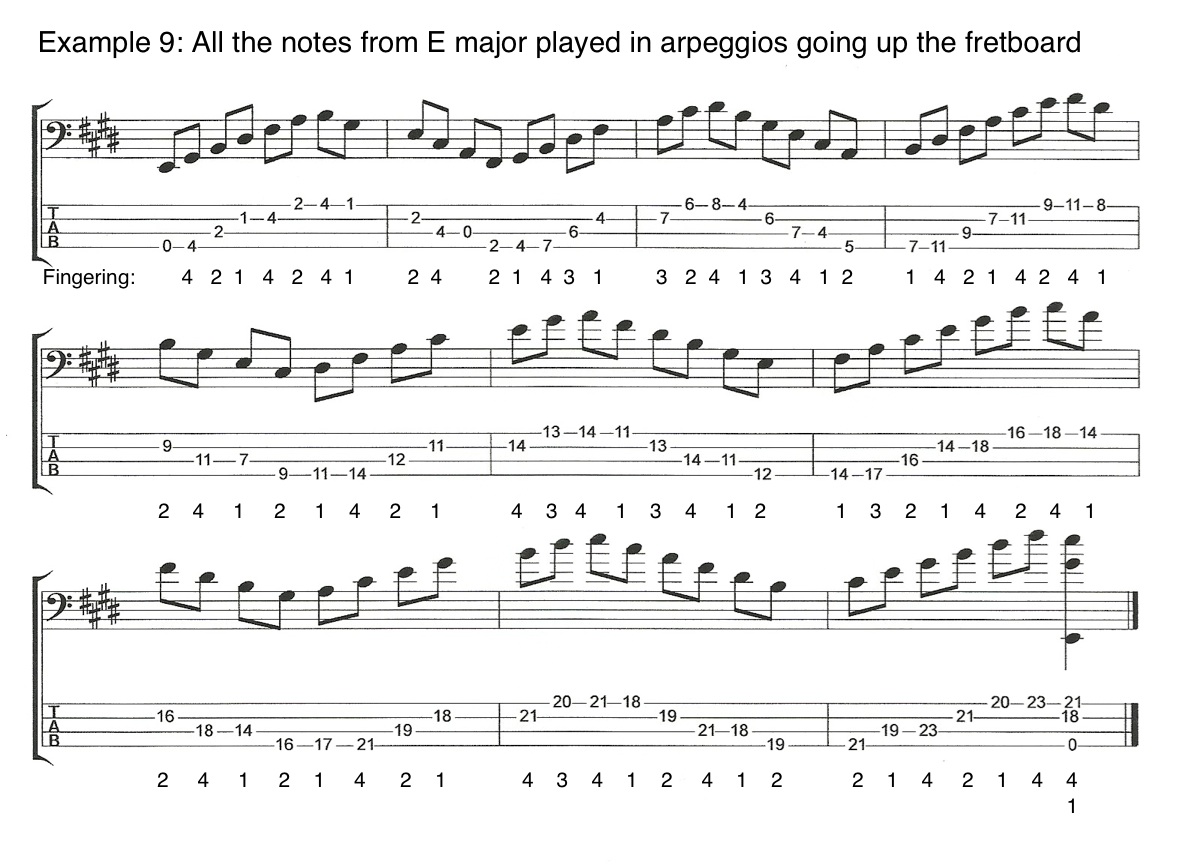
Spend some time working on the above examples until you get used to the “one finger per fret” system. Once you get used to the system, use it to practice some scales and arpeggios. They’re great for mastering left hand techniques. The following examples are just a few scales and arpeggios you can use.

V5E5 Left Hand Techniques for Bass V5E6 Left Hand Techniques for Bass V5E7 Left Hand Techniques for Bass V5E8 Left Hand Techniques for BassV5E10 Left Hand Techniques for BassTake your left hand technique a step further

If you want to take your left hand technique a step further then there is another thing you can do. As you get further up the neck of the bass the frets get closer together. Which means that the stretches needed to play “one finger per fret” get smaller.

It occurred to me that I shouldn’t restrict myself to “one finger per fret” in areas of the fingerboard where my finger span could be much greater than 4 frets. So when I get above the 5th fret of the bass I use my 1st finger to cover 2 different frets while my 2nd, 3rd & 4th fingers still play “one finger per fret”. This allows me to cover 5 frets in a single position. Which gives me access to the entire chromatic scale without having to change position.

Example 9 demonstrates how I play a Eb major scale starting on the 6th fret of the A string. In this case my 1st finger can play the 6th or 7th frets. My 2nd finger plays the 8th fret, my 3rd finger the 9th fret and my 4th finger the 10th fret.

V5E9 Left Hand Techniques for Bass

If you’d like to improve your right hand technique as well then check out this video lesson. Improve Your Right Hand Technique on Bass Guitar.