Tapping Chords on Bass Guitar – Bass Practice Diary 133

Tapping Chords on Bass Guitar – Two-Hand Tapping Exercises – Part 2 – Bass Practice Diary – 10th November 2020

Last week was part one in my series of two-hand tapping exercises for bass guitar. I was looking at the basic technique of coordinating hammer ons and pull offs between both right and left hand. This week, I’m looking at tapping chords by hammering on notes simultaneously with both right and left hand.

Tapping Seventh Chords

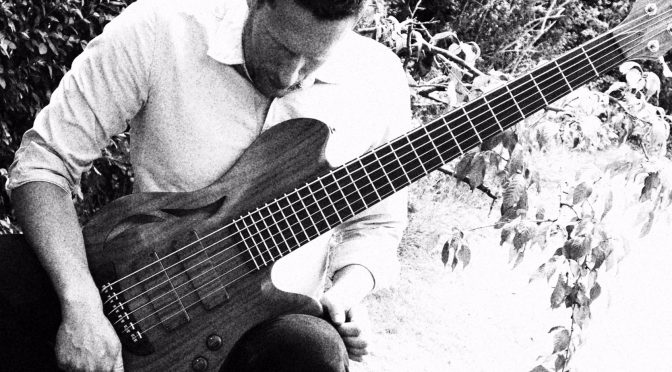
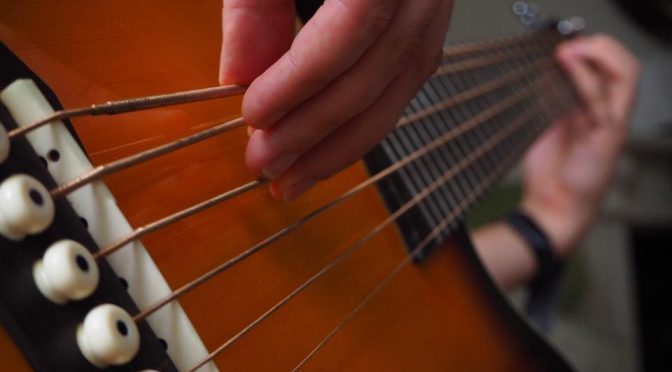
These ideas should work on pretty much any bass guitar. I’ve used a 4-string bass in the video to demonstrate that you can make full sounding chord voicings on just 4-strings. My bass has 24 frets, but I’ve deliberately not gone above the 20th fret, so you can play everything in the video on a Fender style bass with 20 frets.

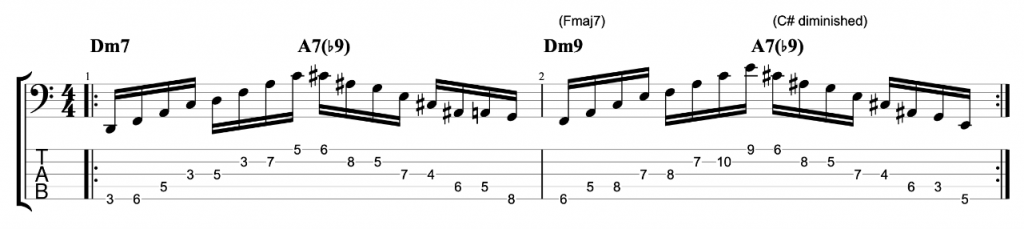
I’m playing 7th chords (major 7, minor 7 & dominant 7). These are four note chords, root, 3rd, 5th and 7th. The concept of this exercise is that I’m going to tap the root and 5th with my left hand and the 3rd and 7th with my right hand. The left hand notes are played on the 3rd and 4th strings and the right hand notes on the 1st and 2nd.

An Exercise to Develop Your Tapping Technique

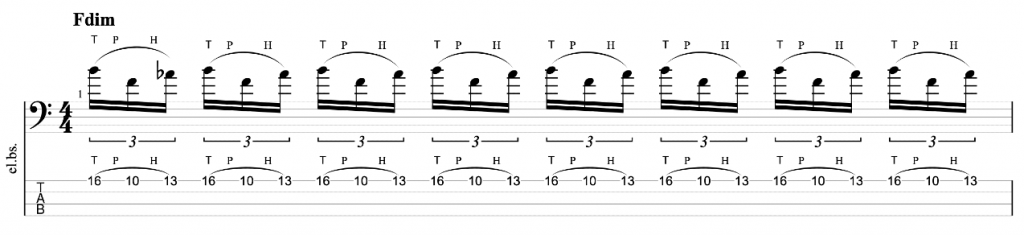
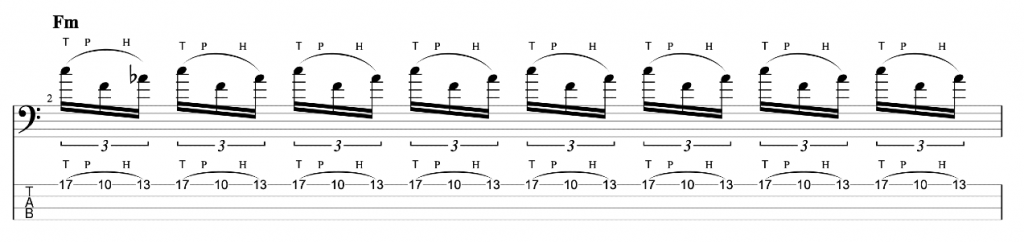
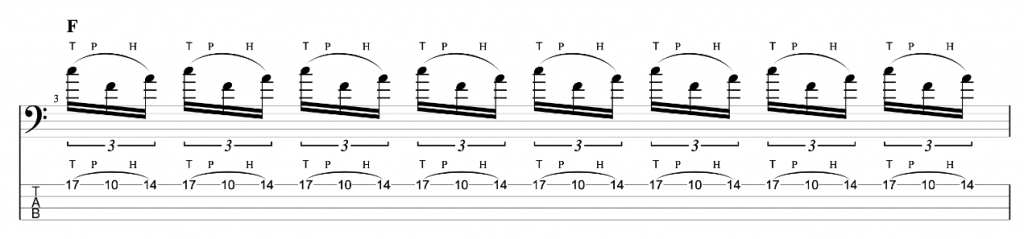
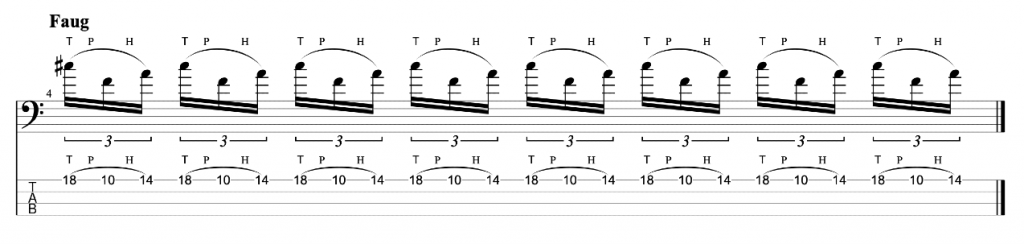
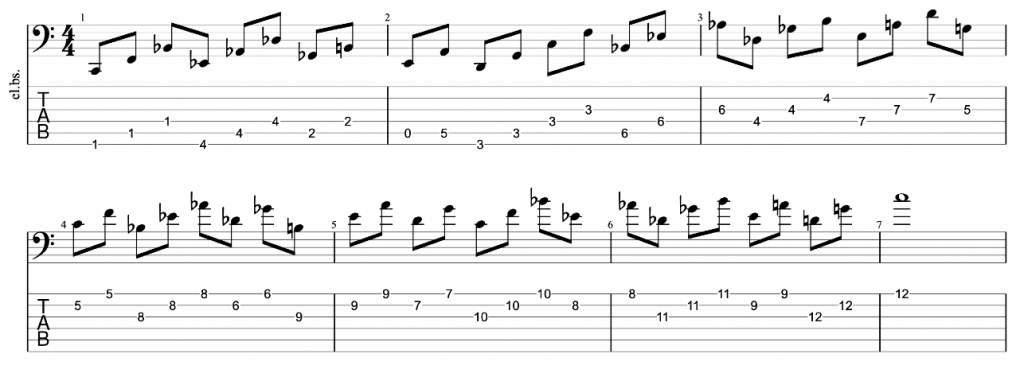
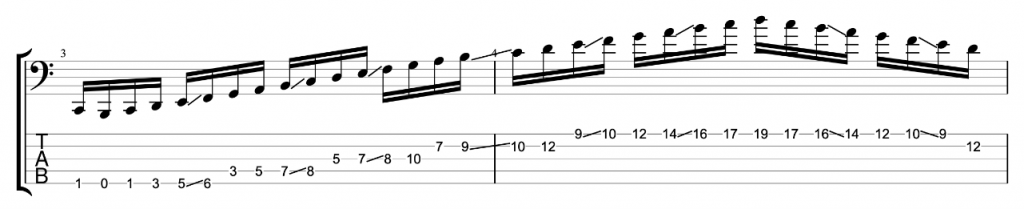
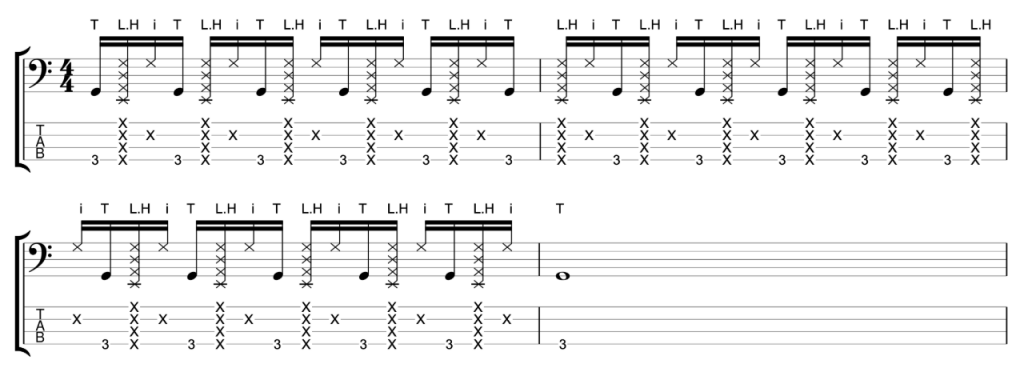
Before you start, I would recommend practicing tapping four finger exercises with both hands. Something like this.

Two Hand Tapping - Four Finger Exercise
Two Hand Tapping – Four Finger Exercise

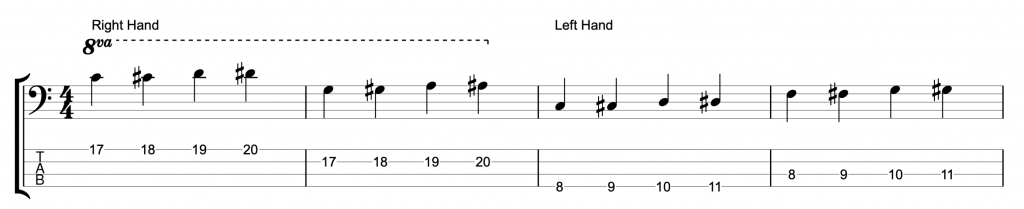
When I’m practicing exercises like this, my goal is not to play the exercise fast. My goal is to make good sounding notes and to get an even sound across four fingers and four strings. As I mentioned in the video, I never use my little finger on the right hand to tap notes when I’m playing music, but I still practice it. Why? Because maybe I’ll develop a technique that uses my little finger one day. Only practice the 3rd and 4th fingers on your right hand if you want to. For the purposes of this exercise, all you need are two fingers on your right hand.

Playing Chord Progressions

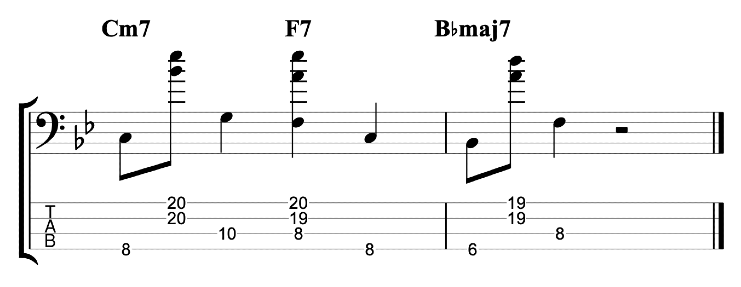
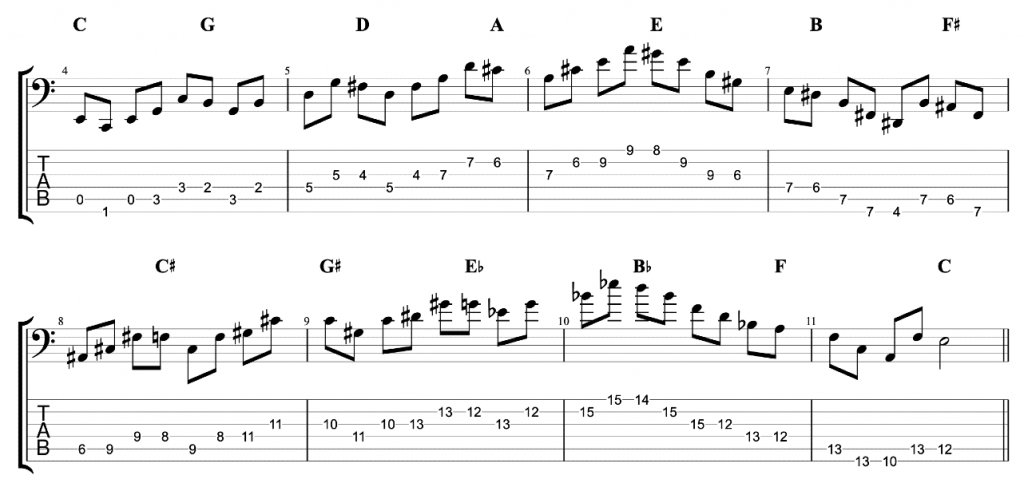
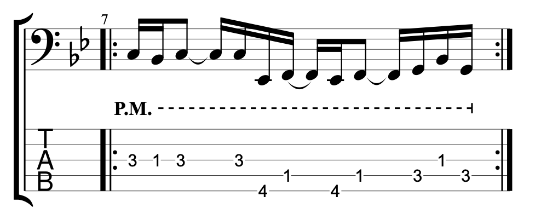
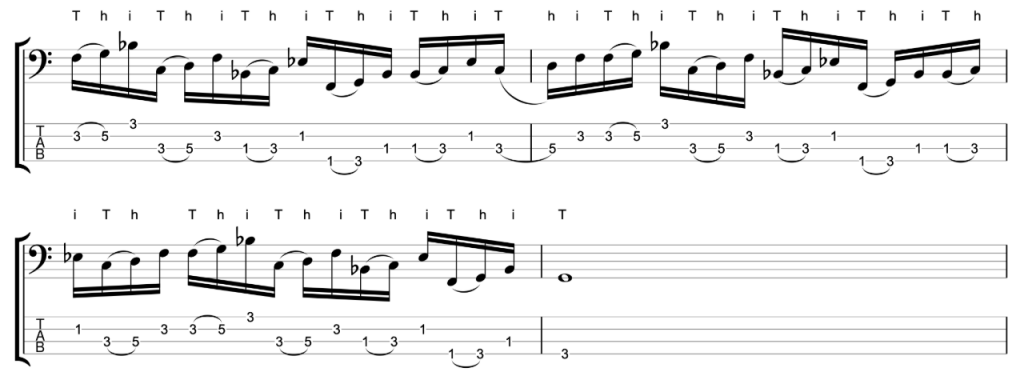
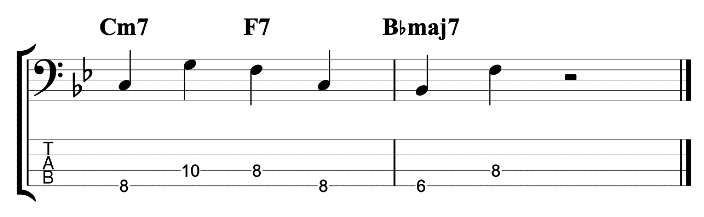
I’ve used a II-V-I progression in the video because it’s the most commonly used chord sequence in jazz. You can use any progression you want and any rhythm or style. But whatever you play, I would start by making a bassline out of the root and 5ths. Like this.

Tapping Chords - II-V-I Bassline
Tapping Chords – II-V-I Bassline – Left Hand Exercise

This exercise should be played entirely with the left hand and all of the notes are hammered on. The left hand notes are your bassline, they are the foundation of the groove. So, it’s worth practicing this until you get the feel where you want it.

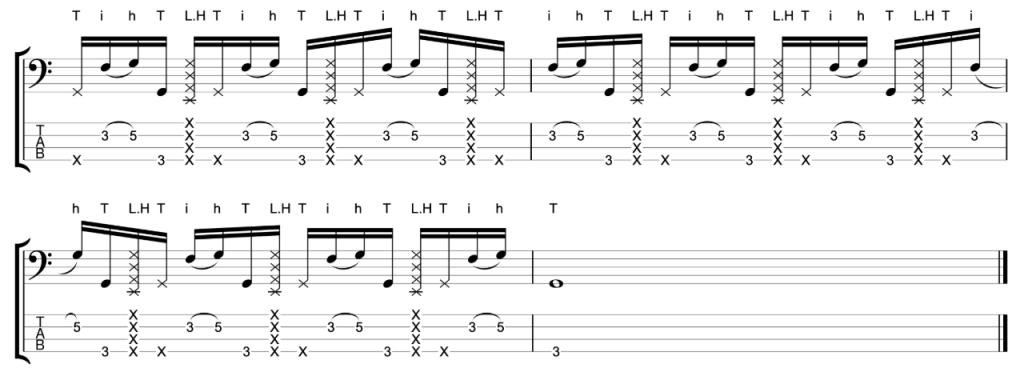
When you have the feel, you can add the 3rds and 7ths with your right hand. These right hand notes should be played simultaneously. Not one after the other like the left hand notes. The right hand notes can be played simultaneously with the root note played by your left hand. This involves simultaneously hammering three different notes on three strings. You can see I’ve done this with the F7 chord. The F is hammered by the left hand while the A and Eb are hammered on by the right hand. Alternatively, you can hammer the right hand notes in between the left hand notes. You can see I’ve done this with the Cm7 and Bbmaj7 chords. Here is the II-V-I exercise.

Tapping Chords - II-V-I Exercise
Tapping Chords – II-V-I Exercise

Two Hand Tapping Exercise for Bass Guitar – Tapping Triads – Bass Practice Diary 132

Two Hand Tapping Exercise for Bass Guitar – Tapping Triads – Bass Practice Diary – 3rd November 2020

Last week I featured a two-hand tapping bass groove that I wrote on bass guitar. This week I’m starting a series of lessons in which I break down the fundamentals of my tapping techniques. The most basic tapping technique is the ability to perform hammer-ons and pull-offs with both your left and right hand. If you’d like some left hand hammer on and pull off exercises, then check out this video. Today I’m going to focus on tapping with the right-hand index finger.

Tapping Arpeggios

Tapping techniques work particularly well for playing arpeggios. Using both hands to generate notes means that you can play wider intervals very fast. That’s extremely hard to do if you’re fretting with the left-hand and plucking with the right-hand. It’s relatively easy to play the smaller intervals of scales fast, by using conventional plucking techniques. But tapping creates a huge advantage for playing the wider intervals of arpeggios fast.

The most basic arpeggio type is a triad, a three note chord. There are four main types of triad: major, minor, diminished and augmented. This exercise simply goes through each one in a sequence.

The Exercise

Tapping Triads Exercise for Bass Guitar

The reason that the sequence is in this order is because I’m starting with the smallest intervals (two minor 3rds), which is a diminished arpeggio. And I’m moving up to the largest intervals (two major 3rds) which is the augmented triad. In the video I then play the exercise in reverse order going from largest intervals to smallest.

Should You Use Compression When Tapping?

I touched on the subject of compression very briefly in the video. Dynamic Range Compression is an audio effect that effectively squashes the dynamics in your playing. It makes the loud notes quieter and the quiet notes louder to even out the dynamics and make everything the same level. You can play bass through a compression pedal, there are many on the market. Or you can add compression to a recording of your bass in a DAW like Pro Tools or Logic.

There is an obvious advantage and an obvious disadvantage to using compression when tapping. The advantage is, that if your hammer ons are louder than your pull offs, or your right hand notes are quieter than your left hand notes, then the compression will compensate and even out the sound.

The obvious disadvantage of using compression when you’re playing, is that it will amplify any unwanted noise. Any squeak from a string or rumble from an unmuted open string will be made louder. Personally, I never use compression when I’m playing, but I do sometimes add it to a recording when appropriate. It’s entirely up to the individual whether they use compression or not, but it is common to use compression for tapping techniques.

Two-Hand Tapping Groove on Bass Guitar with Bass TAB – Bass Practice Diary 131

Two- Hand Tapping Groove on Bass Guitar with Bass TAB – Bass Practice Diary – 27th October 2020

I haven’t done a video featuring two-hand tapping techniques for a while. I’ve had it in my mind to do a series of short video lessons demonstrating some of the tapping techniques that I use. I’m going to do that, starting next week, but first I thought I’d do a video demonstrating how you can apply two-hand tapping techniques to playing a bass groove. I think there’s a common perception of tapping techniques as being flashy soloing techniques. But the truth is that you can use these same techniques to groove. So this week, I’ve written this two-hand tapping groove by way of demonstration.

The Two-Hand Tapping Bass Groove

Two-Hand Tapping Groove

I won’t break down all the techniques that I’m using here, because I’m going to do that over the next few weeks. But essentially this groove is just based around two dominant 7 chords, G7 and C7. I’ve played it and TAB’d it on 5-string bass, but you can play it on 4-string. You can move the F and G notes at the start onto the first and third fret of the E-string. It’s slightly easier to tap those notes on the low B-string, that’s the only reason I’ve played it on a 5-string.

Why Two-Hand Tapping on Bass?

Playing two-hand tapping techniques on bass is not a particularly new idea. Solo bass virtuoso’s like Victor Wooten and Billy Sheehan have been showcasing these techniques for decades. But the popular conception of tapping is still that it’s a guitar technique. The truth is, that tapping works just as well on bass as guitar. But the image of tapping by 1980’s rock guitar heroes like Eddie Van Halen and Steve Vai has left an indelible print in popular consciousness.

My own journey with tapping started as a teenager, after hearing one of the above mentioned guitarists and thinking “can I do that on bass?”. It turned out I could and it wasn’t particularly difficult. At that time tapping was just a party trick for me. But my relationship with tapping changed when I started playing with the Chapman Stick player Jim Lampi.

What’s the Best Instrument for Two-Hand Tapping?

The Chapman Stick is designed as a two-hand tapping instrument. It usually has either ten or twelve strings, half the strings are played with the right-hand and the other half the left. Jim plays the Stick with quite a pianistic approach. He doesn’t go in for the flamboyant rock guitar techniques, but instead uses his instruments to play jazz and make soundscapes and back up singing. He most famously played in John Martyn’s band. Tony Levein is a bass player who also played Chapman Stick.

Jim Lampi opened my eyes to two things about two-hand tapping. One is that it can be incredibly versatile and used musically in any number of different contexts. The other is that, if you want to take two-hand tapping seriously, you should think about investing in a proper two-hand tapping instrument like a Chapman Stick. While tapping works just as well on bass as guitar, the truth is that neither guitar or bass is an ideal instrument for tapping.

I did think once upon a time about investing in a Chapman Stick, but the truth is, that I don’t want anything to distract me from playing the bass. So, I’m going to continue to treat two-hand tapping as a fun diversion from my more frequently used bass techniques.

Fretless Bass Jam/Improv on My Sire M7 5-String Bass – Bass Practice Diary 130

Fretless Bass Jam/Improv on My Sire M7 5-String Bass – Bass Practice Diary – 20th October 2020

I haven’t featured this Sire Marcus Miller M7 5-String fretless bass in a video since I first got it and reviewed it last year. In that review I mentioned that I liked the sound and playability of the bass, but I’d had some issues with it. So, I’ll use this post to update you on how I’ve got along with the bass, one year later.

The Music

Before I talk about the bass, I’ll just quickly tell you about the music in the video. I like to jam with myself at home. Meaning record an improvised bassline and then play over it. Let’s face it, it’ll be a while before I get to jam with any other musicians. Lockdown restrictions have been tightened once again in London and I don’t think it will let up over the winter. So I might as well jam alone.

The bassline was a one take improvised line. I was just improvising bass grooves in 7/8 time signature. I was playing along with the little clave ostinato that you hear at the beginning. The rest of the drums were added after the bass parts.

For the improvised solo parts, I did five complete takes. With each take I got gradually more used to playing along with the bassline I’d improvised. The take in the video is number five. The only composed element is the little harmonised melody section. I added that afterwards as I felt it needed some kind of recognisable melody.

The bass sounds good and it plays well. And you could certainly argue that, that’s all a musical instrument needs to do. I’m inclined to think that way myself, and I do like this bass.

Having said that, as much as I enjoy playing this bass, it has turned out to be the most unreliable instrument that I’ve ever owned in terms of holding it’s setup. I made a video, alongside my review, demonstrating how I initially set the bass up. I needed to do it because the setup was a mess when I first got the bass, which in hindsight was a red flag.

Sire Marcus Miller M7 5-String Fretless, One Year Later!

In the year that’s passed, I’ve needed to set the bass up three times. Setups are susceptible to changes in atmospheric conditions, and changes in seasons often necessitate minor changes to setup and intonation.

The bass arrived in the autumn in the UK having come via Germany. It was built in Indonesia. So it’s fair to say it had experienced a few changes in atmosphere before I ever took it out the box. This partly explains the poor condition of the setup when the bass was new. By the time we arrived at spring this year and the weather started warming up, the action completely changed, and then again recently as we move into autumn again.

Moving from dry and hot to wet and cold seems to really mess this bass up. If you think this is normal, then I’m not explaining the scale of the problem very well. I own a lot of instruments and while some of them experience small changes as the seasons go by, this bass is ten times worse than anything I’ve experienced before.

I’ve been unlucky with this bass, I don’t for a moment think that this is true of all Sire M7 basses. I don’t know what it is about this particular one, maybe there’s a problem or a fault with the truss rod. I own enough Sire instruments to know that the setups are fairly stable on most of their instruments.

I’m used to doing the setups now. I can get the bass back to where I want it in under 20 minutes. However, I feel like I can’t ever sell the bass. Or if I do, I must sell it to someone who really understands what they’re taking on. On the other hand, as much as the setup issue is annoying, I always forgive the bass when I start playing it. Because it plays and sounds really good.

Cycle of Fifths Exercise on 6-String Bass – Bass Practice Diary 129

Cycle of Fifths Exercise on 6-String Bass – Bass Practice Diary – 13th October 2020

This week I’m featuring another 6-string bass exercise. Just like last week’s exercise, this one features the cycle of fifths (or circle of fifths). However this week’s exercise has a much more simple concept and it’s also going the opposite way around the cycle. So the pattern here goes C-F-Bb-Eb etc. rather than C-G-D-A etc. as I played with my triads exercise last week.

The Exercise

As I’ve already alluded to, there are two different ways of going around the cycle of fifths. You can go up a 5th (which is like going down a 4th) or down a 5th (like going up a 4th). This exercise uses the latter. All you have to do, is go around the cycle one note at a time. Once you’ve played 12 notes, you’ve played every note in the octave.

Cycle of Fifths Exercise - 6-String Bass
Cycle of Fifths Exercise – 6-String Bass

The idea is that you keep going, to find where all the notes are all over the fretboard. It’s a great way of learning your fretboard, and it’s also a great technical exercise. Also, playing lines using 4th and 5th intervals is very popular in modern jazz vocabulary, so this exercise will also help you to play those kind of lines.

I’ve written the exercise out over three octaves to get you started. However, I would recommend taking the idea and trying to play continuously all over the fretboard. Start slow and speed up. You don’t have to follow the notes that I’ve written out. No matter what note you’ve just played, you always have the option to either go a 4th up or a 5th down. Good luck!

6-String Bass Exercise – Major Triads in 12 Keys – Bass Practice Diary 128

6-String Bass Exercise – Major Triads in 12 Keys – Bass Practice Diary – 6th October 2020

Last week I featured three exercises for 5-string bass, this week I’ve got an exercise for 6-string bass. In this exercise, I’m playing major arpeggios. It’s fairly typical, when practicing exercises like this, to go through 12 keys. However, I wanted to make this exercise a bit more interesting than just playing twelve major triads one after the other.

The Exercise

6-String Bass Exercise - Major Triads in 12 Keys
6-String Bass Exercise – Major Triads in 12 Keys

I’ve added an extra element by playing the triads as a five note grouping. Rather than playing root, 3rd, 5th, root, I’m playing 3rd, root, 3rd, 5th, root. The five note grouping adds a timing element, causing the chord changes to alternate between happening on and off the beat.

The triads move in fifths, but in the opposite direction to the conventional cycle of fifths. Rather than going from C to F, I’m going from C to G, up a fifth rather than down a fifth. The reason for this is that I’m playing the major 7th note at the end of each arpeggio, but that major 7th note is then being treated as the major 3rd of the next arpeggio. This leads to the sequence of fifths that you see in the exercise.

5-String Bass Exercises with – Bass Practice Diary 127

5-String Bass Exercises – Three Exercises with Five String Bass TAB – Bass Practice Diary – 29th September 2020

Here are three exercises that you can use on 5-string bass. These are typical of the kind of exercises that I play when I’m adjusting to playing a 5-string bass, especially if I haven’t played one for a while. If you follow my Bass Practice Diary videos regularly, then you know that I play 4-string and 6-string basses a lot. It’s easy to trip up on a 5-string bass when you’ve grown accustomed to playing four or six. A few exercises like this, when you start, will really help you to get used to the feel and the range of the instrument. Even if you always play 5-string bass, and you’re looking to improve your fluency around the fretboard. These kind of exercises are great for that too.

Exercise 1: Playing Across All Five Strings

In this first exercise, I’m simply thinking about arpeggiating two chords. Dm7 and A7(b9).

5-string bass exercise 1 - Dm7 - A7b9 arpeggios
5-string bass exercise 1 – Dm7 – A7b9 arpeggios

The exercise starts by going up the notes of a D minor 7 arpeggio. Then it comes down on the A7(b9). I’m relying heavily on the notes of a C#dim7 arpeggio for the A7(b9) chord. The notes C#, E, G and A# are the 3rd, 5th, 7th and b9th of the A7 chord. In the second bar I’ve substituted an Fmaj7 arpeggio for the Dm7 chord. The notes of the F major chord are the 3rd, 5th, 7th and 9th of the Dm7 chord.

Exercise 2: Using the Entire Range of the Bass

In the second exercise, I’m simply playing a C major scale over the entire range of my 5-string bass neck.

5-string bass exercise 2 - Notes in the key of C major
5-string bass exercise 2 – Notes in the key of C major

This is such a fundamental exercise on any instrument. I don’t think of it as playing a C major scale. I think of it as learning the notes in the key of C major. The whole of Western harmony is built around this key. You can think of it as learning all the white notes on a piano, but really it’s just learning where the notes A, B, C, D, E, F & G are. If you know where they are then you can easily work out where the sharps (#) and flats (b) are. And then you know where every note on your bass is.

Exercise 3: Playing a Bass Groove Using the Low B-string

The final exercise is a bass groove.

5-string bass exercise 3 - Using a low Eb in a bass groove in C minor
5-string bass exercise 3 – Using a low Eb in a bass groove in C minor

If anyone says that, “a bass groove isn’t an exercise, it’s music”, then I think that they need to re-think the way that they practice. To me, every piece of music that I play is an exercise, or at least it can be if I think about it in the right way. Exercises exist to help us play music, if there is a disconnect in your mind between the exercises you play and the music you play, then you’ve missed the point. Every exercise that I play is related to something that I have to use in real musical situations. I understand the relationship between the exercise and the practical application of it. In this particular exercise/groove, I’m working on playing a low Eb on the 4th fret of the B-string, whilst playing in the key of C minor. It’s tricky note to hit and it’s hard to make it sound good!

If you’re looking for some more bass practice exercises, why not try my slap bass timing exercises in this video.

Black Nylon Tape Wound Strings on Three Basses – Bass Practice Diary 126

Black Nylon Tape Wound Strings on 3 Basses – La Bella 7710N & Warwick Black Nylon – Bass Practice Diary – 22nd September 2020

This week I’ve been experimenting with putting black nylon tape wound bass strings on my basses. I’ve tried playing black nylon strings on bass guitars before, but I’ve never tried putting them on my own bass guitars. And this is my first time trying tapes on an upright bass. In the video, the double bass is strung up with La Bella Jazz Strings and both the fretless and acoustic bass guitar are using Warwick Black Nylon Tapewounds.

The advantages and disadvantages of tape wounds?

The advantages of using nylon tapewound strings over roundwound strings include, lower tension and less friction. The lower tension can be advantageous for your left hand, because it doesn’t need to press the strings down as hard. And the lower friction (the strings are very smooth to the touch) means that you potentially get less unwanted noise than you would get from round wound strings.

I have to say that my opinion was divided when it came to bass guitar vs double bass. The strings really give you surprisingly good sustain considering the lower tension. On the upright, I loved the lower tension and the greater sustain. However, I felt that on bass guitar, with the shorter scale length, the tension was too low. I’ve never liked the sound of loose strings on bass guitar, which is why I don’t own a short scale bass.

A significant disadvantage of changing your bass strings from steel strings to nylon, is that it will significantly change the setup on your bass. The neck will be under much less tension with nylon strings. So, if your bass guitar is set up for roundwound strings, then the action will completely change under the lower tension. The strings will almost certainly rattle an buzz and you’ll need to setup your bass properly for tape wounds before you can use them. This wasn’t a huge issue for me with the electric bass, because it’s easy to setup. But acoustic instruments don’t usually have adjustable bridges, which makes it more of a problem.

My Conclusions

I really liked the tapes on my upright and I’ll be keeping them on for the foreseeable future. I’ve made another video demoing these strings on this bass. You can find it here.

I quite liked them on the fretless electric bass. The lack of friction is really nice when sliding between notes. However, I miss the brightness and the added string tension of roundwound strings.

Nylon tapes are very popular on acoustic bass guitars, but I have to be honest, that I didn’t like them on mine. I’m sure it would help if I got the bass professionally setup with them. But I don’t like them enough to justify doing that. I’m going to go back to using either bronze round wound strings or half rounds on my acoustic bass guitar.

Sire Marcus Miller V7 Vintage Fretless – Bass Practice Diary 125

Sire Marcus Miller V7 Vintage Fretless – Bass Practice Diary – 15th September 2020

I’ve been wanting to feature my Sire V7 Vintage fretless bass in a video for a while. I’ve featured Sire basses in my videos before, but never this one. And this is probably my favourite of all of the Sire Marcus Miller basses I’ve played. This is the only Sire bass that I’ve played that I didn’t need to do any setting up when it came out of the box. It played perfectly from the outset and the setup has remained very stable ever since.

Sire V7 vs V7 Vintage

So, what’s the difference between this Sire V7 Vintage and the regular V7’s that I featured in this video. This bass has a body made from Ash and the fretted V7’s both had Alder bodies. However, all of the V7 models come in both ash and alder versions. This bass has a maple fingerboard, my fretted V7’s have ebony fretboards, but once again, both models come with both options.

To find the differences between the models you have to look a bit more closely, and the differences are small. The position of the bridge pickup is different. It’s closer to the bridge on the Vintage model and further away on the standard V7’s. This does give the Vintage model a slightly tighter sound on the back pickup. The Vintage models have a gloss finish on the neck, the standard V7 neck has a really nice matt feel. I slightly prefer the matt feel of the standard V7 neck, but it doesn’t make much difference to me.

I think those are the important differences. There are cosmetic differences, like the scratch plate looks different and the bridge on the Vintage model has vintage style saddles. But I’m not interested in that stuff. I’m only interested in how it plays and how it sounds.

Why I like the Sire V7 Vintage Fretless

I said that this is probably my favourite Sire bass that I’ve played. The setup is really good, but honestly that’s probably just luck with this particular bass. Sire basses are set up with a low action, which can be great but it can also go wrong, and this particular one came out well.

So, that’s not the reason I like it. The reason I like it is because it gives me something that I never thought I’d have, for a very low price. I grew up listening to legendary bass players like Jaco Pastorius and Marcus Miller playing vintage Fender Jazz basses. But it’s never been my thing to try and recreate a vintage sound. I’ve always looked forward and tried to create a modern bass sound. Investing in a proper vintage Fender Jazz bass, even a reissue, would be very expensive. And it’s not an investment that I’m willing to make when it’s not the sound I’m aspiring to make.

This Sire bass gives me a vintage style passive J style fretless bass for a price that I can justify buying it and keeping it just to have fun with. Honestly, I hardly ever play the bass with the preamp switched on. Not because the preamp isn’t good (it’s really good). But because I just want it to be a vintage Fender Jazz Bass. The fact that it has this preamp on it, which makes it capable of functioning as a modern active fretless bass, is just a bonus. It really adds to the versatility of the instrument.

I’ve even kept the flat wound strings on it, and I never play flats on my fretless basses. To be honest, the bass has the wrong name on the headstock. I know that Marcus Miller is an under rated fretless player. But every time I pick up this bass I just end up playing Jaco lines for hours. I spent years learning Jaco’s catalogue and playing it on basses that sounded nothing like his bass. Now I have the right tool for the job and I love it.

Slap Bass Timing Exercises – Bass Practice Diary 124

Slap Bass Timing Exercises – Bass Practice Diary – 8th September 2020

If you’ve been following my recent series of videos about timing exercises, then you’ll know how these work by now. You take an odd number note grouping and play those groupings as continuous 16th notes. What I didn’t mention on any of my previous videos, was that these exercises are a great way to practice slap bass. This video feature three slap bass timing exercises. And you can take this concept and develop your own exercises.

The exercises

The first exercise is 16th notes played in three note groupings. The three note grouping consists of a note, G, thumped with the right hand thumb (T). A tap on the strings with the left hand, marked L.H on the notation. And finally a pull with the index finger of the right hand, which I’ve played as a dead note by muting the strings with my left hand.

Slap Bass Timing Exercises – 16th notes in Groupings of Three

The second of the three note sequence, the left hand tap, can be very soft. You don’t need to hit the strings hard, you just need to do it in time. Hitting the strings with the left hand has the effect of silencing the first note. So, even if you don’t here the tap, you will still feel the rhythm by hearing the note G go silent.

The second exercise is an extension of that idea. This time the three note grouping is made by thumb (right hand), hammer (left hand) and pluck (right hand index). And the notes are taken from a C minor pentatonic scale.

Slap Bass Timing Exercises – 16th notes in Groupings of Three – C minor Pentatonic

The final exercise features a five note grouping. The five notes are as follows. Thump the G and then tap with the left hand, exactly as in exercise 1. Then thump with the right hand thumb again, but this time as a dead note muted by the left hand. That’s three, the final two notes are F and G. Pluck the F on the D string and hammer onto the G on the fifth fret with your left hand.

Slap Bass Timing Exercises – 16th notes in Groupings of Five

Creative Bass Playing Blog