Play Bass on Sus Chords (Suspended Chords) – Bass Practice Diary – 12th March 2019
Sus chords or suspended chords create a really cool modern sound. Last week I put out a video of a bassline I’d written on four sus chords. This week I want to explain a little bit of the theory behind my approach to playing on these types of chords.
What is a suspended chord?
I think there is often confusion over what the term suspended actually means when it relates to music. A suspended chord is simply a chord that doesn’t contain a third. A basic musical triad (three note chord) usually contains a root, a third and a fifth. And it’s the third that defines the chord as being either major or minor.
Suspended chords don’t use the third. The third is usually replaced by a fourth (sus4) or a second (sus2). Therefore they’re not major or minor chords. They need a different name, and that name is suspended. The name itself doesn’t really tell you anything important about the nature of the chords or how to play on them, so most musicians usually abbreviate and call them sus chords.
How do you play on sus chords?
Personally, I take a jazz approach to playing on sus chords. A basic sus4 or sus2 chord (like the kind you might find in a pop song) is all very well. But for me these chords get really interesting when you start extending them, creating richer fuller harmonies and chord voicings.
When I’m playing bass on sus chords, I like use the notes of a major 9th chord or arpeggio. But I think of the root note of the sus chord as being the 9th of the major arpeggio.
So, for example, G is the 9th of F major. So I can think of a Gsus chord as being an inverted Fmaj9 chord with the 9th becoming the root.
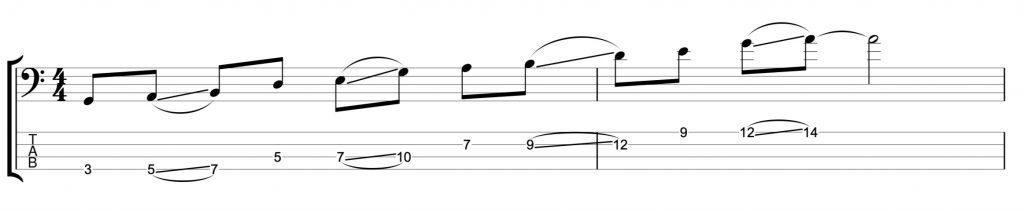
F major 9th arpeggio on G sus chord
If you think of the notes of an Fmaj9 chord with the root G, then the chord tones are root, 2nd (9th), 4th, 6th (13th) and b7th (dominant 7th). So you can think of my Gsus chord as being a G7sus4 chord with a 9th and a 13th added as chord extensions. However, I would simply think of it as Gsus and the chord extensions are there at the discretion of the musicians voicing the chords.
More sus chord arpeggios
These kind of extended sus chords create a really cool modern jazz sound. I think they’re cool because they aren’t major or minor, so the sound of them is always a bit of a question mark. Almost like you’re not really sure when you hear them, how they’re supposed to make you feel.
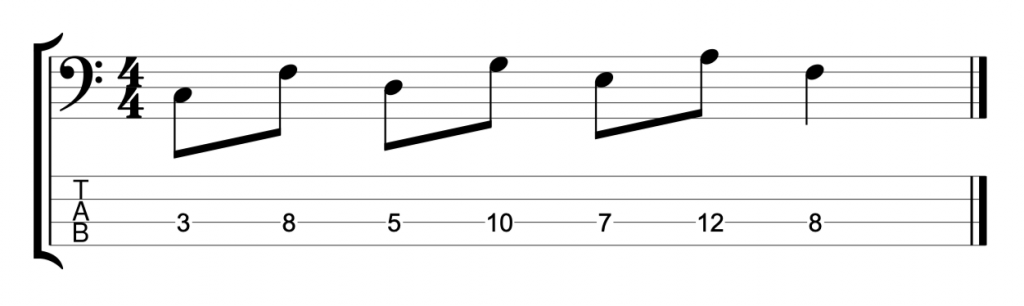
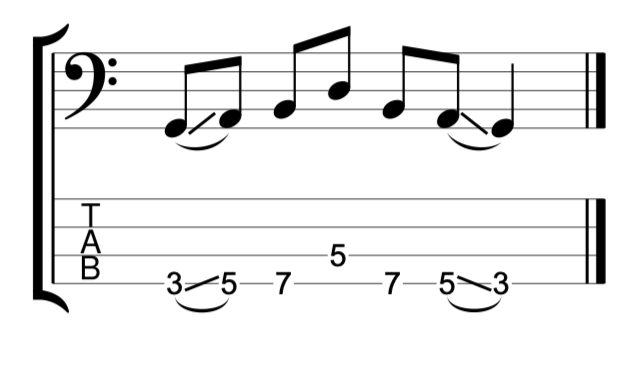
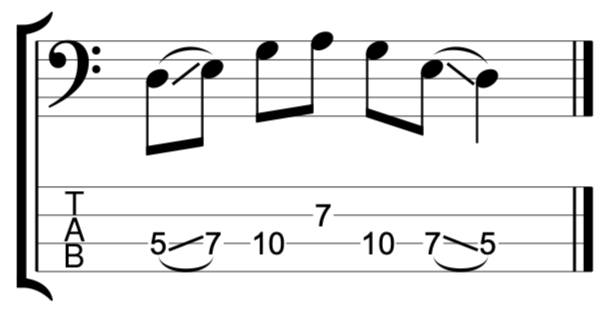
In the bassline I played in last week’s video, I used four sus chords Gsus, Bbsus, Dbsus and Esus. In each case I thought of the root note as being the ninth of a major 9th arpeggio.
Ab major 9th arpeggio on a Bbsus chord Cb major 9th arpeggio on a Dbsus chordD major 9th arpeggio on a Esus chord
Quartal Chord Voicings on Bass Guitar – Bass Practice Diary – 26th February 2019
I haven’t done a video about bass chord voicings for a while. So, this week I’ve decided to practice some of my favourite jazz chords, quartal chord voicings. Quartal harmony is a jazz term which means harmonising chords in intervals of a fourth.
4th Intervals
I did a video recently about playing modern jazz lines using 4th intervals. But I thought after making that video that I wasn’t telling the full story about using 4ths in modern jazz. The quartal chord voicings themselves create a very distinctive modern jazz sound. It’s instantly recognisable once you become familiar with the sound.
Chords are traditionally voiced in intervals of a third. Using quartal voicings in jazz became popular in the 1960’s after Miles Davis made quartal chord voicings a feature of his composition So What from the 1959 album Kind of Blue.
Quartal harmony was a sound that then became associated with the great John Coltrane Quartet of the early to mid 1960’s. The chords were supplied by pianist McCoy Tyner, who is synonymous with quartal harmony, and one of my all time favourite jazz pianists.
McCoy Tyner was using these voicings at a time when the Coltrane Quartet was playing a lot of modal jazz. Meaning that there weren’t lots of chord changes. And the emphasis was more on scalic improvisation over static harmony. So What is also a modal jazz piece. So, if you’re looking to apply some of these quartal chord voicings, then modal jazz tunes are a good place to start.
Quartal Harmony on Bass
The bass is setup for playing quartal chord voicings because the strings are tuned in intervals of a fourth. Which is why it amazes me that more bass players don’t use quartal chord voicings. Many of the chord voicings in the video can be played with just one finger. But despite this simplicity, they create a sophisticated jazz harmony sound.
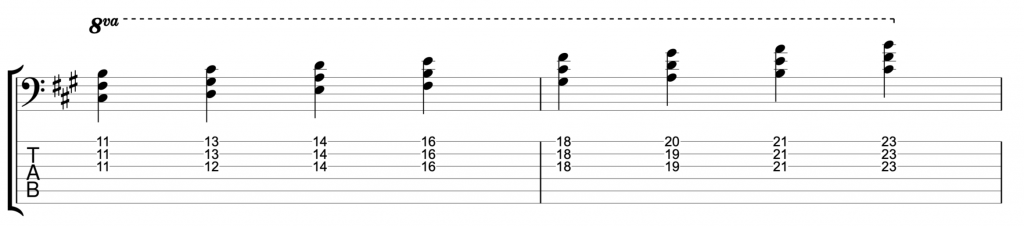
Here is an A major scale harmonised in 4ths.
A major scale – quartal chord voicings
In the video, I’ve used the open A string as a root note underneath all of these voicings.
When you play this, it doesn’t sound like a typical major scale harmonisation. That’s what’s so great about quartal harmony. You can take simple harmony, like a major scale, and completely change it’s character, without needing to change or add any notes.
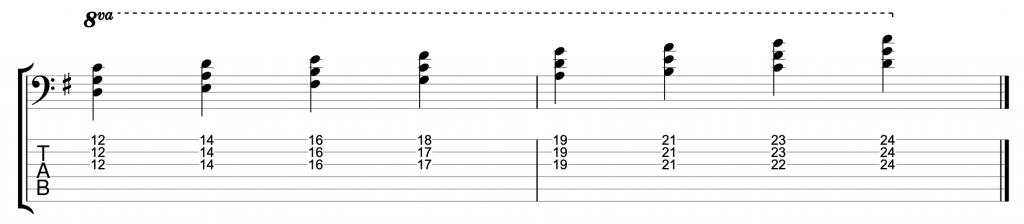
It works for all of the modes of the major scale. Here is the Dorian mode harmonised in 4ths.
A dorian – quartal chord voicings
Applying Quartal Harmony to Jazz
I’ve already mentioned that quartal chord voicings are extremely well suited to modal jazz. If, for example, you’re playing a modal jazz composition with long periods on a minor seventh chord. Like So What or John Coltrane’s Impressions. Then you’re faced with a challenge of how to make just one chord sound interesting.
One solution would be to apply the dorian chord voicings that I’ve written out in the example above. It gives you seven different options for voicings that you could play over a single minor seventh chord (Am7 in the example above). You could use any or all of these voicings to help create a feeling of movement in the otherwise static harmony.
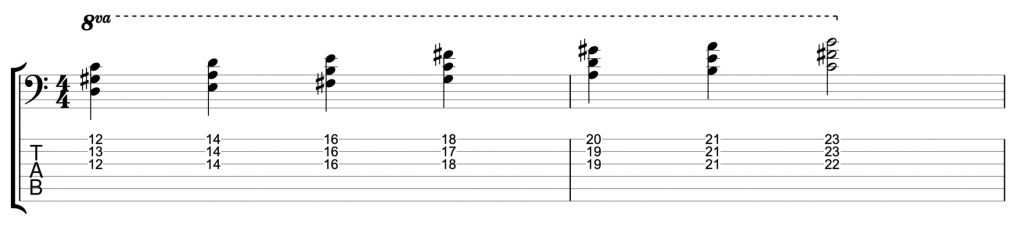
You can apply quartal harmony to virtually any scale or mode. In this next example I’ve applied it to an A harmonic minor scale.
A harmonic minor – quartal chord voicings
The same chord voicings can also be applied to any of the modes of the harmonic minor scale, which includes the altered scale.
One of the fourth intervals in the harmonic minor scale actually comes out as a major third. So, some of the voicings in the example above are not strictly quartal. Because they mix fourths with a third. But it still creates some interesting sounds and you can do your own experimenting to decide which of the voicings are useful.
Playing lines in 4th intervals is a very popular sound modern jazz. It’s a very distinctive sound. And once you’ve incorporated it into your playing, you’ll start to recognise when you hear other musicians using it. This video features an exercise that I’ve written to help you incorporate this sound in your playing.
There are two obvious ways to play 4ths on bass guitar. I believe that if you’re going to be able to come up with basslines in 4ths, then you need to practice and use both ways.
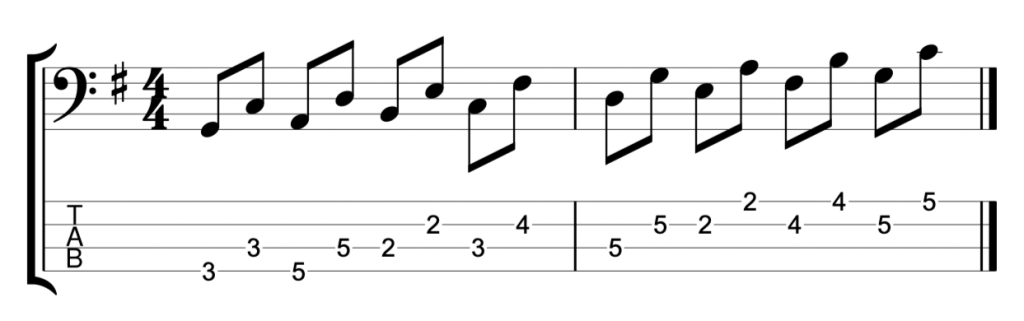
The first way is the easy way. You go from any fretted note to the same fret on an adjacent string. The bass is tuned in 4ths. So, as long as you stick to the same fret, you’ll be playing a 4th. This is very simple and you can apply this to playing scales and harmonies. Here is a G major scale played in intervals of a 4th.
G major scale in 4th intervals
This way of playing 4ths is so simple, that it can lead to some bass players ignoring the slightly more complicated way of playing 4ths. Which is by shifting position up five frets on a single string. Like this.
4th intervals on a single string
I think that this element of shifting position, is essential if you’re going to create musical lines in 4ths. If you only use the first, easier technique, then you’ll very quickly find that you’re stuck in one position on the bass neck. And as a result, it will massively limit your ability to come up with musical lines.
The 4ths Exercise
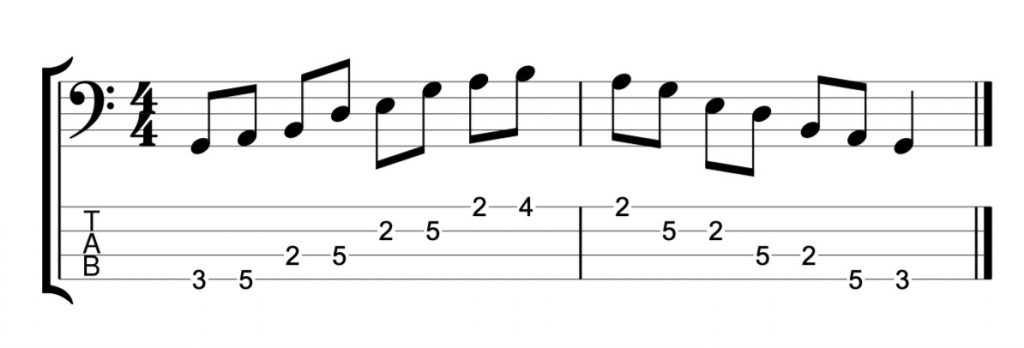
So I’ve written this exercise, which is designed to help you practice playing 4ths in both ways.
4th Intervals Exercise
I’ve written it in the key of A major. But, if you want to master it, please practice it in any and every key. The concept is simple. It starts with a position shift from the A on the 5th fret of the E string to the D on the 10th fret. Then you play a 4th interval from the B on the 7th fret to the E on the 7th fret of the A string.
So it immediately uses both ways of playing 4ths. Then it repeats the same pattern all the way up the neck until you can’t go any further. And then you play everything the same way in reverse.
Once you’ve got used to playing lines in 4ths, start to listen to listen out for the sound of 4ths in other musicians lines. Listen to players like Evan Marien, he’s a brilliant bass player that loves the sound of 4ths in his basslines.
Bass Guitar Chords – Right-Hand Tapping Chord Extensions – Bass Practice Diary – 29th January 2019
Tapping notes with your right hand is a great way to extend your bass chords. I’ve seen lots of bassists do this, particularly in solos. It’s not as difficult as it looks and it works really well for playing extended harmonies. Even on a 4 string bass where it’s often hard to voice extended chords with just your left hand.
Bass Guitar Chords
This isn’t my first video about playing chords on the bass. So, if you’re new to this, then I’d highly recommend checking out some of my previous videos. Like this one, which is the first of a four part video I did on bass guitar chords.
This video features a different approach to playing jazz chord extensions. By tapping the extensions with your right hand. Using this technique, you can really open up your chord voicings by playing harmonies in a completely different register to the notes you’re playing with your left hand.
I should start by saying that my tapping technique is basic. I don’t use tapping techniques a lot. In fact, these types of chords are pretty much the only places where I will use my right hand to tap chords. But I think that’s also the case for most bass players. Right-hand tapping is rarely a first choice technique for bassists, it’s an added extra that you can use on solos.
Having said that. I know that there are musicians for whom tapping is there principle technique, and they have much more advanced techniques using four fingers on their right hand, just like their left. My basic tapping technique involves hammering on, sliding and pulling off notes with my index, middle and ring fingers on my right hand. It’s all I need for what I do.
Diatonic Triads
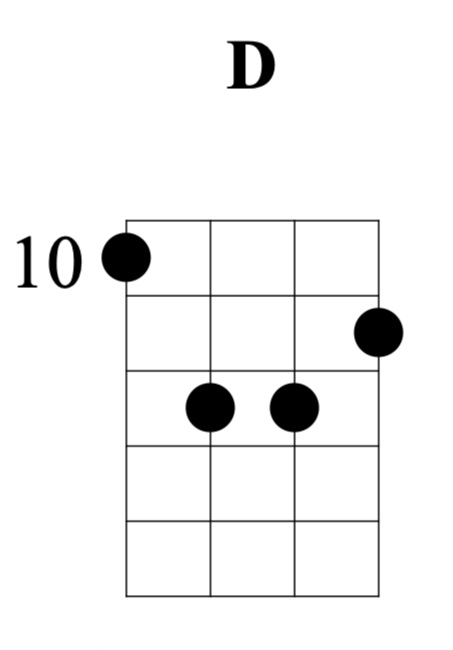
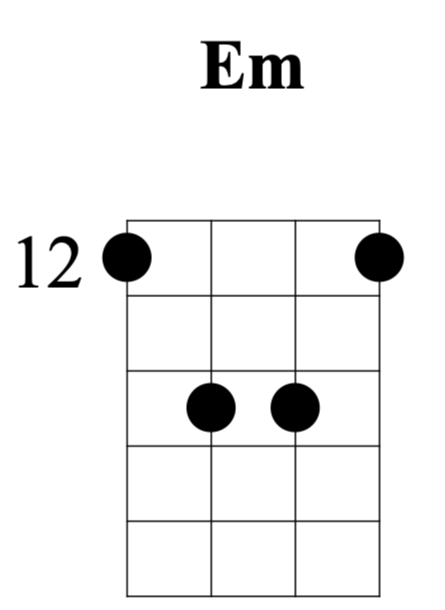
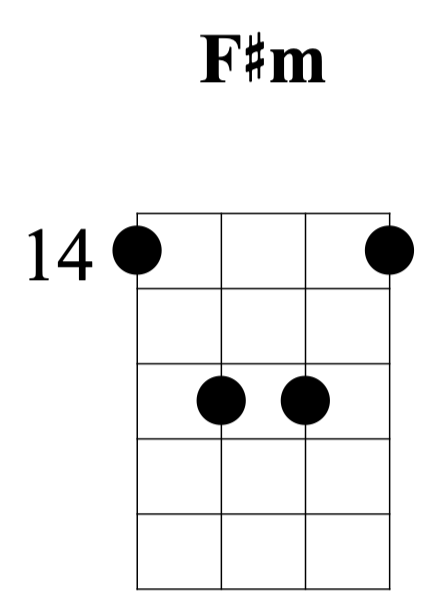
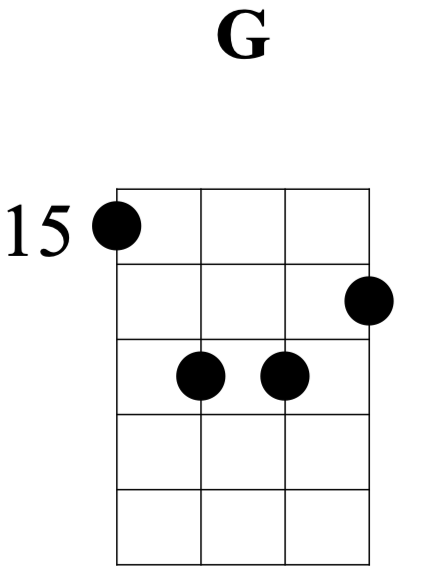
Diatonic triads are just basic major and minor chords that you find in every key. (You could also include diminished and augmented triads but I’m just using major and minor here). The first four chords, in the key of D major are D, Em, F#m and G. Here is how I have voiced those chords with my left hand in this video.
D major triad
E minor triad
F# minor triadG major triad
These triads form the basic chords onto which I can add my chord extensions with my right hand. With each chord, I start by playing each triad, plucking the strings with my right hand, Thumb plays 4th string, index plays 3rd string, middle plays 2nd string and ring finger plays 1st string. Or p, i, m, a, to use classical guitar terminology. None of these notes are tapped, they are fretted with the left hand in traditional style.
Chord Extensions
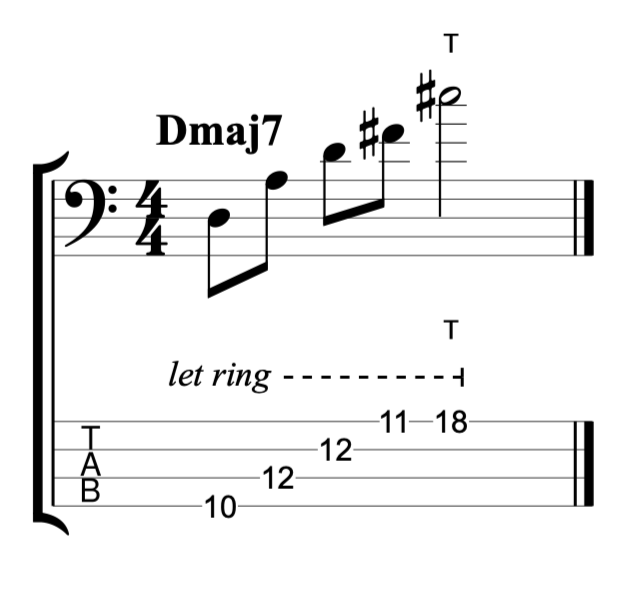
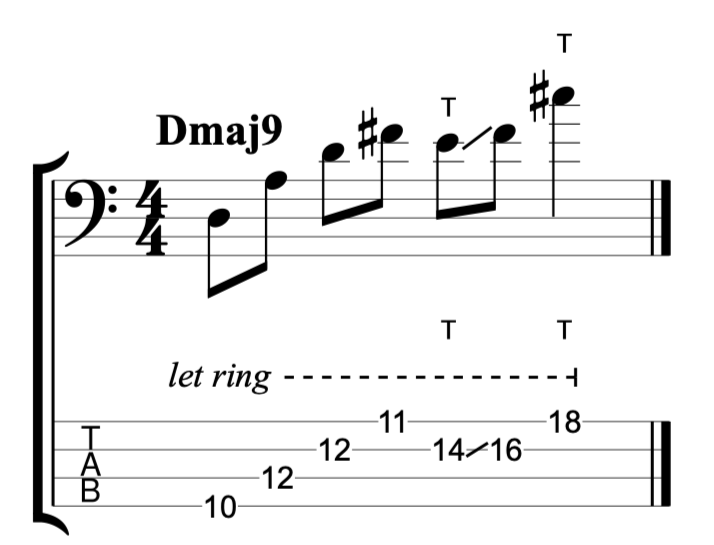
Start by adding chord extensions on just one chord. In this example I’ve added a major 7th to the D major triad making it a Dmaj7. The 7th is the only note tapped by the right hand.
D major 7th
Make sure you tap the note onto the 18th fret. If you tap in between the 17th and 18th fret, it won’t sound as clear.
In this next example, I’ve tapped a 9th, E, and slid the note up to the major third F#.
D major with added 9th
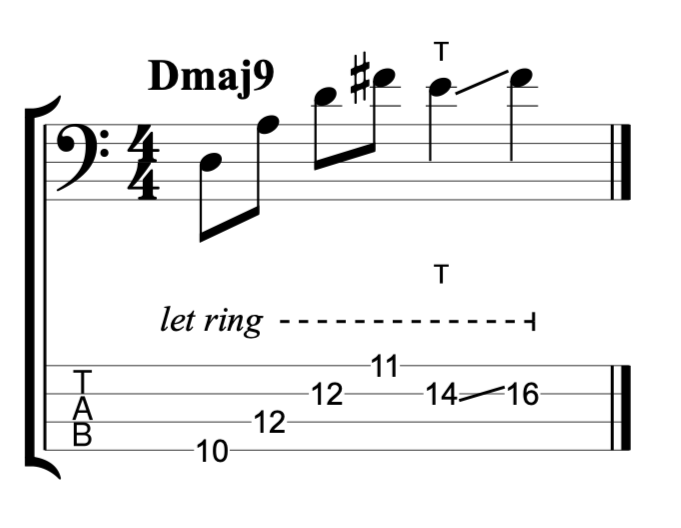
In this third example I’ve included the major 7th and the 9th.
D major 9th
Right-Hand Tapping Exercise
Once you’ve got used to the technique, try playing this exercise.
Tapping Chord Extensions Exercise
There’s quite a lot going on here, so I won’t write an exhaustive analysis. But here’s a quick guide.
Over the D triad I’m tapping major 7th, 6th, #11th and 9th. On the E minor I’m adding minor 7th, 11th and 9th. On the F# minor I’ve used minor 6th, minor 7th and b9th and on the G major triad I’ve played similar extensions to the D major. Major 6th, 9th, major7th and #11th.
Sliding Notes on a Fretless Bass – Bass Practice Diary – 22nd January 2019
Sliding between notes is an integral part of phrasing on a fretless bass. This video features an exercise to help you practice sliding accurately between notes by using the pentatonic scale.
When you slide between notes on a fretless bass, the first thing that you need to concentrate on, is keeping the notes in tune. When you slide, it’s very easy to slide too far and go sharp, or not quite far enough and the note will be flat. So my first advice is to start slowly and use a backing track.
Backing tracks are very easy to find for free on Youtube. Here is an example of a backing track in G major that you could use to help you practice this exercise. When you practice with a backing track it’s so much easier to hear when you go a little bit out of tune.
Use the Pentatonic Scale to Practice Sliding Notes on Fretless Bass
The easiest way to play a pentatonic scale is by playing two notes on each string like this.
G major pentatonic – two notes per string
The reason it’s easy is because it doesn’t involve any position shifts. But it offers very little opportunity to slide between notes.
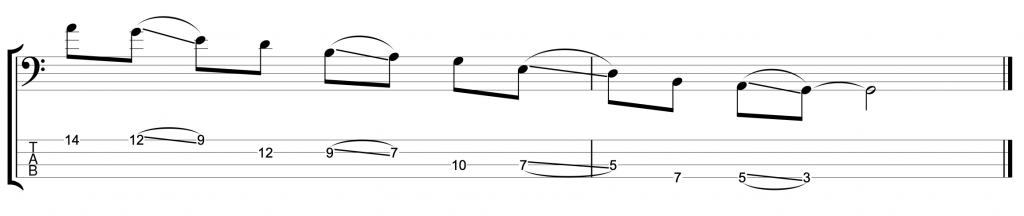
In order to incorporate slides, you need to keep shifting position, which involves playing at least three notes per string like this.
Sliding Notes with 1st Finger in G major AscendingSliding Notes with 1st Finger in G major Descending
You can also practice this on a fretted bass. It’s easier on a fretted bass because you don’t need to be as accurate. But position shifting is an important skill for any bass player to practice.
The idea of the exercise is that you always slide with your 1st finger (index finger). Playing three notes on each string, you play the first of the three notes with your 1st finger and then slide up to the second note. You can play the third note on each string with either your third finger or little finger.
Slide Notes With Any Finger
It’s easiest to use your 1st finger to slide. But you want to be able to slide accurately with all of the fingers on your left hand. So come up with your own variations of this exercise and use different fingers to play the slides. Here’s a variation that I demonstrated in the video which uses your 4th finger (little finger) to play the slides.
Sliding Notes with 4th Finger in G major Ascending
Another variation that I demonstrated in the video, is to break the exercise down into small sections. Don’t feel like you need to practice the whole scale all at once. Work on each position shift one at a time. Like this.
I think that practicing like this actually replicates what you will play in a real musical situation better than playing the whole scale all at once. You could use the example above as a fretless bass fill on a G major chord. And the example below which starts on a D could also be a fill when you’re playing in the key of G.
Just like any scale exercise, don’t forget to practice this exercise in different positions and different keys. And try to adapt the idea of sliding and position shifting to any other scales, arpeggios or technical exercises that you practice.
The term artificial harmonics relates to various techniques where you use your right hand alone to play the harmonics. Artificial harmonics are more difficult to achieve than natural harmonics because you need to do two things at the same time with your right hand. In this post I’m going to look at three different techniques.
The Jaco Pastorius Technique
Many bass players, myself included, discovered artificial harmonics through listening to Jaco Pastorius. I remember as a teenager listening to Weather Report’s tune Birdland and wondering how the introduction could possibly be played on a bass. I was already familiar with natural harmonics. But Jaco seemed to be playing melodies and bending notes with the fluency of a guitar player.
The secret was, that he was using his right-hand thumb to touch the strings lightly, while his right-hand fingers were plucking the notes. And, at the same time, he was fretting notes with his left hand and imitating the phrasing of a guitarist bending strings by sliding the notes on his fretless bass. A lot of things going on at the same time!
It was Jaco’s technique that I was trying to copy when I first started playing artificial harmonics. But that was only until I found a technique which I found worked much better for me and the way I wanted to play. I haven’t used the Jaco technique in well over 10 years now.
The Steve Bailey Technique
After hearing Jaco, the first time that I saw a bass player doing something significantly different with artificial harmonics was on a DVD called Bass Extremes Live.
I’m sure many of you are already familiar with Victor Wooten and Steve Bailey’s incredible bass duets. But at the time I first saw that film, I knew all about Victor Wooten, but I didn’t know Steve Bailey.
Steve Bailey was making incredible arrangements using artificial harmonics on a six string fretless bass. He was playing chords using bass notes and harmonics played simultaneously, which seemed impossible, even to someone who was already well familiar with Jaco Pastorius’ repertoire.
The Steve Bailey technique involves straightening your index finger on your right hand. And using it to lightly touch the string. Then you can use your third finger to pluck the string at the same time. Meanwhile, your right-hand thumb can be used to play bass notes.
Once I’d learned this technique I never went back to the Jaco technique. Because I found that I could play everything that I was doing before with the Steve Bailey technique but I could also play chords using artificial harmonics. I don’t want to get into a debate about which technique is better or worse. We’re all individuals and Jaco’s technique worked for Jaco and Steve Bailey’s technique works for him. And personally I’ve found that Steve Bailey’s technique works for me as well.
My Own Experiments with Artificial Harmonics
Recently I made a video which I called Improvisation on Three Basses. The idea for that video came because I was playing the chords of Miles Davis’ tune Flamenco Sketches using an artificial harmonics technique that I’ve seen used by guitarists like Ted Greene and Tommy Emmanuel. But I’ve never seen it used by a bass player.
I was wondering if I could adapt it to playing chords on a bass guitar. So I tried out playing one of my favourite chord progressions. I was amazed by how well it worked. And it led me to wonder why I haven’t seen it done before.
The technique involves using your index finger to touch the string. Then plucking the same string with your thumb and then using your third finger to play notes on other strings.
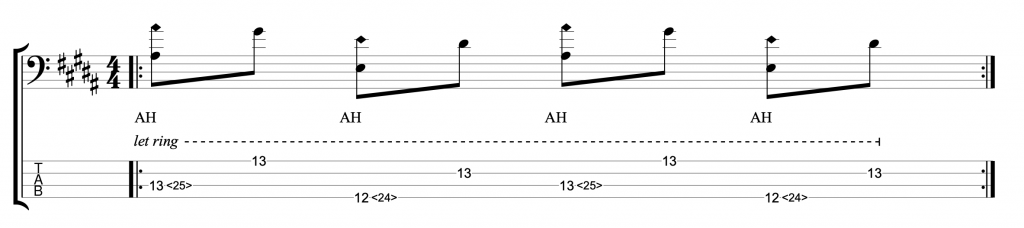
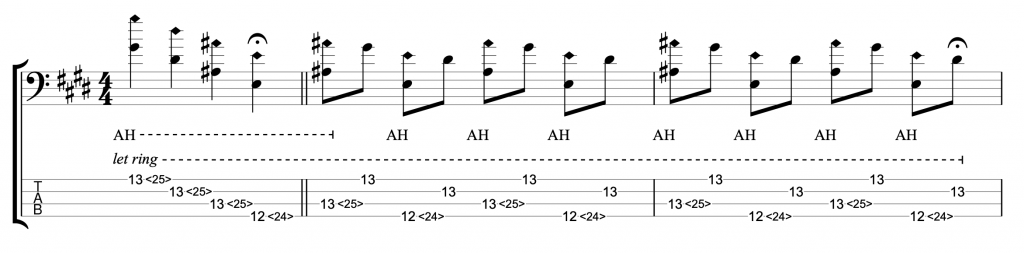
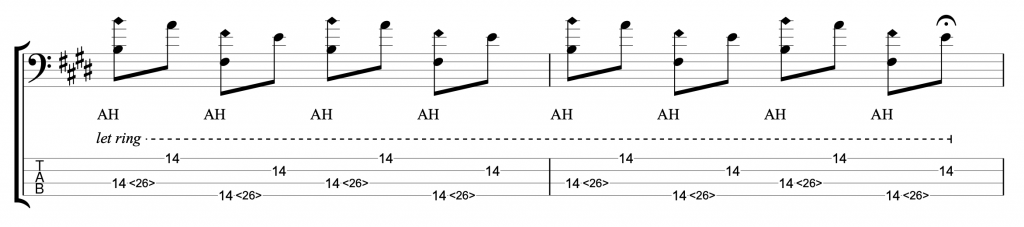
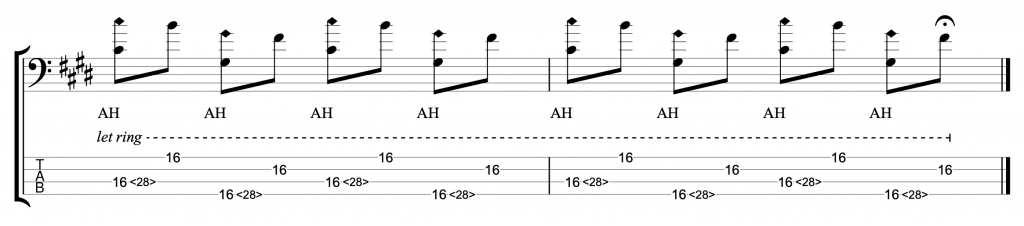
Here is the exercise that I wrote and played in the video using this technique.
Artificial Harmonics Exercise
This is an extended version of the same idea. It uses a chord progression that starts with an Emaj7#11 then F#m11 and G#m11.
Play Harmonics on Bass Guitar – Part 1: Natural Harmonics – Bass Practice Diary – 11th December 2018
I use harmonics a lot in my bass arrangements, so I thought I’d do a complete guide to playing harmonics on bass. It’s too much information for just one video, so I’ve split it into two parts, natural harmonics and artificial harmonics. This video contains everything you need to know about natural harmonics on bass. Including the harmonic series and advice for making chord voicing using harmonics.
Natural Harmonics
I should start by saying that I’m not a big fan of the terms natural and artificial harmonics. To me, they are all just harmonics, they follow the same rules and principles. The distinction is that natural harmonics are created from open strings, whereas artificial harmonics are created from notes that are fretted with the left hand. Calling them natural or artificial makes as much sense as calling notes played on open strings ‘natural notes’ and notes fretted with the left hand ‘artificial notes’.
There is nothing artificial about artificial harmonics, all harmonics exist naturally. However, there is a difference in the techniques that you use to play natural verses artificial harmonics, which I will look at across these two videos. So, I’ll continue to use the terms, natural and artificial, even though I’m not sure they’re ideal.
So, natural harmonics are created by touching the open strings very lightly with your left hand and then plucking the string as normal with your right hand. For the harmonic to be clear, you must avoid the string making contact with any fret, and you should remove both hands from the string immediately after plucking with your right hand. The string should be left to ring as if it were an open string. The difference is that the note you will hear will be much higher than the open string.
The Harmonic Series (Overtone Series)
In order to properly understand and use harmonics, you must first become familiar with the harmonic series. The harmonic series is a sequence of tones that make up a musical note. Musical notes are not simple sound waves. In fact they’re very complex and they comprise a whole sequence of overtones that we call the harmonic series. We can explore this sequence on our basses by playing harmonics.
The harmonic series is, in theory at least, infinite. So it’s impossible to learn or play the entire harmonic series. As you go further up the series, the harmonics become harder and harder to hear and to find on your bass string. So, I’m only really interested in the first few notes of the series.
The series always starts at the exact half way point of the string. This means the halfway point between the nut and the bridge. On your bass, the halfway point is marked by the twelfth fret. You will always find a harmonic at the halfway point of any string that is pulled tight between two points. It doesn’t matter what note you tune the string to and it doesn’t matter what instrument you are playing. The harmonic at the twelfth fret will produce a note that is exactly one octave above the open string.
So, the harmonic series starts with an octave and then is goes up a fifth and then to another octave. This will be a note two octaves above the open string. These harmonics will both occur in two different places on each string. One on the left side of the centre of the string, and one in the same position on the right side of the centre.
The next note in the sequence is a major 3rd above the previous note. So the harmonic series up to this point gives us a kind of major arpeggio.
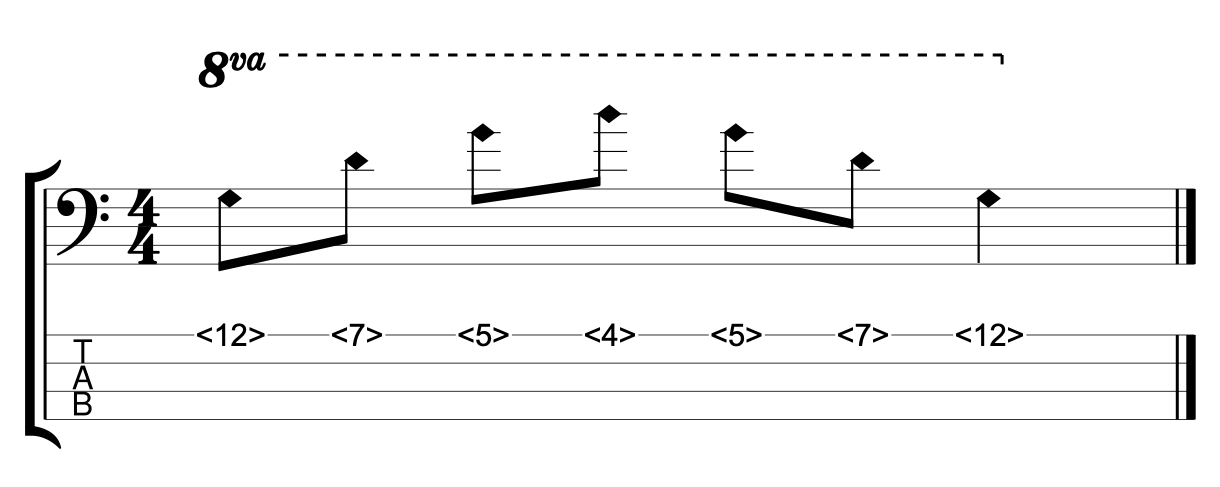
Natural Harmonics – Harmonic Series on G
Here is the sequence written out on the first string of a four string bass. So, the sequence is written in G. The sequence goes, G, D, G, B.
Creating Chord Voicings with Harmonics
The same major arpeggio pattern will repeat itself on any open string, Root, 5th, Root, 3rd. Which makes it fairly simple to work out what notes you’re playing when you play these harmonics.
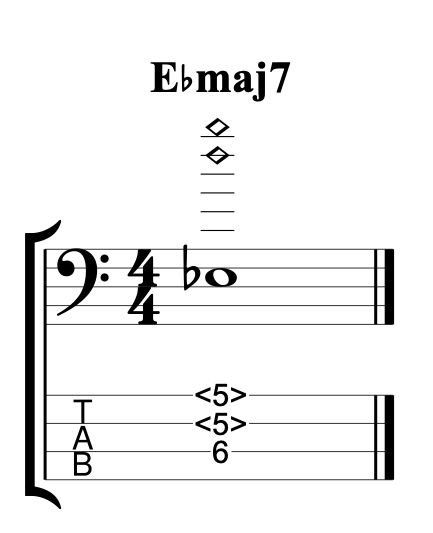
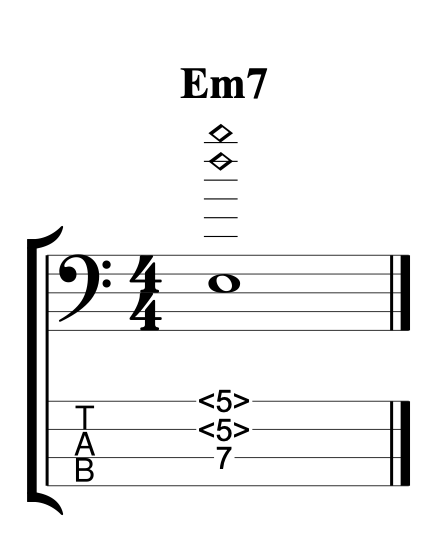
Once you know what the notes are, you can start to combine natural harmonics and normal fretted bass notes to create chord voicings. I gave two examples in the video, both using the harmonics D and G played on the fifth fret of the first and second strings.
When you add the root note Eb to the harmonics D and G it creates an Eb major 7th chord. G is the major third and D is the major seventh. I’ve done that by fretting the Eb on the 6th fret of the third string, but there are other ways you could play this chord. If you change the root note to E, you get an E minor 7th chord. The G and D become the minor 3rd and 7th.
Learn to Play Triplet Rhythms on Straight 16th Note Bass Grooves – Bass Practice Diary 4th December 2018
I’m currently putting the finishing touches to my second book, which is a follow up to Electric Bass: Improve Your Groove. In the new book, I have a section which is about feeling multiple subdivisions. Meaning, can you play bass grooves that use both straight 8th notes and 16th notes, as well as triplet rhythms?
It’s hard to switch between straight rhythms and triplet rhythms without dropping the groove. This video features a bass groove that I wrote for the book. It has a straight 16th note feel, but it also contains triplets.
Quarter Note Triplets (Crochet Triplets)
The video features two variations of the same groove. Here is the first, simpler variation.
Straight 16th Bass Groove with Quarter Note Triplets
This version of the groove features straight 8th and 16th notes, Ta-Ka and Ta-Ka-Di-Mi. But it also features quarter note or crochet triplets.
Quarter note triplets are a rhythm that many people struggle with. But they don’t need to be any more difficult that 8th note triplets. An 8th note triplet is simply a beat subdivided into three, Ta-Ki-Ta. A quarter note triplet is the length of two 8th note triplets. So, if you can feel 8th note triplets, you should be able to play quarter note triplets.
Think about it like this. Two beats contain six 8th note triplets. Ta-Ki-Ta, Ta-Ki-Ta. If you play on every other syllable, like this Ta-ki-Ta, ta-Ki-ta, then you are playing quarter note triplets.
16th Note Triplets
The second variation of the groove features all of the same subdivisions as the first, but it also contains 16th note triplets.
Straight 16th Bass Groove with 16th note Triplets
16th note triplets are easy to understand. They are sometimes difficult to play because they can be very fast, even at moderate tempos.
The first thing to understand about 16th note triplets is that they are essentially the same subdivision as 8th note triplets, Ta-Ki-Ta.
In order to create 16th note triplets you must first feel the straight 8th notes Ta-Ka. Once you have the straight 8th note feel, you must divide each 8th note into triplets, Ta-Ki-Ta.
It’s actually easier to play 16th note triplets on straight grooves like this than it is to play them on triplet feels such as shuffles and swing. The reason is that they are derived from subdividing the straight 8th notes into triplets.
Hammer Ons and Pull Offs – Left Hand Technique Lesson – Bass Practice Diary – 27 November 2018
Someone asked me recently to do a video with some Hammer Ons and Pull Offs exercises. I don’t usually do videos based on suggestions, but this time I thought it was a good idea. Because practising Hammer Ons and Pull Offs is a great way to improve your Left Hand Technique.
Having said that, I believe that there are a few basic things that you need to get right if you are going to improve your technique by practicing hammer ons and pull offs.
Left Hand Techniques
The first thing is to come up with exercises that use four fingers on your left hand. If you want to play with good technique in your left hand then you need to be able to play evenly between all of your fingers.
I see so many beginner and intermediate bass players favouring certain fingers and trying to avoid other fingers on their left hand. It’s very natural to play like that because when you start, everyone has stronger index and middle fingers than ring finger and little finger. But that’s the reason you practice left hand techniques, in order to overcome that.
If you play hammer ons and pull offs using the same two fingers every time, then you are actually making your left hand technique more uneven when you practice.
So, Rule One of left hand technique is practice with four fingers. The only exception to this is when you are specifically working on strengthening a weak finger. As I demonstrated in the video with my third finger.
Hammer Ons
The second thing that you need to get right is, when you hammer on, you need to hammer on to the fret and not in between two frets. For example, if you want to play the fifth fret on the first string, you need to hammer onto the fifth fret, not in between the fourth and fifth fret.
You need to be very accurate because if you go even a little bit in front of the fret, you will lose the note. The sound is created by striking the string against the fret. So, if you don’t hammer on accurately then the sound will be weak and quiet.
Many bass players struggle with this because they don’t spread out their fingers on the left hand. If you play with your fingers too close together, you won’t be able to reach the frets with your third and fourth fingers and your hammer ons will be weak.
So, Rule Two is spread you fingers wide and hammer on accurately onto the frets.
Pull Offs
The pull off technique is a bit easier. But make sure you don’t just lift your fingers off the strings. You need to excerpt a gentle pull on the string as you pull off. If you don’t, the notes will die out as you repeat the exercises. If you pull too hard, the notes will sound uneven as your pull offs will be much louder than your hammer ons.
When you get the pull off technique right, you should be able to keep all of these exercises going continuously without needing to play any notes with your right hand. The pull off technique is easiest to execute on the first string.
So, Rule Three is practice these exercises on all strings, not just on the first string.
The Hammer On and Pull Off Exercises with Bass TAB
This is the first exercise that I played in the video.
Hammer Ons and Pull Offs Example 1
I would recommend that you don’t spend too much time playing the same exercise the same way. You should keep coming up with your own little variations. And try to focus on the things that you find difficult.
If you practice the same exercise too much, you will become very good at playing that one exercise. But if you keep varying the exercise you will eventually become very good at the technique, which is what you want.
Here is the second exercise from the video.
Hammer Ons and Pull Offs Example 2
In this example you keep your first finger held down continuously. Now here is a variation in which you hold your second finger down continuously.
Hammer Ons and Pull Offs Example 3
Make sure you hold your second finger down on a string that you’re not using. Because you won’t be able to pull off with your first finger if your second finger is held down on the string you’re playing. You can vary this exercise again by holding down your third and then fourth fingers. It gets harder each time.
Rule Four
Rule four is the most important rule, and it should apply to everything you practice. The rule is, focus on timing and not speed. Use a drum beat or a metronome and practice everything you do by playing in time.
Hammer ons and pull offs are relatively easy to play fast, but they’re much harder to play in time, and it’s hard to get all the notes to sound even. So my best recommendation is start slow, play in time, make it even and then gradually increase the tempo.
Six String Bass – A guide to the 6 String Bass – Bass Practice Diary – 30th October 2018
I just want to share some of the reasons why I play a six string bass. I get asked about six string basses a lot. So, I thought I should make a video about why I play them. And also give out some advice for anyone learning or thinking of learning to play a six string bass. I’ll also write a little bit about the history of the bass guitar and how basses came to have six strings.
The first thing I need to say is that how many strings you choose to play, 4, 5, 6 or any other number, is not that important. What is important is the music you play and how you choose to play your instrument.
You need to decide what is the best instrument for you and the way you want to play. There’s no right or wrong answer when it comes to how many strings. And I think that bass players sometimes care too much about it. They need to remember that what matters is music, not strings.
Why do I play a six string bass?
Having said that, I do have good reasons for playing six strings and I’ll share some of them with you now.
The biggest advantage of playing six strings is the extra range you get. With an extra low string and an extra high string you can extend your range in both directions, which makes six string basses very versatile. I don’t do many gigs where I don’t need to use the extended low range of my six string bass. I can play bass lines that weren’t originally written to be played on bass guitar.
The extended high range of the instrument enables me to play melodies, chord voicings and harmonies that would be very hard to achieve on four and five string basses. I know that not every bass player wants to explore these kind of harmonies, but I do, and if you’re interested in that too then you should think about playing six strings.
Is it Harder to Play Six string Bass?
Yes and no. Hopefully if you’ve seen my other videos you’ve seen me play four and five string basses. Other than the extended range, there’s no difference in the way I play 6 string to 4 or 5 string basses either technically or musically. My technique changes when I switch to fretless bass. But it doesn’t change when I switch between a fretted 4 and a fretted 6 string bass.
So for me, playing 6 isn’t any harder than 4 or 5 strings. In fact it’s easier because I play 6 most of the time and it’s what I’m most comfortable with.
Having said that, you need a strong technique to play 6 string bass well. And you need to make sure that you really learn all six strings.
Bass Technique
There are a few technical things to consider when you learn to play six string bass. I see some 4 string players putting their left hand thumb on top of the neck when they play. It’s not great technique to do that and you can’t get away with it on a 6. The extra width in the neck means you won’t be able to access the low strings.
Another technical consideration is string damping, meaning that you don’t want to let open strings make noise when you’re not playing them. This is a technical consideration for all bass players, but the more strings you have, the more difficult it is, so you need to work on that if you’re going to play six strings well.
My final thought on the technical considerations is that it’s a bit harder to learn to play slap bass on a six string, because the high C string can be a bit in the way. But if your technique is good then you can still play in that style.
Learning to play bass
When I started playing bass, I learned on a 4 string bass like most people do. Then I switched to 5 and then 6. I started playing 6 string basses in my late teens. The first thing I did when I got the extra strings, was learn where the notes are on those strings. If you don’t do that, you’ll never play the 6 string bass really well.
I’ve heard it said that bass players should learn how to play 4 strings properly before trying to play 6. That doesn’t make any sense to me at all. If you take that argument to it’s logical conclusion then we should all start with one string on our basses. We should learn it properly and then add another and learn that properly. That’s not how you learn to play a musical instrument.
My advice would be that if you want to play a six string bass, then get one and start to learn it properly. Make sure that your technique is good and that you learn all six strings.
What to Look out for When Buying a Six String Bass?
So if you’re thinking of learning a six string bass, there is some advice that I’d like to give you about the instrument that you buy.
The first thing that I think is really important is string spacing. You want a nice wide string spacing, just like a 4 string bass. I really wouldn’t recommend getting a bass with a very narrow neck and the strings close together. I’ve mentioned already that there’s no difference in the way I approach playing 4, 5 or 6 strings. And for that to be the case, I need the string spacings to be the same. If the strings are much closer together then it suddenly feels like I’m playing a different instrument.
The Sound
The next thing to consider is that the bass has a very even sound across it’s whole range. It needs to have a strong and clear low B string. And it also needs to sound good and be easy to play in the high register. If your bass is week in any part of it’s range, then you’ll lose the benefit of having the extra range that the 6 strings give you.
The Balance
The last thing that I would highlight is the balance. That’s very important. If your bass neck is too heavy then it will dive to the floor when you let go with your left hand. Which means that you’ll have to constantly hold it up which will ruin anybody’s technique. So make sure your bass is well balanced. Make sure you can rest it on your lap with no hands and the neck doesn’t dive for the floor.
So, if you have a six string bass with a wide string spacing, a nice even sound across it’s whole range and it’s well balanced, then you have everything you need. And the good news is that you don’t have to spend a fortune to get a good six string bass.
My Warwick Artist Series “Steve Bailey” Bass
I know that people will ask what is the bass in the video. So, I should say that it’s a Warwick Artist Series bass. Unfortunately they don’t make these any more, which is a shame because they’re really good. But if you’re looking for something similar without breaking the bank, then I would recommend trying the Warwick Rockbass line.
I just want to say one more thing about the history of the bass guitar and why basses have four strings to begin with.
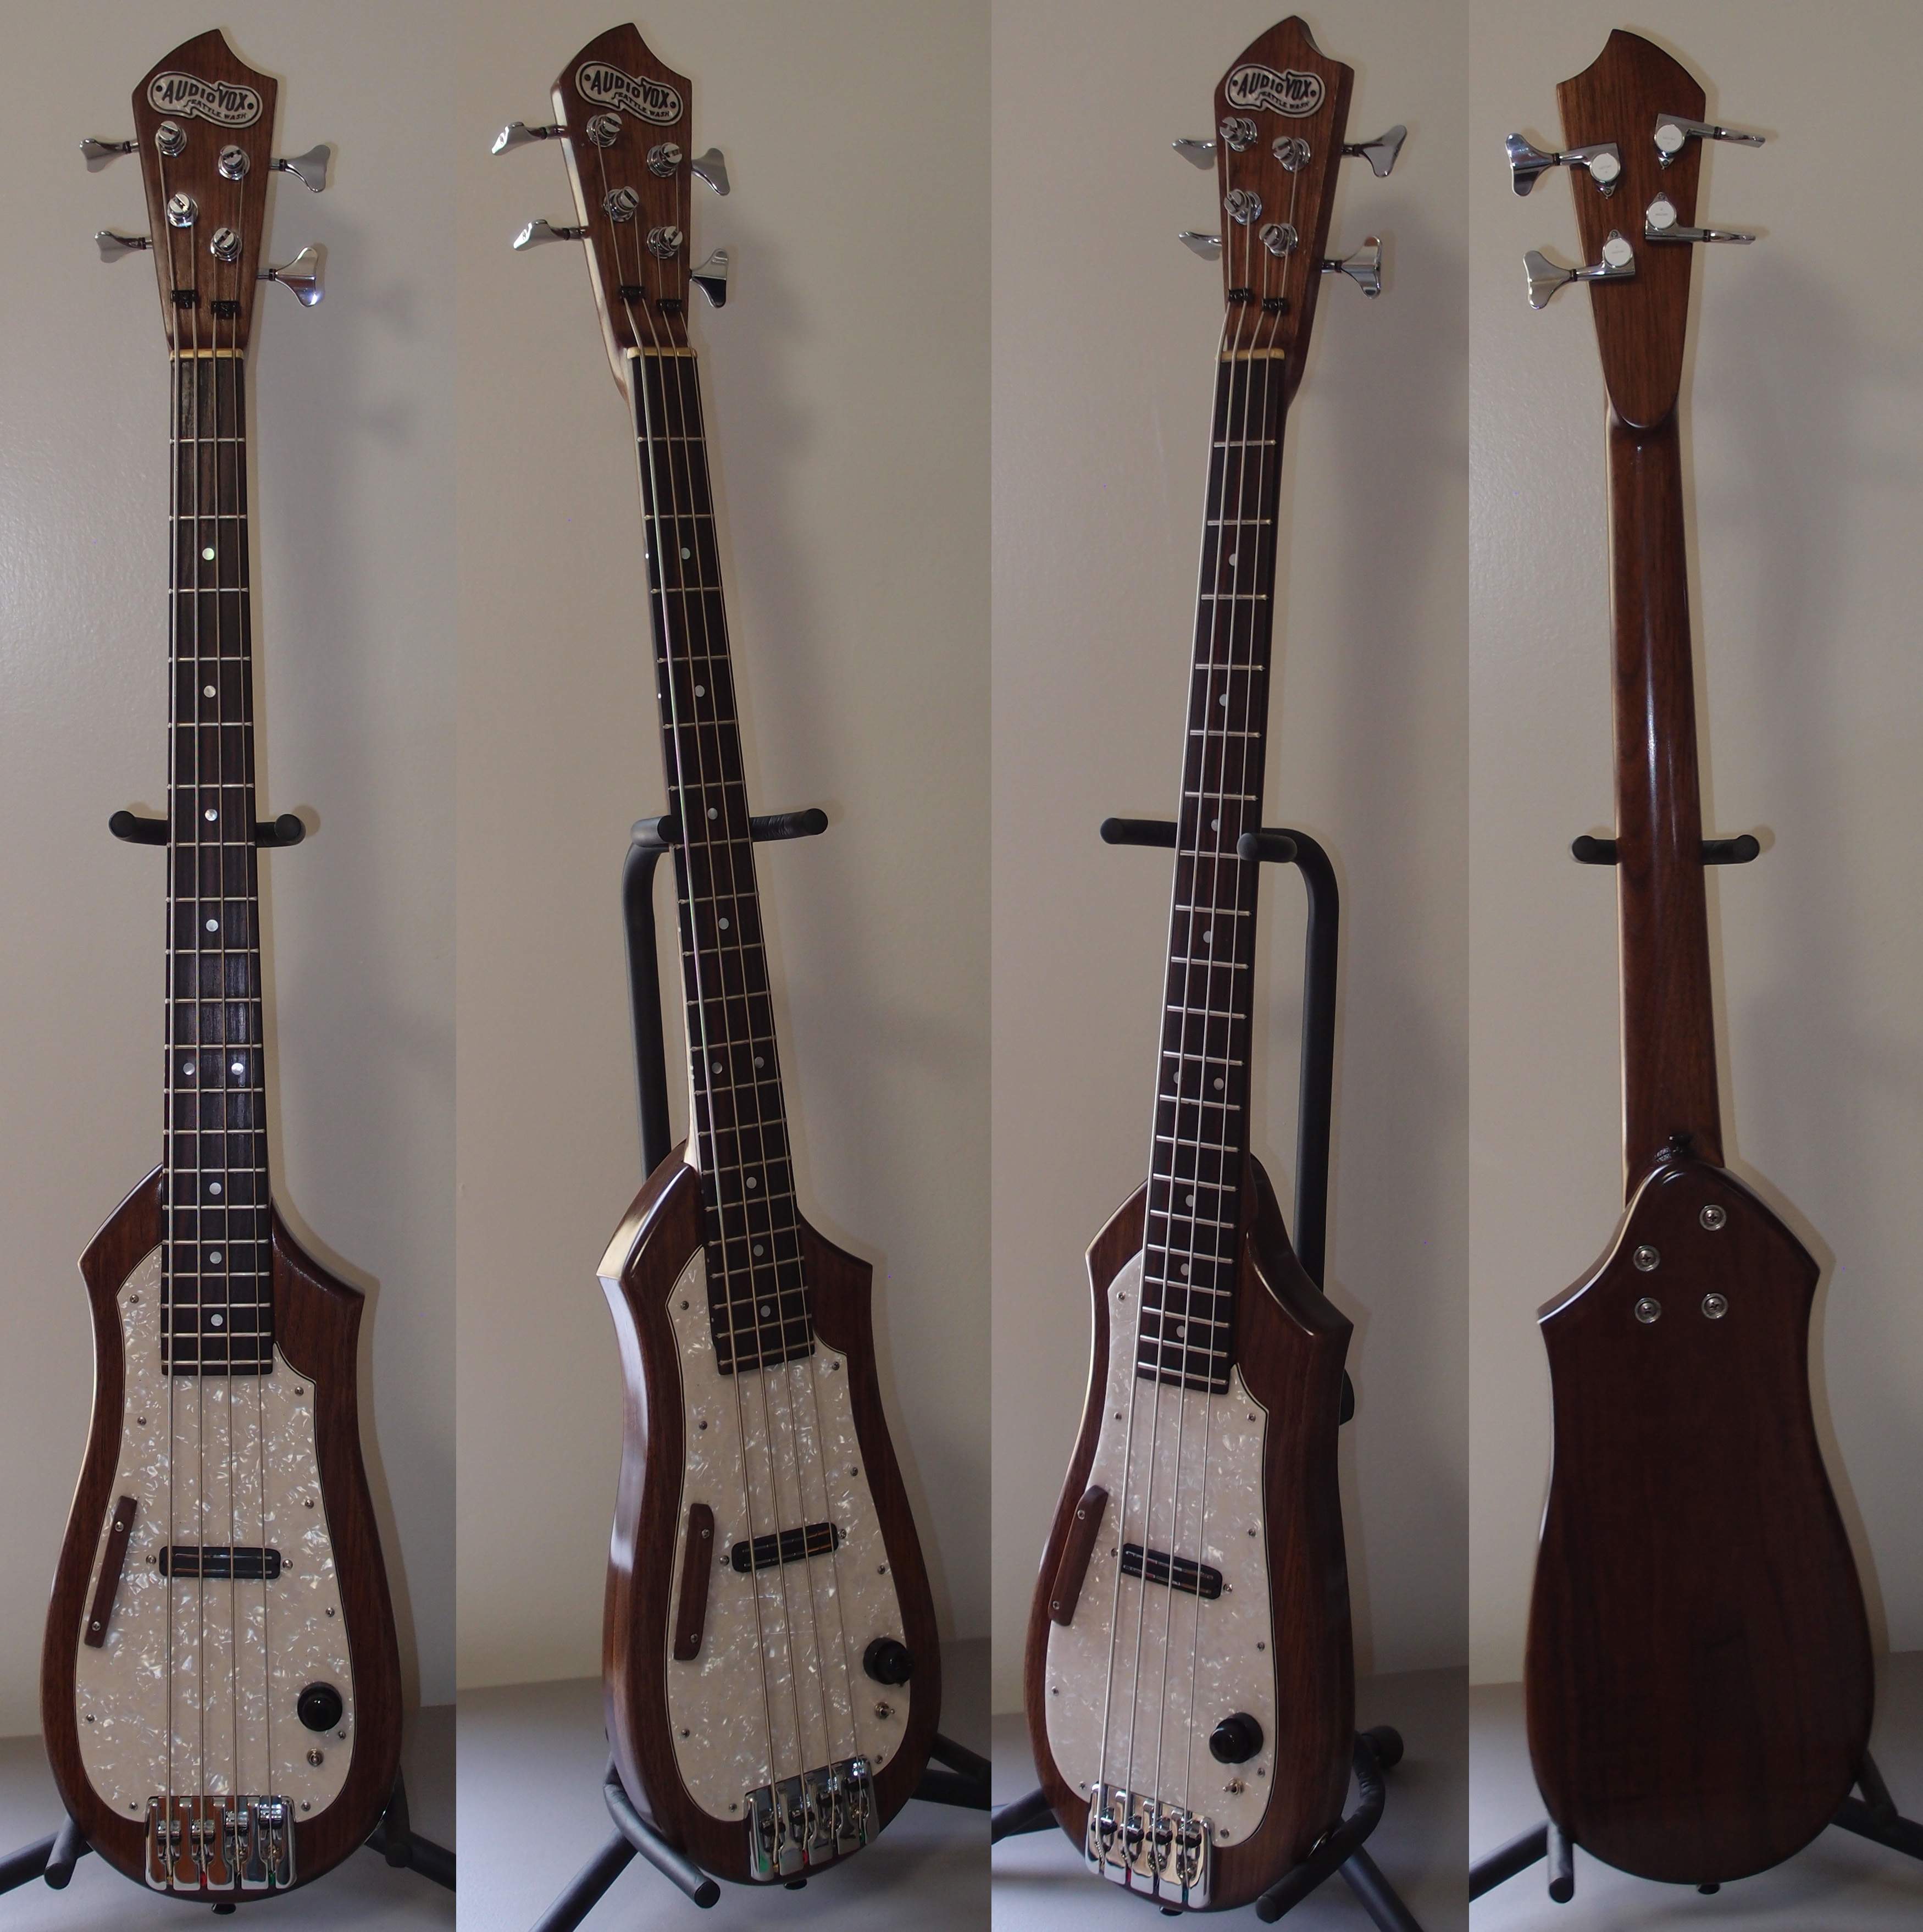
Many people think that Leo Fender invented the electric bass in the 1950’s, he didn’t. It was invented in the 1930’s by a gentleman named Paul Tutmarc. And it was originally sold as a bass fiddle.
Musical instruments usually evolve from other instruments rather than being invented out of the blue. The electric bass was no different. It was modelled on the orchestral strings violins, double basses etc. Hence it had four strings, was tuned like a double bass and it was called a bass fiddle.
Paul Tutmarc’s Electric Bass
What Leo Fender did, which was revolutionary for the electric bass, was to realise that it would be much easier to play if it was shaped like a guitar rather than a fiddle. And he created all of those iconic Fender basses like the Precision and the Jazz Bass which became the archetypes for all future bass guitars. But the Fender basses retained the four string tuning of Tutmarc’s original electric bass fiddles.
Who Invented the Six String Bass?
It was Anthony Jackson in the 1970’s who started to ask the question, if the bass guitar is now a member of the guitar family, not the orchestral strings family, then why retain the four string double bass tuning? Surely it makes more sense to have six strings like a guitar? It was Jackson who came up with what we now consider standard tuning for a six string bass. He called his bass guitars contrabass guitars. The name never caught on, but the concept of the six string bass has become more and more popular.
In conclusion
That’s my thoughts, and please don’t take this as any kind of criticism of four or five string basses. Most of my favourite bass players play four string basses and many play five. I play four string basses. And I can’t stress how much it doesn’t matter how many strings you like to use. You should find the bass that feels right for the way you play, and that’s all that matters.