Tag Archives: free bass lesson

Use Intervals of a 4th To Create a Modern Jazz Sound – Bass Practice Diary 43

Playing lines in 4th intervals is a very popular sound modern jazz. It’s a very distinctive sound. And once you’ve incorporated it into your playing, you’ll start to recognise when you hear other musicians using it. This video features an exercise that I’ve written to help you incorporate this sound in your playing.

If you’re not sure what I mean by an interval of a 4th then check out my video guide to playing intervals on the bass.

How to Play 4ths on Bass Guitar

There are two obvious ways to play 4ths on bass guitar. I believe that if you’re going to be able to come up with basslines in 4ths, then you need to practice and use both ways.

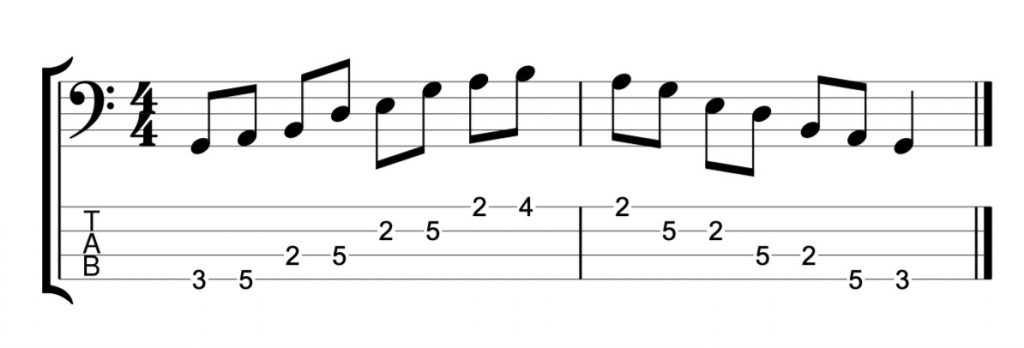
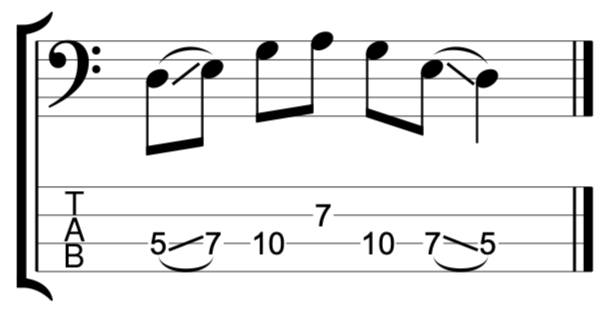
The first way is the easy way. You go from any fretted note to the same fret on an adjacent string. The bass is tuned in 4ths. So, as long as you stick to the same fret, you’ll be playing a 4th. This is very simple and you can apply this to playing scales and harmonies. Here is a G major scale played in intervals of a 4th.

G major scale in 4th intervals

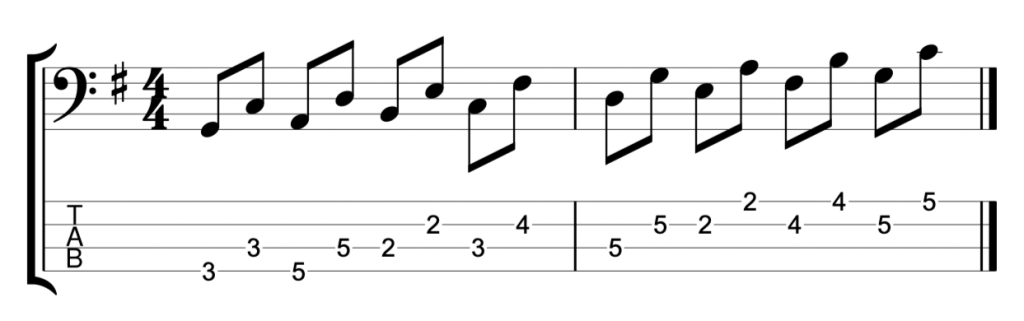
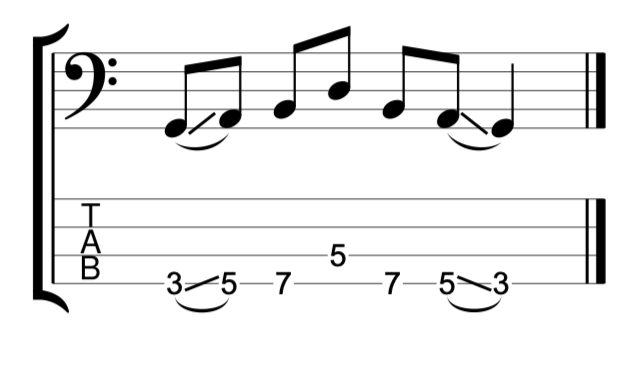
This way of playing 4ths is so simple, that it can lead to some bass players ignoring the slightly more complicated way of playing 4ths. Which is by shifting position up five frets on a single string. Like this.

4th intervals on a single string

I think that this element of shifting position, is essential if you’re going to create musical lines in 4ths. If you only use the first, easier technique, then you’ll very quickly find that you’re stuck in one position on the bass neck. And as a result, it will massively limit your ability to come up with musical lines.

The 4ths Exercise

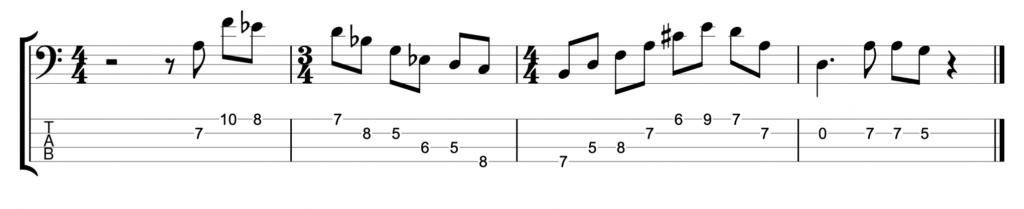
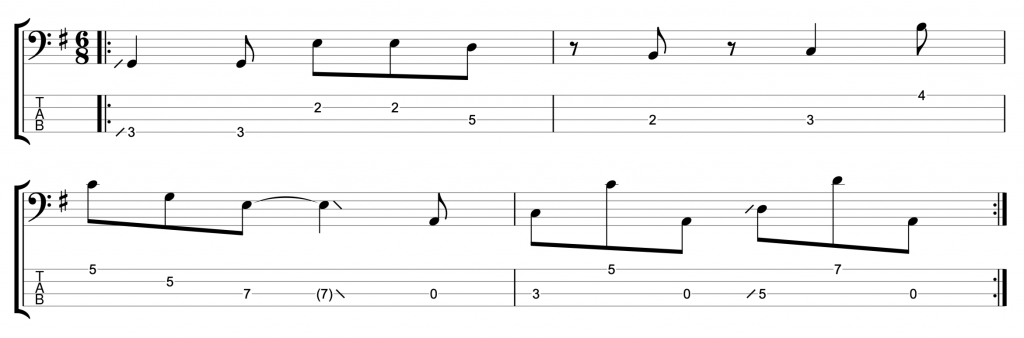
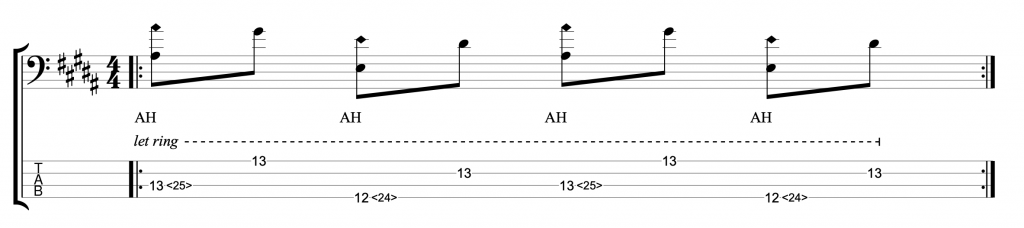
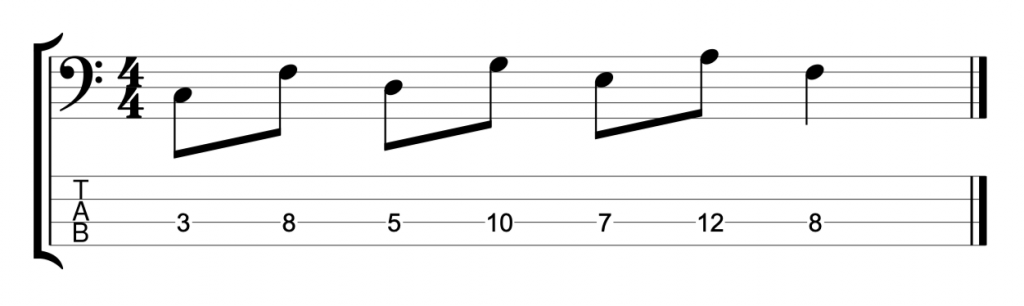
So I’ve written this exercise, which is designed to help you practice playing 4ths in both ways.

4th Intervals Exercise

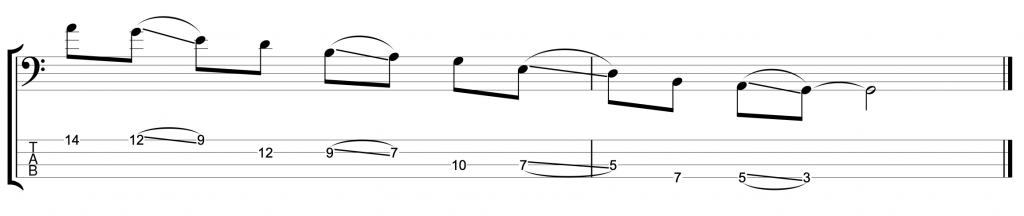
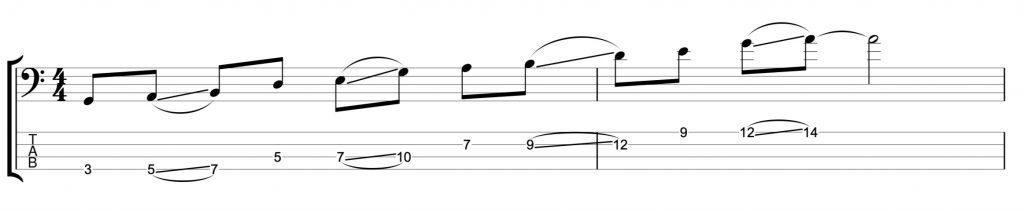
I’ve written it in the key of A major. But, if you want to master it, please practice it in any and every key. The concept is simple. It starts with a position shift from the A on the 5th fret of the E string to the D on the 10th fret. Then you play a 4th interval from the B on the 7th fret to the E on the 7th fret of the A string.

So it immediately uses both ways of playing 4ths. Then it repeats the same pattern all the way up the neck until you can’t go any further. And then you play everything the same way in reverse.

Once you’ve got used to playing lines in 4ths, start to listen to listen out for the sound of 4ths in other musicians lines. Listen to players like Evan Marien, he’s a brilliant bass player that loves the sound of 4ths in his basslines.

Jaco Pastorius Jazz Lick – Bass Practice Diary 42

Jaco Pastorius Jazz Lick – Bass Practice Diary – 5th February 2019

This week I’m featuring a lick from Jaco Pastorius’ solo on (Used to be a) Cha Cha from his debut album. It’s one of my favourite Jaco solo’s because it contains incredible melodic jazz lines like the one I’ve featured in the video. Here’s the lick!

Jaco Pastorius Jazz Lick

Several things stand out to me about this lick. It’s very fast, it takes place over moving harmony, Eb major to D minor and it includes an odd meter bar. I don’t know for sure that he improvised the line, but I believe that he did. And to improvise a line at that speed over moving harmony and an odd meter bar is extraordinary. That solo is one of many moments from that album that really underline why Jaco was such a genius and why his legacy has been so long lasting on the bass guitar.


Bass Guitar Chords – Right-Hand Tapping Chord Extensions – Bass Practice Diary 41

Bass Guitar Chords – Right-Hand Tapping Chord Extensions – Bass Practice Diary – 29th January 2019

Tapping notes with your right hand is a great way to extend your bass chords. I’ve seen lots of bassists do this, particularly in solos. It’s not as difficult as it looks and it works really well for playing extended harmonies. Even on a 4 string bass where it’s often hard to voice extended chords with just your left hand.

Bass Guitar Chords

This isn’t my first video about playing chords on the bass. So, if you’re new to this, then I’d highly recommend checking out some of my previous videos. Like this one, which is the first of a four part video I did on bass guitar chords.

Playing Chords on Bass Guitar Part 1

More recently I made this video about playing chord extensions on bass guitar.

Jazz Chord Extensions on Bass Guitar

Right-Hand Tapping

This video features a different approach to playing jazz chord extensions. By tapping the extensions with your right hand. Using this technique, you can really open up your chord voicings by playing harmonies in a completely different register to the notes you’re playing with your left hand.

I should start by saying that my tapping technique is basic. I don’t use tapping techniques a lot. In fact, these types of chords are pretty much the only places where I will use my right hand to tap chords. But I think that’s also the case for most bass players. Right-hand tapping is rarely a first choice technique for bassists, it’s an added extra that you can use on solos.

Having said that. I know that there are musicians for whom tapping is there principle technique, and they have much more advanced techniques using four fingers on their right hand, just like their left. My basic tapping technique involves hammering on, sliding and pulling off notes with my index, middle and ring fingers on my right hand. It’s all I need for what I do.

Diatonic Triads

Diatonic triads are just basic major and minor chords that you find in every key. (You could also include diminished and augmented triads but I’m just using major and minor here). The first four chords, in the key of D major are D, Em, F#m and G. Here is how I have voiced those chords with my left hand in this video.

D major triad

E minor triad

F# minor triad
G major triad

These triads form the basic chords onto which I can add my chord extensions with my right hand. With each chord, I start by playing each triad, plucking the strings with my right hand, Thumb plays 4th string, index plays 3rd string, middle plays 2nd string and ring finger plays 1st string. Or p, i, m, a, to use classical guitar terminology. None of these notes are tapped, they are fretted with the left hand in traditional style.

Chord Extensions

Start by adding chord extensions on just one chord. In this example I’ve added a major 7th to the D major triad making it a Dmaj7. The 7th is the only note tapped by the right hand.

D major 7th

Make sure you tap the note onto the 18th fret. If you tap in between the 17th and 18th fret, it won’t sound as clear.

In this next example, I’ve tapped a 9th, E, and slid the note up to the major third F#.

D major with added 9th

In this third example I’ve included the major 7th and the 9th.

D major 9th

Right-Hand Tapping Exercise

Once you’ve got used to the technique, try playing this exercise.

Tapping Harmony Video Complete
Tapping Chord Extensions Exercise

There’s quite a lot going on here, so I won’t write an exhaustive analysis. But here’s a quick guide.

Over the D triad I’m tapping major 7th, 6th, #11th and 9th. On the E minor I’m adding minor 7th, 11th and 9th. On the F# minor I’ve used minor 6th, minor 7th and b9th and on the G major triad I’ve played similar extensions to the D major. Major 6th, 9th, major7th and #11th.

How to Practice Sliding Notes on a Fretless Bass – Bass Practice Diary 40

Sliding Notes on a Fretless Bass – Bass Practice Diary – 22nd January 2019

Sliding between notes is an integral part of phrasing on a fretless bass. This video features an exercise to help you practice sliding accurately between notes by using the pentatonic scale.

When you slide between notes on a fretless bass, the first thing that you need to concentrate on, is keeping the notes in tune. When you slide, it’s very easy to slide too far and go sharp, or not quite far enough and the note will be flat. So my first advice is to start slowly and use a backing track.

Backing tracks are very easy to find for free on Youtube. Here is an example of a backing track in G major that you could use to help you practice this exercise. When you practice with a backing track it’s so much easier to hear when you go a little bit out of tune.

Use the Pentatonic Scale to Practice Sliding Notes on Fretless Bass

The easiest way to play a pentatonic scale is by playing two notes on each string like this.

G major pentatonic – two notes per string

The reason it’s easy is because it doesn’t involve any position shifts. But it offers very little opportunity to slide between notes.

In order to incorporate slides, you need to keep shifting position, which involves playing at least three notes per string like this.

Sliding Notes with 1st Finger in G major Ascending
Sliding Notes with 1st Finger in G major Descending

You can also practice this on a fretted bass. It’s easier on a fretted bass because you don’t need to be as accurate. But position shifting is an important skill for any bass player to practice.

The idea of the exercise is that you always slide with your 1st finger (index finger). Playing three notes on each string, you play the first of the three notes with your 1st finger and then slide up to the second note. You can play the third note on each string with either your third finger or little finger.

Slide Notes With Any Finger

It’s easiest to use your 1st finger to slide. But you want to be able to slide accurately with all of the fingers on your left hand. So come up with your own variations of this exercise and use different fingers to play the slides. Here’s a variation that I demonstrated in the video which uses your 4th finger (little finger) to play the slides.

Sliding Notes with 4th Finger in G major Ascending

Another variation that I demonstrated in the video, is to break the exercise down into small sections. Don’t feel like you need to practice the whole scale all at once. Work on each position shift one at a time. Like this.

I think that practicing like this actually replicates what you will play in a real musical situation better than playing the whole scale all at once. You could use the example above as a fretless bass fill on a G major chord. And the example below which starts on a D could also be a fill when you’re playing in the key of G.

Just like any scale exercise, don’t forget to practice this exercise in different positions and different keys. And try to adapt the idea of sliding and position shifting to any other scales, arpeggios or technical exercises that you practice.

Learn a Fretless Bass Groove with Bass TAB – Bass Practice Diary 39

Fretless Bass Groove with Bass TAB – Bass Practice Diary – 15th January 2019

This week during my bass practice, I’ve been composing bass grooves in 6/8. This video features one fretless bass groove that I’ve written. I choose to feature this one because it fits nicely on 4, 5 or 6 string bass. So hopefully all bass players will be able to have a go at playing it.

Fretless Bass Groove

The bassline is in G major. I’ve written some phrasing, by marking some of the slides on the TAB. But my advice is to focus on the rhythm more than the phrasing.

Once you’ve got the rhythm of the groove, I think you’ll find that the phrasing comes quite naturally. And I don’t mind if you phrase it differently to me. I think phrasing is very personal and I rarely try to imitate another musicians phrasing too closely.

Start by practicing slowly. The full speed is 110BPM and I’ve included a slower version at 70BPM. But I would probably advise starting even slower than that. And make sure that the rhythm is accurate. The rhythm in bar two is particularly tricky. It’s like playing on all of the off beats in a bar of 3/4, but the feel is still 6/8.

Six Eight (6/8) Time Signature

I’ve written before that 6/8 is one of my favourite meters to play in. You can find my guide to playing 6/8 basslines here. I’ve also written about 6/8 in my upcoming book for Fundamental Changes which will be published this year.

A Guide to Harmonics on Bass – Part 2: Artificial Harmonics – Bass Practice Diary 38

Learn to Play Artificial Harmonics

Artificial Harmonics – Play Harmonics on Bass Guitar – Part 2 – Bass Practice Diary – 8th January 2019

This is part two of my complete guide to playing harmonics on bass. This week I’m looking at artificial harmonics (find part one about natural harmonics video here).

The term artificial harmonics relates to various techniques where you use your right hand alone to play the harmonics. Artificial harmonics are more difficult to achieve than natural harmonics because you need to do two things at the same time with your right hand. In this post I’m going to look at three different techniques.

The Jaco Pastorius Technique

Many bass players, myself included, discovered artificial harmonics through listening to Jaco Pastorius. I remember as a teenager listening to Weather Report’s tune Birdland and wondering how the introduction could possibly be played on a bass. I was already familiar with natural harmonics. But Jaco seemed to be playing melodies and bending notes with the fluency of a guitar player.

The secret was, that he was using his right-hand thumb to touch the strings lightly, while his right-hand fingers were plucking the notes. And, at the same time, he was fretting notes with his left hand and imitating the phrasing of a guitarist bending strings by sliding the notes on his fretless bass. A lot of things going on at the same time!

It was Jaco’s technique that I was trying to copy when I first started playing artificial harmonics. But that was only until I found a technique which I found worked much better for me and the way I wanted to play. I haven’t used the Jaco technique in well over 10 years now.

The Steve Bailey Technique

After hearing Jaco, the first time that I saw a bass player doing something significantly different with artificial harmonics was on a DVD called Bass Extremes Live.

I’m sure many of you are already familiar with Victor Wooten and Steve Bailey’s incredible bass duets. But at the time I first saw that film, I knew all about Victor Wooten, but I didn’t know Steve Bailey.

Steve Bailey was making incredible arrangements using artificial harmonics on a six string fretless bass. He was playing chords using bass notes and harmonics played simultaneously, which seemed impossible, even to someone who was already well familiar with Jaco Pastorius’ repertoire.

The Steve Bailey technique involves straightening your index finger on your right hand. And using it to lightly touch the string. Then you can use your third finger to pluck the string at the same time. Meanwhile, your right-hand thumb can be used to play bass notes.

Once I’d learned this technique I never went back to the Jaco technique. Because I found that I could play everything that I was doing before with the Steve Bailey technique but I could also play chords using artificial harmonics. I don’t want to get into a debate about which technique is better or worse. We’re all individuals and Jaco’s technique worked for Jaco and Steve Bailey’s technique works for him. And personally I’ve found that Steve Bailey’s technique works for me as well.

My Own Experiments with Artificial Harmonics

Recently I made a video which I called Improvisation on Three Basses. The idea for that video came because I was playing the chords of Miles Davis’ tune Flamenco Sketches using an artificial harmonics technique that I’ve seen used by guitarists like Ted Greene and Tommy Emmanuel. But I’ve never seen it used by a bass player.

I was wondering if I could adapt it to playing chords on a bass guitar. So I tried out playing one of my favourite chord progressions. I was amazed by how well it worked. And it led me to wonder why I haven’t seen it done before.

The technique involves using your index finger to touch the string. Then plucking the same string with your thumb and then using your third finger to play notes on other strings.

Here is the exercise that I wrote and played in the video using this technique.

Artificial Harmonics Exercise

This is an extended version of the same idea. It uses a chord progression that starts with an Emaj7#11 then F#m11 and G#m11.

Artificial Harmonics Chord Progression

Learn to Play Triplet Rhythms on Straight 16th Note Bass Grooves – Bass Practice Diary 33

Learn to Play Triplet Rhythms on Straight 16th Note Bass Grooves – Bass Practice Diary 4th December 2018

I’m currently putting the finishing touches to my second book, which is a follow up to Electric Bass: Improve Your GrooveIn the new book, I have a section which is about feeling multiple subdivisions. Meaning, can you play bass grooves that use both straight 8th notes and 16th notes, as well as triplet rhythms?

It’s hard to switch between straight rhythms and triplet rhythms without dropping the groove. This video features a bass groove that I wrote for the book. It has a straight 16th note feel, but it also contains triplets.

Quarter Note Triplets (Crochet Triplets)

The video features two variations of the same groove. Here is the first, simpler variation.

Straight 16th Bass Groove with 16th note Triplets

Straight 16th Bass Groove with 16th note Triplets
Straight 16th Bass Groove with Quarter Note Triplets

This version of the groove features straight 8th and 16th notes, Ta-Ka and Ta-Ka-Di-Mi. But it also features quarter note or crochet triplets.

Quarter note triplets are a rhythm that many people struggle with. But they don’t need to be any more difficult that 8th note triplets. An 8th note triplet is simply a beat subdivided into three, Ta-Ki-Ta. A quarter note triplet is the length of two 8th note triplets. So, if you can feel 8th note triplets, you should be able to play quarter note triplets.

Think about it like this. Two beats contain six 8th note triplets. Ta-Ki-Ta, Ta-Ki-Ta. If you play on every other syllable, like this Ta-ki-Ta, ta-Ki-ta, then you are playing quarter note triplets.

16th Note Triplets

The second variation of the groove features all of the same subdivisions as the first, but it also contains 16th note triplets.

Straight Triplets 1 Part 2

Straight Triplets 1 Part 1
Straight 16th Bass Groove with 16th note Triplets

16th note triplets are easy to understand. They are sometimes difficult to play because they can be very fast, even at moderate tempos.

The first thing to understand about 16th note triplets is that they are essentially the same subdivision as 8th note triplets, Ta-Ki-Ta.

In order to create 16th note triplets you must first feel the straight 8th notes Ta-Ka. Once you have the straight 8th note feel, you must divide each 8th note into triplets, Ta-Ki-Ta.

It’s actually easier to play 16th note triplets on straight grooves like this than it is to play them on triplet feels such as shuffles and swing. The reason is that they are derived from subdividing the straight 8th notes into triplets.

Hammer Ons and Pull Offs on Bass – Left Hand Technique Lesson – Bass Practice Diary 32

Hammer Ons and Pull Offs – Left Hand Technique Lesson – Bass Practice Diary – 27 November 2018

Someone asked me recently to do a video with some Hammer Ons and Pull Offs exercises. I don’t usually do videos based on suggestions, but this time I thought it was a good idea. Because practising Hammer Ons and Pull Offs is a great way to improve your Left Hand Technique.

Having said that, I believe that there are a few basic things that you need to get right if you are going to improve your technique by practicing hammer ons and pull offs.

Left Hand Techniques

The first thing is to come up with exercises that use four fingers on your left hand. If you want to play with good technique in your left hand then you need to be able to play evenly between all of your fingers.

I see so many beginner and intermediate bass players favouring certain fingers and trying to avoid other fingers on their left hand. It’s very natural to play like that because when you start, everyone has stronger index and middle fingers than ring finger and little finger. But that’s the reason you practice left hand techniques, in order to overcome that.

If you play hammer ons and pull offs using the same two fingers every time, then you are actually making your left hand technique more uneven when you practice.

So, Rule One of left hand technique is practice with four fingers. The only exception to this is when you are specifically working on strengthening a weak finger. As I demonstrated in the video with my third finger.

Hammer Ons

The second thing that you need to get right is, when you hammer on, you need to hammer on to the fret and not in between two frets. For example, if you want to play the fifth fret on the first string, you need to hammer onto the fifth fret, not in between the fourth and fifth fret.

You need to be very accurate because if you go even a little bit in front of the fret, you will lose the note. The sound is created by striking the string against the fret. So, if you don’t hammer on accurately then the sound will be weak and quiet.

Many bass players struggle with this because they don’t spread out their fingers on the left hand. If you play with your fingers too close together, you won’t be able to reach the frets with your third and fourth fingers and your hammer ons will be weak.

So, Rule Two is spread you fingers wide and hammer on accurately onto the frets.

Pull Offs

The pull off technique is a bit easier. But make sure you don’t just lift your fingers off the strings. You need to excerpt a gentle pull on the string as you pull off. If you don’t, the notes will die out as you repeat the exercises. If you pull too hard, the notes will sound uneven as your pull offs will be much louder than your hammer ons.

When you get the pull off technique right, you should be able to keep all of these exercises going continuously without needing to play any notes with your right hand. The pull off technique is easiest to execute on the first string.

So, Rule Three is practice these exercises on all strings, not just on the first string.

The Hammer On and Pull Off Exercises with Bass TAB

This is the first exercise that I played in the video.

Hammer Ons and Pull Offs Example 1

I would recommend that you don’t spend too much time playing the same exercise the same way. You should keep coming up with your own little variations. And try to focus on the things that you find difficult.

If you practice the same exercise too much, you will become very good at playing that one exercise. But if you keep varying the exercise you will eventually become very good at the technique, which is what you want.

Here is the second exercise from the video.

Hammer Ons and Pull Offs Example 2

In this example you keep your first finger held down continuously. Now here is a variation in which you hold your second finger down continuously.

Hammer Ons and Pull Offs Example 3

Make sure you hold your second finger down on a string that you’re not using. Because you won’t be able to pull off with your first finger if your second finger is held down on the string you’re playing. You can vary this exercise again by holding down your third and then fourth fingers. It gets harder each time.

Rule Four

Rule four is the most important rule, and it should apply to everything you practice. The rule is, focus on timing and not speed. Use a drum beat or a metronome and practice everything you do by playing in time.

Hammer ons and pull offs are relatively easy to play fast, but they’re much harder to play in time, and it’s hard to get all the notes to sound even. So my best recommendation is start slow, play in time, make it even and then gradually increase the tempo.


Jazz Blues Lick on Fretless Bass – Bass Practice Diary 30

Jazz Blues Lick on Fretless Bass – Bass Practice Diary – 13th November 2018

This week I’ve done a detailed breakdown of a jazz lick that I played on a Bb blues progression in last week’s Bass Practice Diary. The lick combines the diminished scale with the blues scale which creates a jazz blues sound.

I’ve played the lick on my Warwick Thumb SC six string fretless bass. But I’ve transposed the lick down an octave so it can be comfortably played on a four string bass and I’ve written the TAB for four string bass in standard tuning.

Jazz Blues Lick

The concept of the blues solo that I played last week was combining the diminished scale and the blues scale. The reason why I’ve highlighted this very short lick is because it combines both the blues scale sound and the diminished sound in one very short lick. The Diminished scale provides a jazz sound while the blues scale keeps the lick rooted in the blues.

If you want to know more of the theory then check out last week’s video, but for now I’ll just take you through the lick.

The Lick

Jazz Blues Lick
Bb7 Jazz Blues Lick

The lick is played on a Bb7 chord but it starts on a G. The lick actually starts before beat one. The way I played it last week, you can think of the G as functioning as the major 3rd of the Eb7 chord in the preceding bar. However you could also play the same note on a Bb7 chord and think of it as a 13th.

From that note it goes up using the diminished scale. The second note Ab lands on beat one and it’s a chord tone, the dominant 7th. If you followed the sequence of the scale then the next note would be the root note Bb, but I’ve chosen to skip the root and go to the next note in the scale which is the b9, B natural (Cb).

Then it’s D and F. Two chord tones, major 3rd and 5th. And both feature in the diminished scale.

It’s worth mentioning at this point, that it’s the b9 that’s creating the diminished sound. All of the other notes are chord tones. They exist in the diminished scale, but without the b9, they would just sound like an arpeggio. It’s amazing what the presence of just one outside note can do to change the sound of a harmonic phrase.

For more of the theory about inside and outside notes, check out these two posts.

Everything You Need to Know About Harmony on Bass Guitar

How to Use Outside Notes In Your Basslines

The Blues Scale

The Blues has its own rules when it comes to harmony. The blues scale is essentially a minor pentatonic scale with one extra note. An outside note, the b5.

If you want to define the sound of the blues, then a good place to start is by playing the minor 3rd from the blues scale on a dominant 7th chord containing a major 3rd. You could argue that anytime you mix minor and major 3rds on dominant chords you are playing a blues sound.

Going back to my lick, I’ve just played a major third and then the 5th of the Bb7 chord, F. The note F exists in the Bb blues scale, the Bb diminished scale and the Bb7 chord. So it’s a very safe note. I’m using it here to transition from playing the diminished scale into playing the blues scale.

From the F, the lick simply goes down the blues scale until it gets to the root note Bb. It includes the minor third Db, so the riff includes both major 3rd, D and minor 3rd Db. Which, as I’ve mentioned, creates a blues sound.

In Conclusion

The diminished scale, and especially the b9 from the diminished scale, create a jazz sound. While the presence of both major and minor 3rds creates a blues sound. And both of these sounds are combined in one very short lick, just nine notes altogether. Which I think is quite cool.

I played several licks with a similar idea in last week’s video and I’ve transcribed one full 12-bar chorus. I think that the lick that I’ve chosen is the shortest and most succinct. Which is why I chose this one. I hope you’ve found this helpful!


How to Use the Diminished Scale in Jazz – Bass Practice Diary 29

Use the Diminished Scale to Play Jazz – Bass Practice Diary – 6th November 2018

This week I’ve been practising using diminished sounds to play on dominant 7th chords in jazz. If you want to bring a more jazz sound to your playing, using the diminished scale is a great way to do it. Because it creates an interesting series of inside and outside notes when played on dominant chords.

What is the diminished scale?

The diminished scale is what I would call a symmetrical scale. It sounds like it should be something very complicated but it’s actually very simple. In many ways it’s even more simple than a major scale.

Symmetrical scales are scales that use the same intervals repeatedly. In the case of a diminished scale the intervals are a half tone (semi tone) and a whole tone. Symmetrical scales are also called modes of limited transposition or fixed transposition, which sounds even more complicated. But it still isn’t. It simply means that there are a very limited number of different ways you can transpose the scale. For example, because of the repeating intervals a G diminished scale is the same as a Bb diminished scale and Db and E diminished scales. So the idea of playing in 12 keys is a bit redundant. Another example of a mode of limited transposition is the whole tone scale. You can also use the whole tone scale to play on dominant 7th chords, but that’s another video for another day.

There are only two different ways you can play a diminished scale, you can either start with a half tone or you can start with a whole tone. After that it just repeats the same patterns over and over. Which makes it quite easy to play, as I said before, in many ways easier to play than a major scale.

Here is an example of an arpeggiated diminished scale pattern that I featured in the video.

"Arpeggiated

How to practise a diminished scale

In the video I’ve used the example of a Bb7 chord. Here is a diminished scale starting on a Bb and beginning with a half tone.

HalfWhole Diminished Scale Starting on Bb
Half/Whole Diminished Scale Starting on Bb

I don’t always think about the scale starting on the root note. Often I will use the major third (D natural in this case) as a jumping off point. And in that case I will think of the scale as starting with a whole tone.

Another approach that I use is to start on the #9 or minor third. In this case Db. In this case the first two notes of the scale will be the minor 3rd (an outside note) resolving to the major third (a chord tone). This is a real signifier of the blues and it will help give your diminished licks a bluesy flavour.

How to apply the diminished scale in jazz

As I’ve previously mentioned, the diminished scale most commonly gets applied to dominant 7th chords in jazz. Here is the same Bb half/whole scale written out with the intervalic relationships to a Bb7 chord written over each note.

"Bb7

As you can see, the scale gives you all of the standard chord tones in a Bb7 chord. Root, major third, 5th and dominant 7th. However, it also includes one unaltered chord extension, the 13th, and three altered chord voicing, b9, #9 and #11. It’s these altered extensions that give the diminished scale a jazz flavour when you play them on a dominant 7th chord.

The best way to demonstrate this is by playing a jazz blues, because the blues uses dominant 7th chords a lot. I’ve transcribed a chorus of blues solo that I improvised in which I was using both the diminished sounds and the more traditional blues sound of the blues scale.

Check out next weeks Bass Practice Diary 30 if you want to look more at some of the diminished blues licks I’m playing here.

"<yoastmark