Tag Archives: bass lesson

Minor Scales on Bass Guitar – Bass Practice Diary 92

Minor Scales – Melodic Minor, Harmonic Minor, Natural Minor & Dorian – Bass Practice Diary – 21st January 2020

If I ask you to play a C minor scale, what do you play? Minor scales are not as simple as major scales. Most of us know what to play if someone asks us to play a C major scale, but minor scales are confusing. There are several different minor scales, and how do you know which one to play and when.

How many different minor scales are there?

If you’re going to understand minor scales, then it’s important to understand the difference between three different scales, melodic minor, harmonic minor and natural minor. Every scale is a sequence of intervals, and for each of these three scales the intervals are the same for the first five notes. It’s the 6th and 7th notes of the scales that contain the variations.

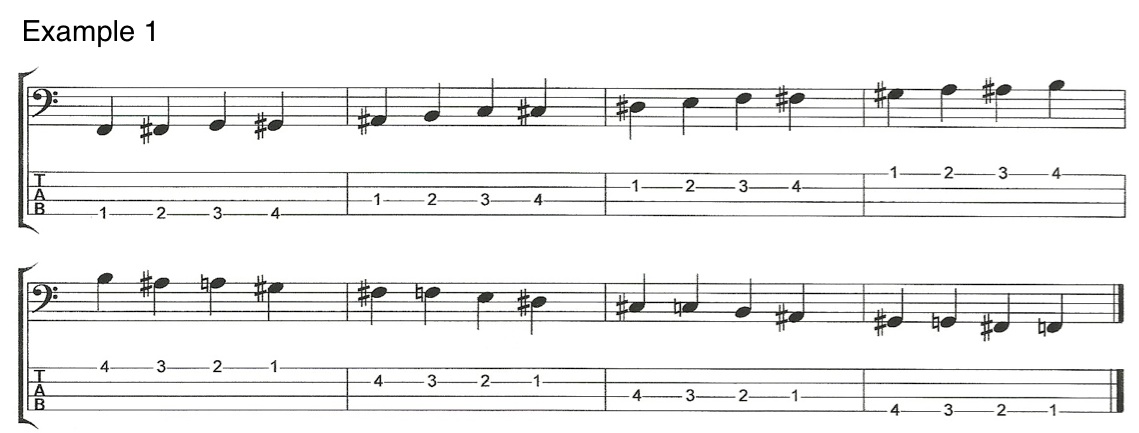
The terminology of minor scales confuses people for the simple reason that classical musicians treat minor scales differently from jazz musicians. To help explain this I’m going to start by looking at the natural minor and the melodic minor scales. I’ll use the key of A minor because it’s the simplest, it has no sharps or flats, so the natural minor scale contains the notes A, B, C, D, E, F & G.

Minor Scales - A Natural Minor
A natural minor scale

The A natural minor scale contains all of the same notes as a C major scale. That means that the natural minor scale is actually a mode of the major scale. It’s mode six, called Aeolian. Now, compare that to the melodic minor scale.

The melodic minor scale

Minor Scales - Melodic Minor
A melodic minor scale

The melodic minor scale has a raised 6th and 7th, meaning F# instead of F natural and G# instead of G natural. It’s important to understand that the melodic minor scale is not a mode of the major scale like the natural minor. It’s a parent scale and has seven modes of it’s own. You can check out my video about the modes of the melodic minor scale.

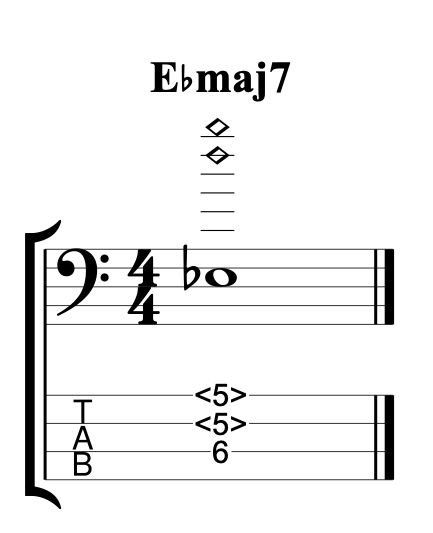
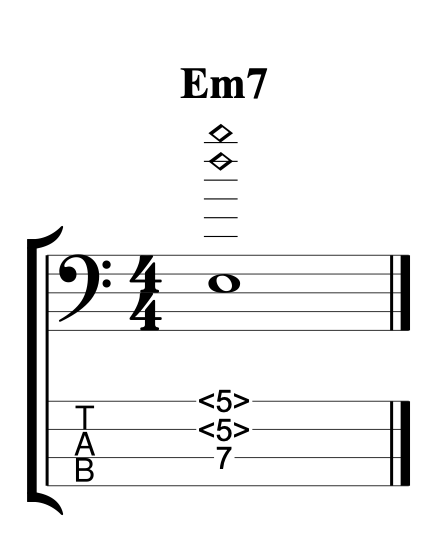
So, the natural minor scale is mode six of the major scale and the melodic minor is a scale with it’s own set of modes. So, not only do these scales sound different, they are also very different in their application. The natural minor scale implies a minor 7th chord functioning as chord VI in a major key, while the melodic minor implies a minor chord with a major 7th functioning as chord I in a minor key.

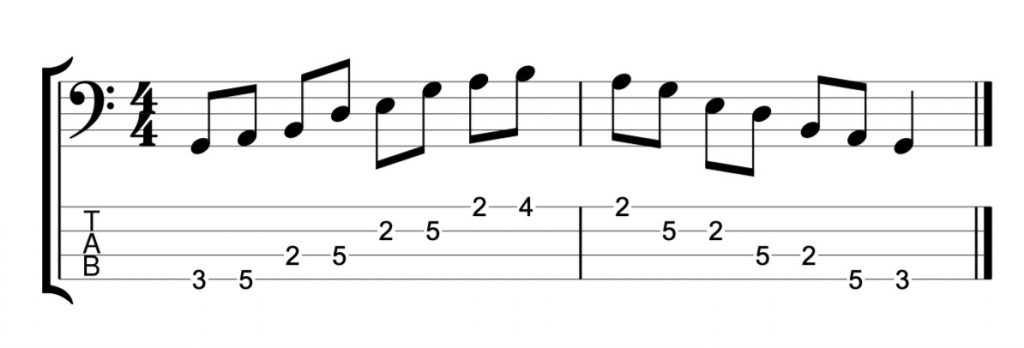
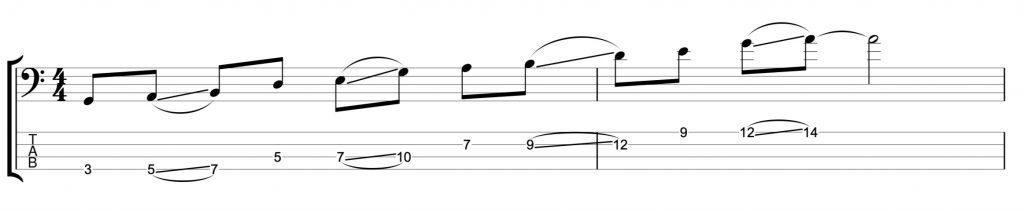
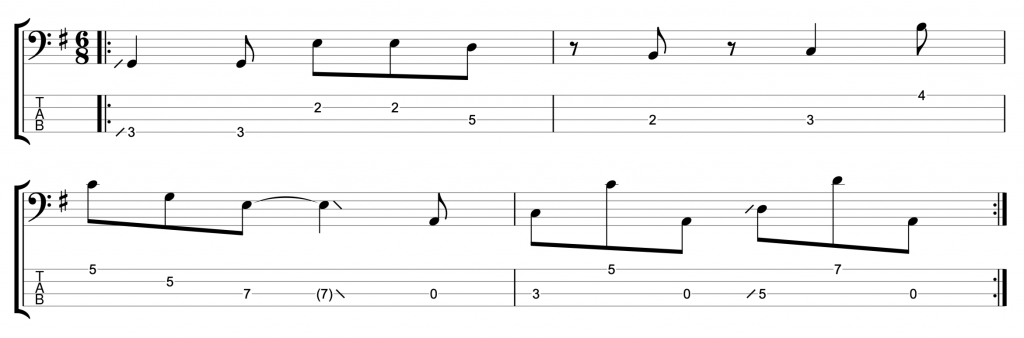
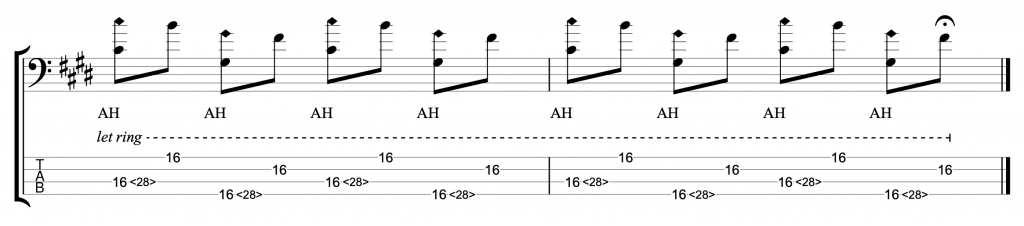
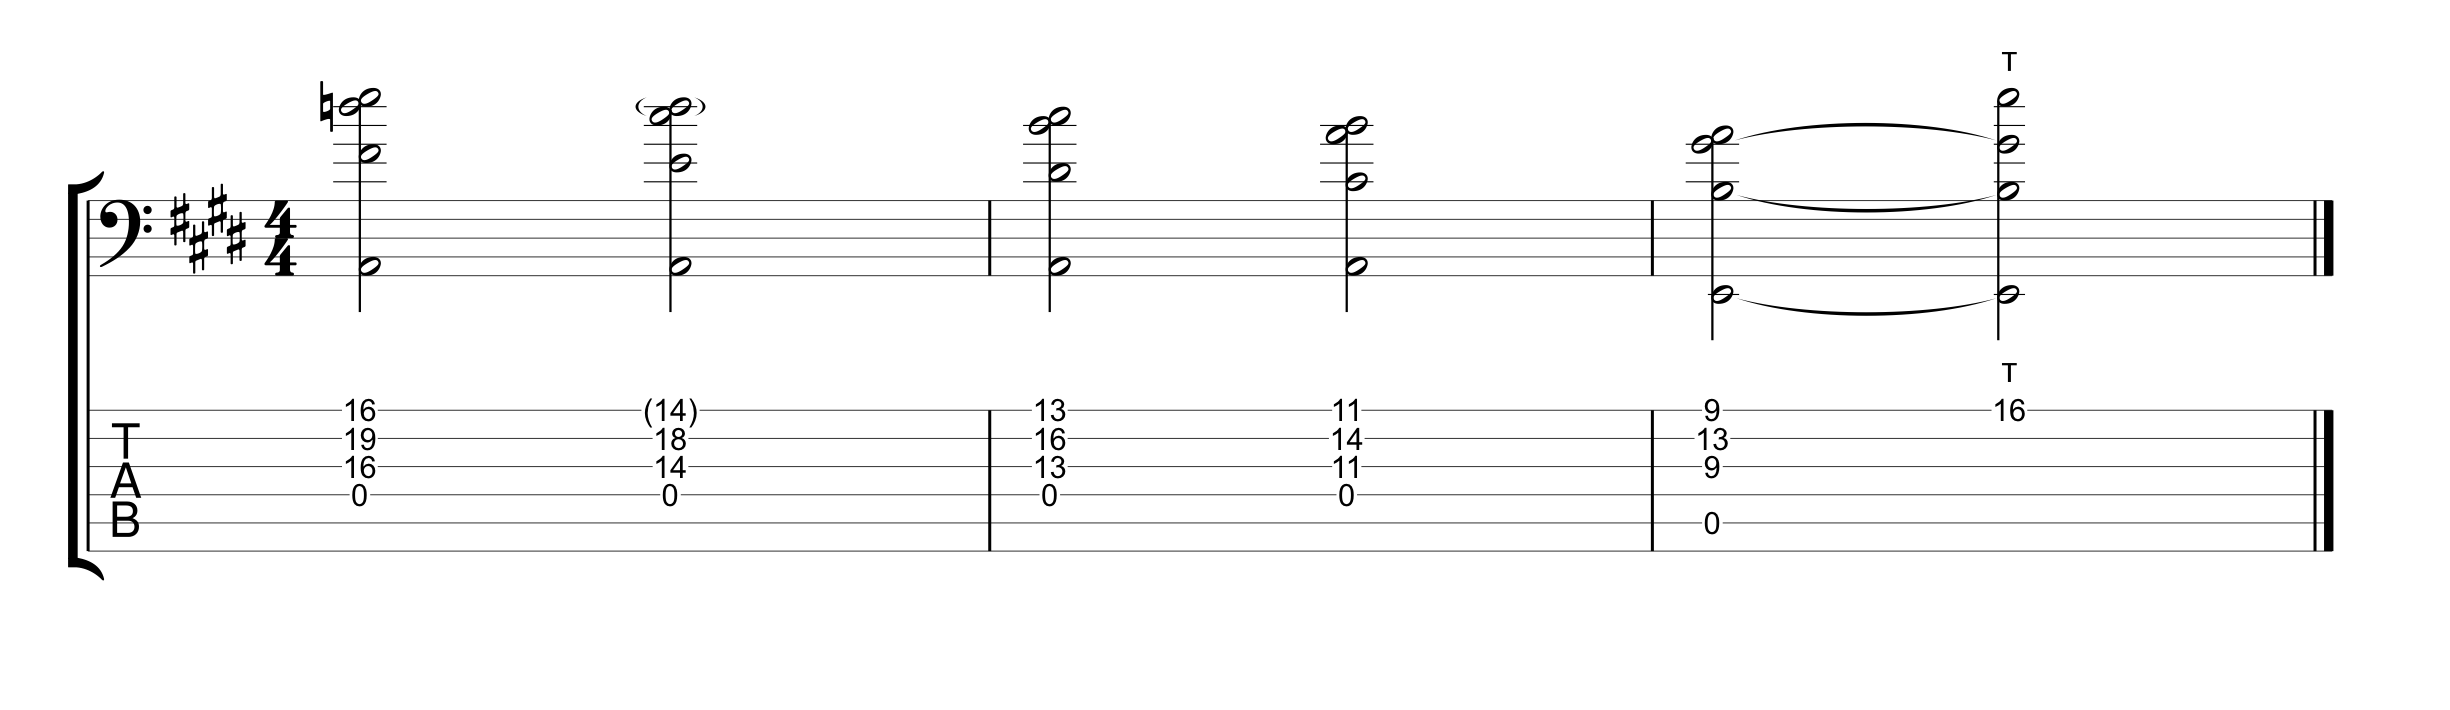
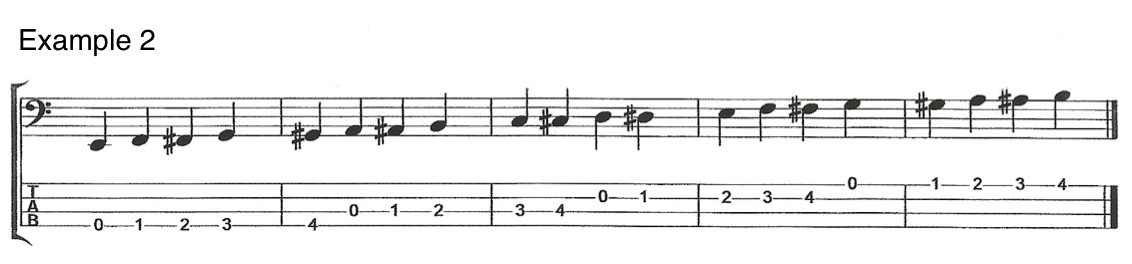
This becomes more confusing when you learn that classical music treats both these scales as one scale. The melodic minor is the ascending version of the scale, and the natural minor is the descending version of the scale. And together these are called the melodic minor. You can play it on the bass like this.

Minor Scales - Classical Melodic Minor
Classical Melodic Minor Scale

The harmonic minor scale

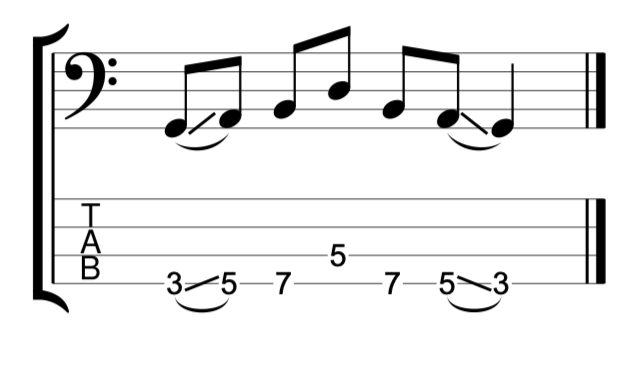
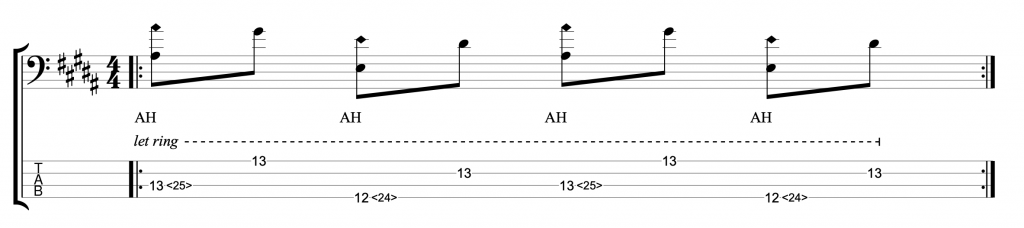
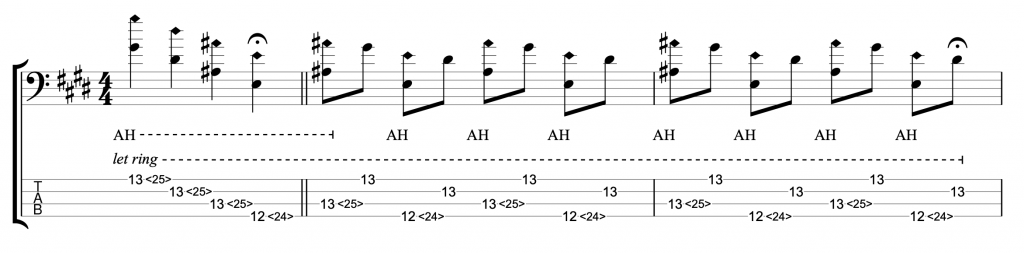
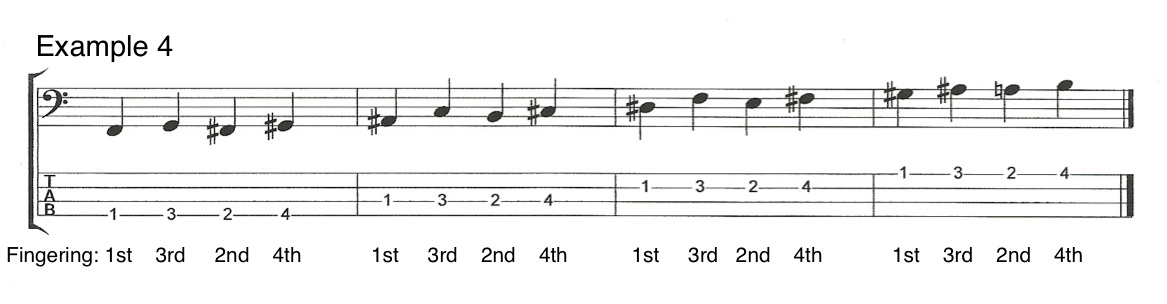
There is another minor scale, which, like the melodic minor, is a parent scale to seven of it’s own modes. It’s called the harmonic minor and it has a minor 6th and a major 7th. That means that in the key of A minor, the 6th will be an F natural and the 7th will be a G#.

Minor Scales - Harmonic minor
A harmonic minor scale

The harmonic minor scale can also imply chord I in a minor key.

The Dorian Mode

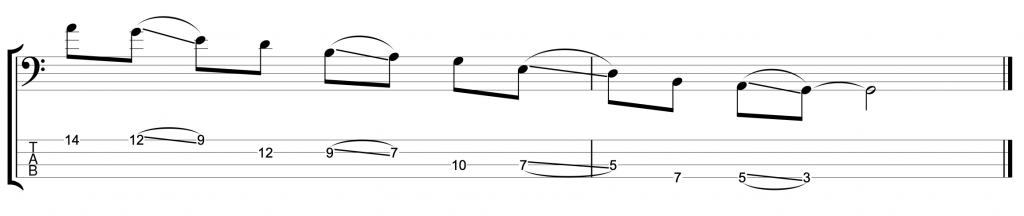
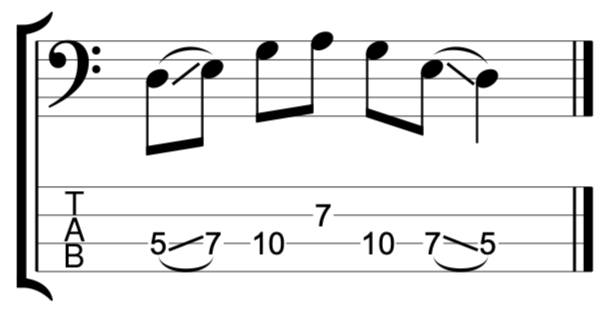
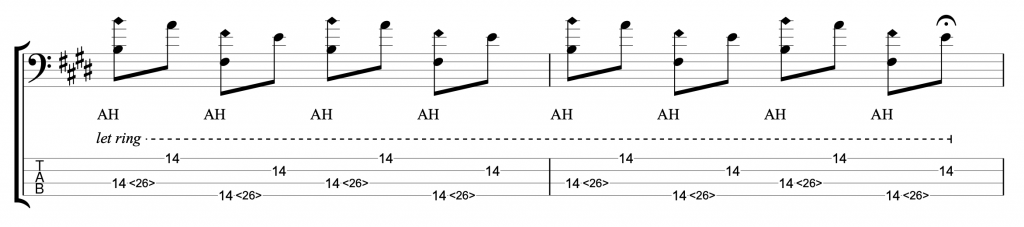
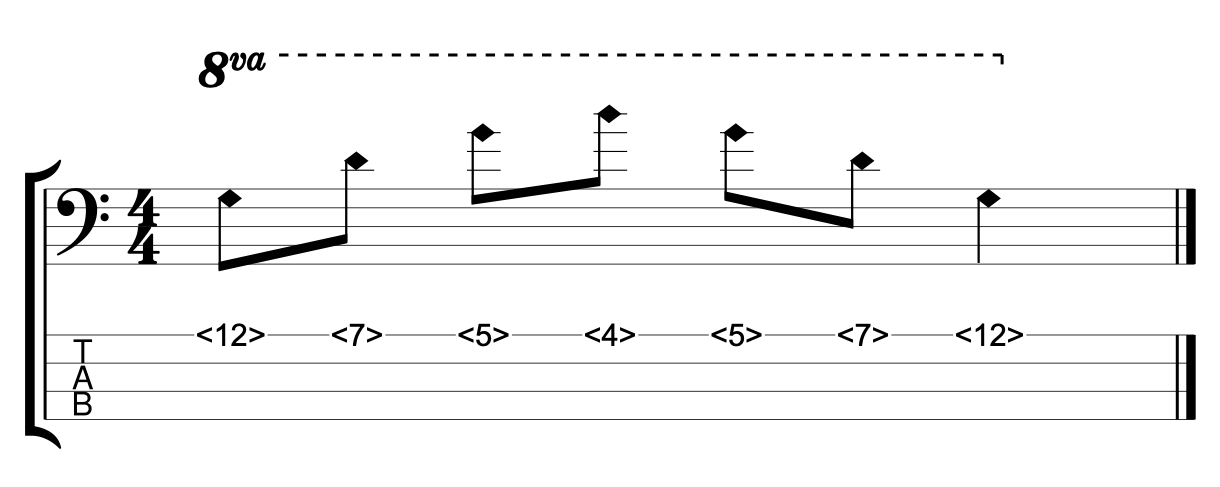
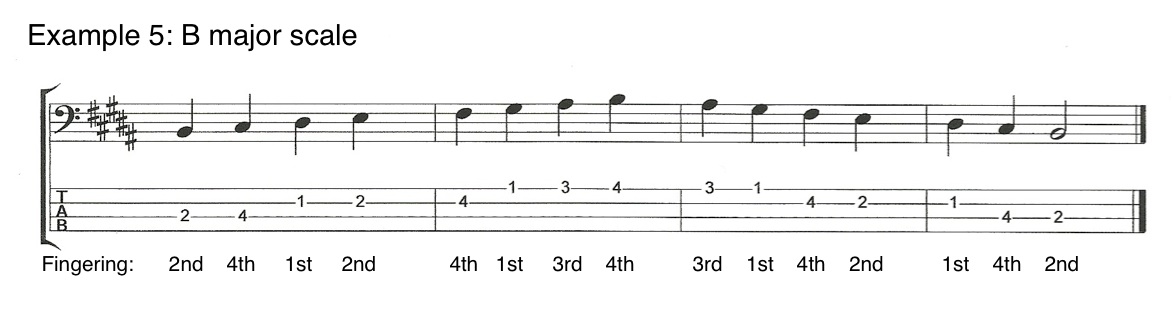
I’ve included a fourth scale in my video. The dorian scale is another mode of the major scale, mode number two. The reason I’ve included it is because it’s a much more common choice of scale for improvisers playing on minor 7th chords than the natural minor scale. However, you wouldn’t use an A dorian scale to play on chord I in the key of A minor. You would use it to play on an A minor 7th chord functioning as chord II in G major. It goes like this.

dorian
A dorian scale

The A dorian scale contains a major 6th F# and the minor 7th G natural.

Jazz Chord Progressions – Part 2 – I III7 IV V – Bass Practice Diary 77

Jazz Chord Progressions on 6 String Bass – Part 2 – Bass Practice Diary – 8th October 2019

Here’s Part 2 of the video I started last week about playing jazz chord progressions on six string bass. Last week I was looking at the chord progression I III IV V. And I came up with some diatonic voicings on my six string bass to take me through that progression in a few different keys. This week I’m including some common and simple chord alterations that you can add, to make that chord progression sound more interesting.

I – III7 – IV – V

I mentioned last week that there are two common ways to play through the I III IV V progression. The first is with a minor 7th chord on chord III. Which is the correct voicing if you harmonise all the chords according to the major scale of the key you’re in (diatonic harmony). But there is a common jazz alteration, which is to play the III chord as a dominant 7th chord. Listen to the opening chords on the melody of the jazz standard Someday My Prince Will Come and you’ll recognise that sound.

Here is how I would play that chord progression in the key of E on a six string bass.

I III7 IV V Chord Progression on Six String Bass

You’ll notice that I’ve included either extensions or alterations on each voicing except the very first one. The first chord is E major 7th, which I’ve voiced like this.

There is one obvious alteration that I could make to this chord, which would be a sharpened 4th (commonly referred to as 11th). That chord alteration would change the sound of Chord I to a Lydian sound. The chord would look like this.

Chord III7 and IV

In the example in the video I’ve played the III chord as G#7b13, like this.

But it’s important to understand that it isn’t the b13 note which is the outside note in this key. The G#7 chord is already a chord substitution because the major 3rd, C (or B#) isn’t in the key of E major. The b13 note is actually the note E, which obviously is in the key of E major.

The IV chord I’ve played like this.

The inclusion of the #11 here is a normal diatonic note to play on a IV chord in a major key. A simple chord substitution here would be to play F# minor 7th instead of A major.

Chords V and I

The V chord is where you can really have some fun with extensions and alterations. In my example I’ve used a B7b13 voicing.

But you can also alter the 9th by sharpening or flattening it.

And you can even alter the 5th by flattening it as well. These kind of altered dominant sounds would often be used as chord V in a minor key. Chord V in a major key would be more conventionally played without alterations, such as B9 or B13.

But I really like the use of the b13 in this case, especially because I’ve voiced the final I chord as E major 9th with the ninth at the top.

So those two chords, B7b13 – Emaj9, create a little chromatic melodic movement. The b13 on the B chord is the note G, which drops onto the F# which is the 9th of the E major chord. It could also go chromatically up onto G# which would be the major 3rd of the E major chord. These are chromatic approach notes which are a common melodic device used in jazz.

Keep following my weekly practice diary on Johnny Cox Music for many more videos about jazz chord progressions coming up soon.

How to Practice Sliding Notes on a Fretless Bass – Bass Practice Diary 40

Sliding Notes on a Fretless Bass – Bass Practice Diary – 22nd January 2019

Sliding between notes is an integral part of phrasing on a fretless bass. This video features an exercise to help you practice sliding accurately between notes by using the pentatonic scale.

When you slide between notes on a fretless bass, the first thing that you need to concentrate on, is keeping the notes in tune. When you slide, it’s very easy to slide too far and go sharp, or not quite far enough and the note will be flat. So my first advice is to start slowly and use a backing track.

Backing tracks are very easy to find for free on Youtube. Here is an example of a backing track in G major that you could use to help you practice this exercise. When you practice with a backing track it’s so much easier to hear when you go a little bit out of tune.

Use the Pentatonic Scale to Practice Sliding Notes on Fretless Bass

The easiest way to play a pentatonic scale is by playing two notes on each string like this.

G major pentatonic – two notes per string

The reason it’s easy is because it doesn’t involve any position shifts. But it offers very little opportunity to slide between notes.

In order to incorporate slides, you need to keep shifting position, which involves playing at least three notes per string like this.

Sliding Notes with 1st Finger in G major Ascending
Sliding Notes with 1st Finger in G major Descending

You can also practice this on a fretted bass. It’s easier on a fretted bass because you don’t need to be as accurate. But position shifting is an important skill for any bass player to practice.

The idea of the exercise is that you always slide with your 1st finger (index finger). Playing three notes on each string, you play the first of the three notes with your 1st finger and then slide up to the second note. You can play the third note on each string with either your third finger or little finger.

Slide Notes With Any Finger

It’s easiest to use your 1st finger to slide. But you want to be able to slide accurately with all of the fingers on your left hand. So come up with your own variations of this exercise and use different fingers to play the slides. Here’s a variation that I demonstrated in the video which uses your 4th finger (little finger) to play the slides.

Sliding Notes with 4th Finger in G major Ascending

Another variation that I demonstrated in the video, is to break the exercise down into small sections. Don’t feel like you need to practice the whole scale all at once. Work on each position shift one at a time. Like this.

I think that practicing like this actually replicates what you will play in a real musical situation better than playing the whole scale all at once. You could use the example above as a fretless bass fill on a G major chord. And the example below which starts on a D could also be a fill when you’re playing in the key of G.

Just like any scale exercise, don’t forget to practice this exercise in different positions and different keys. And try to adapt the idea of sliding and position shifting to any other scales, arpeggios or technical exercises that you practice.

Learn a Fretless Bass Groove with Bass TAB – Bass Practice Diary 39

Fretless Bass Groove with Bass TAB – Bass Practice Diary – 15th January 2019

This week during my bass practice, I’ve been composing bass grooves in 6/8. This video features one fretless bass groove that I’ve written. I choose to feature this one because it fits nicely on 4, 5 or 6 string bass. So hopefully all bass players will be able to have a go at playing it.

Fretless Bass Groove

The bassline is in G major. I’ve written some phrasing, by marking some of the slides on the TAB. But my advice is to focus on the rhythm more than the phrasing.

Once you’ve got the rhythm of the groove, I think you’ll find that the phrasing comes quite naturally. And I don’t mind if you phrase it differently to me. I think phrasing is very personal and I rarely try to imitate another musicians phrasing too closely.

Start by practicing slowly. The full speed is 110BPM and I’ve included a slower version at 70BPM. But I would probably advise starting even slower than that. And make sure that the rhythm is accurate. The rhythm in bar two is particularly tricky. It’s like playing on all of the off beats in a bar of 3/4, but the feel is still 6/8.

Six Eight (6/8) Time Signature

I’ve written before that 6/8 is one of my favourite meters to play in. You can find my guide to playing 6/8 basslines here. I’ve also written about 6/8 in my upcoming book for Fundamental Changes which will be published this year.

A Guide to Harmonics on Bass – Part 2: Artificial Harmonics – Bass Practice Diary 38

Learn to Play Artificial Harmonics

Artificial Harmonics – Play Harmonics on Bass Guitar – Part 2 – Bass Practice Diary – 8th January 2019

This is part two of my complete guide to playing harmonics on bass. This week I’m looking at artificial harmonics (find part one about natural harmonics video here).

The term artificial harmonics relates to various techniques where you use your right hand alone to play the harmonics. Artificial harmonics are more difficult to achieve than natural harmonics because you need to do two things at the same time with your right hand. In this post I’m going to look at three different techniques.

The Jaco Pastorius Technique

Many bass players, myself included, discovered artificial harmonics through listening to Jaco Pastorius. I remember as a teenager listening to Weather Report’s tune Birdland and wondering how the introduction could possibly be played on a bass. I was already familiar with natural harmonics. But Jaco seemed to be playing melodies and bending notes with the fluency of a guitar player.

The secret was, that he was using his right-hand thumb to touch the strings lightly, while his right-hand fingers were plucking the notes. And, at the same time, he was fretting notes with his left hand and imitating the phrasing of a guitarist bending strings by sliding the notes on his fretless bass. A lot of things going on at the same time!

It was Jaco’s technique that I was trying to copy when I first started playing artificial harmonics. But that was only until I found a technique which I found worked much better for me and the way I wanted to play. I haven’t used the Jaco technique in well over 10 years now.

The Steve Bailey Technique

After hearing Jaco, the first time that I saw a bass player doing something significantly different with artificial harmonics was on a DVD called Bass Extremes Live.

I’m sure many of you are already familiar with Victor Wooten and Steve Bailey’s incredible bass duets. But at the time I first saw that film, I knew all about Victor Wooten, but I didn’t know Steve Bailey.

Steve Bailey was making incredible arrangements using artificial harmonics on a six string fretless bass. He was playing chords using bass notes and harmonics played simultaneously, which seemed impossible, even to someone who was already well familiar with Jaco Pastorius’ repertoire.

The Steve Bailey technique involves straightening your index finger on your right hand. And using it to lightly touch the string. Then you can use your third finger to pluck the string at the same time. Meanwhile, your right-hand thumb can be used to play bass notes.

Once I’d learned this technique I never went back to the Jaco technique. Because I found that I could play everything that I was doing before with the Steve Bailey technique but I could also play chords using artificial harmonics. I don’t want to get into a debate about which technique is better or worse. We’re all individuals and Jaco’s technique worked for Jaco and Steve Bailey’s technique works for him. And personally I’ve found that Steve Bailey’s technique works for me as well.

My Own Experiments with Artificial Harmonics

Recently I made a video which I called Improvisation on Three Basses. The idea for that video came because I was playing the chords of Miles Davis’ tune Flamenco Sketches using an artificial harmonics technique that I’ve seen used by guitarists like Ted Greene and Tommy Emmanuel. But I’ve never seen it used by a bass player.

I was wondering if I could adapt it to playing chords on a bass guitar. So I tried out playing one of my favourite chord progressions. I was amazed by how well it worked. And it led me to wonder why I haven’t seen it done before.

The technique involves using your index finger to touch the string. Then plucking the same string with your thumb and then using your third finger to play notes on other strings.

Here is the exercise that I wrote and played in the video using this technique.

Artificial Harmonics Exercise

This is an extended version of the same idea. It uses a chord progression that starts with an Emaj7#11 then F#m11 and G#m11.

Artificial Harmonics Chord Progression

A Guide to Harmonics on Bass – Part 1: Natural Harmonics – Bass Practice Diary 34

Play Harmonics on Bass Guitar – Part 1: Natural Harmonics – Bass Practice Diary – 11th December 2018

I use harmonics a lot in my bass arrangements, so I thought I’d do a complete guide to playing harmonics on bass. It’s too much information for just one video, so I’ve split it into two parts, natural harmonics and artificial harmonics. This video contains everything you need to know about natural harmonics on bass. Including the harmonic series and advice for making chord voicing using harmonics.

Natural Harmonics

I should start by saying that I’m not a big fan of the terms natural and artificial harmonics. To me, they are all just harmonics, they follow the same rules and principles. The distinction is that natural harmonics are created from open strings, whereas artificial harmonics are created from notes that are fretted with the left hand. Calling them natural or artificial makes as much sense as calling notes played on open strings ‘natural notes’ and notes fretted with the left hand ‘artificial notes’.

There is nothing artificial about artificial harmonics, all harmonics exist naturally. However, there is a difference in the techniques that you use to play natural verses artificial harmonics, which I will look at across these two videos. So, I’ll continue to use the terms, natural and artificial, even though I’m not sure they’re ideal.

So, natural harmonics are created by touching the open strings very lightly with your left hand and then plucking the string as normal with your right hand. For the harmonic to be clear, you must avoid the string making contact with any fret, and you should remove both hands from the string immediately after plucking with your right hand. The string should be left to ring as if it were an open string. The difference is that the note you will hear will be much higher than the open string.

The Harmonic Series (Overtone Series)

In order to properly understand and use harmonics, you must first become familiar with the harmonic series. The harmonic series is a sequence of tones that make up a musical note. Musical notes are not simple sound waves. In fact they’re very complex and they comprise a whole sequence of overtones that we call the harmonic series. We can explore this sequence on our basses by playing harmonics.

The harmonic series is, in theory at least, infinite. So it’s impossible to learn or play the entire harmonic series. As you go further up the series, the harmonics become harder and harder to hear and to find on your bass string. So, I’m only really interested in the first few notes of the series.

The series always starts at the exact half way point of the string. This means the halfway point between the nut and the bridge. On your bass, the halfway point is marked by the twelfth fret. You will always find a harmonic at the halfway point of any string that is pulled tight between two points. It doesn’t matter what note you tune the string to and it doesn’t matter what instrument you are playing. The harmonic at the twelfth fret will produce a note that is exactly one octave above the open string.

So, the harmonic series starts with an octave and then is goes up a fifth and then to another octave. This will be a note two octaves above the open string. These harmonics will both occur in two different places on each string. One on the left side of the centre of the string, and one in the same position on the right side of the centre.

The next note in the sequence is a major 3rd above the previous note. So the harmonic series up to this point gives us a kind of major arpeggio.

Natural Harmonics - Harmonic Series on G
Natural Harmonics – Harmonic Series on G

Here is the sequence written out on the first string of a four string bass. So, the sequence is written in G. The sequence goes, G, D, G, B.

Creating Chord Voicings with Harmonics

The same major arpeggio pattern will repeat itself on any open string, Root, 5th, Root, 3rd. Which makes it fairly simple to work out what notes you’re playing when you play these harmonics.

Once you know what the notes are, you can start to combine natural harmonics and normal fretted bass notes to create chord voicings. I gave two examples in the video, both using the harmonics D and G played on the fifth fret of the first and second strings.

When you add the root note Eb to the harmonics D and G it creates an Eb major 7th chord. G is the major third and D is the major seventh. I’ve done that by fretting the Eb on the 6th fret of the third string, but there are other ways you could play this chord. If you change the root note to E, you get an E minor 7th chord. The G and D become the minor 3rd and 7th.

Ebmaj7 Voiced Using Natural Harmonics

Em7 Voiced Using Natural Harmonics

Hammer Ons and Pull Offs on Bass – Left Hand Technique Lesson – Bass Practice Diary 32

Hammer Ons and Pull Offs – Left Hand Technique Lesson – Bass Practice Diary – 27 November 2018

Someone asked me recently to do a video with some Hammer Ons and Pull Offs exercises. I don’t usually do videos based on suggestions, but this time I thought it was a good idea. Because practising Hammer Ons and Pull Offs is a great way to improve your Left Hand Technique.

Having said that, I believe that there are a few basic things that you need to get right if you are going to improve your technique by practicing hammer ons and pull offs.

Left Hand Techniques

The first thing is to come up with exercises that use four fingers on your left hand. If you want to play with good technique in your left hand then you need to be able to play evenly between all of your fingers.

I see so many beginner and intermediate bass players favouring certain fingers and trying to avoid other fingers on their left hand. It’s very natural to play like that because when you start, everyone has stronger index and middle fingers than ring finger and little finger. But that’s the reason you practice left hand techniques, in order to overcome that.

If you play hammer ons and pull offs using the same two fingers every time, then you are actually making your left hand technique more uneven when you practice.

So, Rule One of left hand technique is practice with four fingers. The only exception to this is when you are specifically working on strengthening a weak finger. As I demonstrated in the video with my third finger.

Hammer Ons

The second thing that you need to get right is, when you hammer on, you need to hammer on to the fret and not in between two frets. For example, if you want to play the fifth fret on the first string, you need to hammer onto the fifth fret, not in between the fourth and fifth fret.

You need to be very accurate because if you go even a little bit in front of the fret, you will lose the note. The sound is created by striking the string against the fret. So, if you don’t hammer on accurately then the sound will be weak and quiet.

Many bass players struggle with this because they don’t spread out their fingers on the left hand. If you play with your fingers too close together, you won’t be able to reach the frets with your third and fourth fingers and your hammer ons will be weak.

So, Rule Two is spread you fingers wide and hammer on accurately onto the frets.

Pull Offs

The pull off technique is a bit easier. But make sure you don’t just lift your fingers off the strings. You need to excerpt a gentle pull on the string as you pull off. If you don’t, the notes will die out as you repeat the exercises. If you pull too hard, the notes will sound uneven as your pull offs will be much louder than your hammer ons.

When you get the pull off technique right, you should be able to keep all of these exercises going continuously without needing to play any notes with your right hand. The pull off technique is easiest to execute on the first string.

So, Rule Three is practice these exercises on all strings, not just on the first string.

The Hammer On and Pull Off Exercises with Bass TAB

This is the first exercise that I played in the video.

Hammer Ons and Pull Offs Example 1

I would recommend that you don’t spend too much time playing the same exercise the same way. You should keep coming up with your own little variations. And try to focus on the things that you find difficult.

If you practice the same exercise too much, you will become very good at playing that one exercise. But if you keep varying the exercise you will eventually become very good at the technique, which is what you want.

Here is the second exercise from the video.

Hammer Ons and Pull Offs Example 2

In this example you keep your first finger held down continuously. Now here is a variation in which you hold your second finger down continuously.

Hammer Ons and Pull Offs Example 3

Make sure you hold your second finger down on a string that you’re not using. Because you won’t be able to pull off with your first finger if your second finger is held down on the string you’re playing. You can vary this exercise again by holding down your third and then fourth fingers. It gets harder each time.

Rule Four

Rule four is the most important rule, and it should apply to everything you practice. The rule is, focus on timing and not speed. Use a drum beat or a metronome and practice everything you do by playing in time.

Hammer ons and pull offs are relatively easy to play fast, but they’re much harder to play in time, and it’s hard to get all the notes to sound even. So my best recommendation is start slow, play in time, make it even and then gradually increase the tempo.


Suspended and Major Chord Voicings – Bass Practice Diary 15

Suspended and Major Chord Voicings – Bass Practice Diary – 31st July 2018

This week I’ve been looking for new and interesting chord voicings on my 6-string bass. Suspended chords tend to create a modern sound and I’ve demonstrated one particular voicing that I like and has proved to be quite versatile.

When I found this particular voicing I started moving it around to different positions and playing it over open strings, which created other chords, mostly major chords. What you see in the video is me improvising using this chord voicing.

It isn’t particularly structured practice, but that’s ok, because sometimes when you’re practising an impulse takes over and you just play for fun. That’s what’s happening in this video. And as soon as I’d shot the video, I pulled out my fretless Warwick Thumb SC to play a bit of melodic improvisation over the top.

If you’re interested in that kind of melodic improvising with fretless bass then check out these two recent posts. Use Fretless Bass to Play Jazz Solos and Melodies and Charlie Parker Tunes on Fretless Bass Guitar.

What Are Suspended Chords?

Suspended chords or sus chords are chords that omit a third in favour of using either the second or fourth or both. The absence of a third makes the chords neither major or minor. It’s the third that defines whether a chord is major or minor. And sus chords have a neutral sound as a result of not having a third. Listen to Herbie Hancock’s Maiden Voyage for an example of the suspended chord sound being used in jazz.

The chord symbol for a C suspended chord can be written as Csus. I sometimes see it written as C11. I don’t like the 11 chord symbol because, although a 4th is the same as an 11th, the 11 chord symbol implies to me the presence of a third, dominant seventh and a ninth. So the sus symbol is more accurate.

Csus2 is C, D and G (root, 2nd, 5th), Csus4 is C, F and G (root, 4th, 5th). You can think of C7sus as Bb/C. The Bb, D and F from the Bb major triad function as the dominant 7th, 2nd and 4th and create a suspended sound when you play them over a C root note. You could also call the same chord C9sus because the 2nd and 9th are interchangeable in the same way that the 4th and 11th are.

The Opening Chord Sequence

Suspended and Major Chord Voicings Opening Sequence

The opening sequence in the video is played over an open A string until the final chord which is played over an open E. All of the voicings are built by playing an interval of a sixth between the D and G strings, and an interval of a second between the G and C strings. Try making your own chords using the same voicings. You can adapt them onto four and five string basses by playing over the open E string and voicing the chords on the A, D and G strings.

Due to the improvised nature of my performance in the video, many of these chords are no longer sus chords. Many of them are major chords. What started off as an exercise in finding suspended chord voicings became an improvisation using the same chord voicing against open strings.

The Chord Theory

The first chord in the opening sequence is a suspended chord, but the second has a major sound. It contains a C#. Which is the major 3rd of A. If you listen carefully in the video I don’t play the top note on the second chord. It would have been a D. I was improvising and I’ve no idea what I was thinking in the moment. But I may have thought that C# and D would clash, being a semi-tone apart. In hindsight I slightly regret this. Conventional jazz theory says don’t include a major 3rd and natural 11th in the same chord voicing. But I think it works in this context. So I’ve included the note in the TAB even though it’s not in the video.

The third chord creates a lydian sound with the sharp 11th D# and major 3rd C#. You can check out my video on lydian sounds by clicking here. The fourth chord creates a straightforward A major sound with an added 9th. And the final chord creates an E major/Esus sound. Again, I’ve included the major 3rd and natural 11th, which I think sounds cool. Even though the two notes clash if you play them simultaneously. Notice that I’ve finger picked each note individually to cut down on the impact of such clashes. The final note that I’ve included is tapped with my right hand index finger.

The Closing Sequence

The closing sequence simply uses the last two chords of the opening sequence and repeats them. I hope you have some fun with these chord voicings and you’re able to come up with some original chords.


Everything You Need to Know About Harmony on Bass Guitar

Everything you need to know about harmony on the bass 

Harmony is a lot simpler than most people think.

Like it or not the bass is a harmony instrument, bass lines have been around for centuries before the electric bass was invented and they’re the lowest harmony part. So Harmony and rhythm are our main functions as bass players. Rhythm is a much bigger and (in my opinion) much more interesting topic, but I wanted to make this video to show you exactly how simple harmony is.

Know the Chromatic Scale

The key to understanding harmony is first of all knowing that there are only 12 notes. Chromatic scale is simply a technical term for what you get when you play all 12 notes one after the other. If you’re not yet familiar with the chromatic scale, that is where you should start. It’s easier than learning the alphabet, there are more than twice as many letters in the alphabet than there are notes.

How Do You Avoid Playing Wrong Notes?

As bass players we usually play one note at a time. I know that you can play chords on the bass, I’ve made videos about it, but it isn’t our primary function. The term bass line implies one note at a time.

I am firmly of the opinion that there is no such thing as a wrong note. There are only 12 notes in total so if we start classifying some of these as wrong, we’re seriously limiting our options. There are inside notes and outside notes (I’ll explain these as I go on) and it’s our job as musicians to find ways of using them that makes sense musically.

Learn To Play Arpeggios!

So our job in terms of harmony is to choose which note out of the 12 we play at any one time. And the first thing that every bass player needs to know is chord tones or arpeggios. Arpeggio is just a classical term meaning all the notes of a chord played one at a time. Guitar players have chords and bass players have arpeggios. If you don’t know your arpeggios you will end up playing root notes all the time and your basslines will be boring.

How many notes in an arpeggio depends on the chord in question, but lets take an A7 chord for example. There are 4 notes (demonstrate). 4 out of 12. That’s already 1/3rd of all the notes and the chord tones are the strongest notes you can use in a harmonic situation.

What are Inside and Outside Notes?

Next is scale tones. Scales tend to have seven notes in them (not all I know, but standard major and minor scales and all their modes do). We’ve used four of them already in the arpeggio so there are three others that we can use as passing tones. These are the inside notes, notes that belong in the harmony. The remaining five notes that are not within the scale are the outside notes, you can think of these as chromatic passing notes.

So, Here’s Everything You Need to Know!

And that’s it, there are 12 notes, chord tones, scale tones and chromatic passing tones. It’s that simple. Your job is to learn what each of them sounds like, and the only way to do that is play them as much as you can. So cancel your application for that three year college course on advanced harmony and instead go forth and play your bass!

What Else is There?

Harmony and rhythm are the two biggest worlds in the language of music. And rhythm is much simpler than you might think as well, once you know how to sub-divide a beat into two, three and four. You know most of what you need to know about rhythm, but if you want more detail on rhythm you need to get my book Improve Your Groove. Here’s a link, https://geni.us/bassgroove

Enjoy!

Left Hand Techniques for Bass Guitar

Learn Left Hand Techniques on Bass Guitar

In this video lesson, I’ll teach you the best and most efficient techniques for your left hand on the bass. I’ll explain the one finger per fret technique and how you can extend the range even further by changing how you use your left hand index finger.

Use the most efficient left hand technique possible

For me practicing techniques is all about learning to play in the most efficient way possible. Whether I’m working on my left or right hand technique, I’m always trying to find the simplest way to play the notes that involves the least amount of movement in my hands. As far as I’m concerned all unnecessary movement slows me down.

One finger per fret

For my left hand I like to use the “one finger per fret” system. You can practise and master this technique by using the following exercise.

V5E1 Left Hand Techniques for BassThis is a very common exercise that bass players (and guitar players) have been using for decades. If you add the open strings to this exercise as shown in Example 2 then you can play the chromatic scale from the open E string to the B on the 4th fret of the G string without shifting position. V5E2 Left Hand Techniques for BassExample 3 shows how to practice the “one finger per fret system” on a single string, and you can practice this way on each string individually. The benefit of this exercise is that it teaches us to shift positions up and down the neck whilst maintaining good technique in our left hand. V5E3 Left Hand Techniques for BassYou can alter this exercise by changing the order of the fingering. For example instead of playing 1st, 2nd, 3rd then 4th finger you could try 1st, 3rd, 2nd, 4th as in Example 4, or any other pattern you can come up with. V5E4Scales and arpeggios played using one finger per fret

Spend some time working on the above examples until you get used to the “one finger per fret” system. Once you get used to the system, use it to practice some scales and arpeggios. They’re great for mastering left hand techniques. The following examples are just a few scales and arpeggios you can use.

V5E5 Left Hand Techniques for Bass V5E6 Left Hand Techniques for Bass V5E7 Left Hand Techniques for Bass V5E8 Left Hand Techniques for BassV5E10 Left Hand Techniques for BassTake your left hand technique a step further

If you want to take your left hand technique a step further then there is another thing you can do. As you get further up the neck of the bass the frets get closer together. Which means that the stretches needed to play “one finger per fret” get smaller.

It occurred to me that I shouldn’t restrict myself to “one finger per fret” in areas of the fingerboard where my finger span could be much greater than 4 frets. So when I get above the 5th fret of the bass I use my 1st finger to cover 2 different frets while my 2nd, 3rd & 4th fingers still play “one finger per fret”. This allows me to cover 5 frets in a single position. Which gives me access to the entire chromatic scale without having to change position.

Example 9 demonstrates how I play a Eb major scale starting on the 6th fret of the A string. In this case my 1st finger can play the 6th or 7th frets. My 2nd finger plays the 8th fret, my 3rd finger the 9th fret and my 4th finger the 10th fret.

V5E9 Left Hand Techniques for Bass

If you’d like to improve your right hand technique as well then check out this video lesson. Improve Your Right Hand Technique on Bass Guitar.