Johnny Cox & Lewis Davies – Bass and Drums Jam

Bass and Drums Jam Session

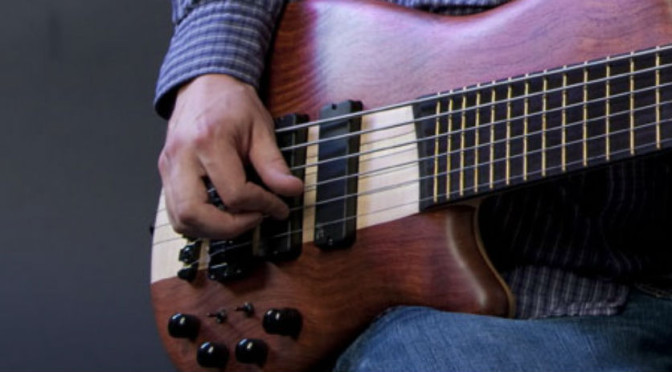
This is a video I shot with my friend Lewis Davies a few years ago. We spent the afternoon hanging out and having a jam at his studio. We recorded this to show what we came up with.

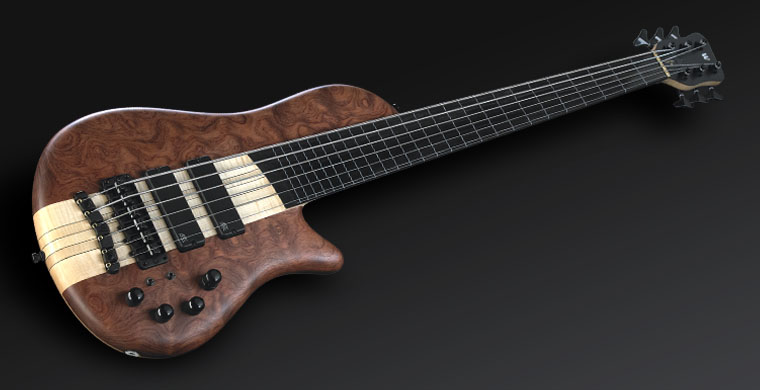
I took my Warwick “Steve Bailey” Artist Series bass and my Roland GR-55 over to my friend Lewis’ studio in South London during the summer of 2015. We spent the afternoon having a jam together and this is what we came up with. I hope you enjoy it.

Warwick Steve Bailey Artist Series Bass

You can find my video demo and written review of my 6-string Warwick Artist Series bass guitar by using this link.

https://johnnycoxmusic.com/warwick-artist-s…-bailey-6-string/

Roland GR-55 Synth Pedal

You can check out my video demos of the Roland GR-55 synth pedal along with the Roland GK-3B divided pickup by using this link.

https://johnnycoxmusic.com/roland-gr-55-war…tist-series-bass/


Johnny Cox & Siemy Di – Roland GR-55 Improvisation – Part 2

Jamming at Home Playing My Bass With a Roland GR-55 Guitar Synth

This is a video I shot at my house with my good friend Siemy Di. We didn’t prepare anything, we just turned on the camera and jammed. I’m using my Warwick “Steve Bailey” Artist Series Bass and a Roland GR-55.

Siemy Di and I have worked together since 2006 and we have a fantastic musical relationship. We were introduced when I was in my early twenties by a mentor, Lucky Ranku, leader of the African Jazz All-stars.

In the video I’m using my 6-string Warwick Artist Series Bass with a Roland GK-3B divided pickup that I installed by the bridge. I’m playing it through a Roland GR-55 guitar synth pedal. The pieces are entirely improvised.

Around the time this was filmed, Siemy Di and I were performing live regularly around East London at venues such as The Servant Jazz Quarters, The Vortex, Open The Gate and The Passing Clouds. The gigs were almost entirely improvised and we deliberately did very little preparation for each gig. Some performances were better than others but it was always great fun to play with a great musician like Siemy. This video captures a little taste of what those performances were like. Not perfect but always interesting.

Siemy Di and I are still close friends but we don’t do those gigs anymore. We both have young children now, so spending our evenings at jazz clubs is out of the question these days. Maybe one day in the future we’ll do something similar, although I imagine it will be quite different. This video captures a moment in time that was an important time for both musicians.

Check out Siemy Di’s Drumeo video here. I recorded all the bass and guitar parts for both the first and last pieces.

Johnny Cox and Siemy Di – Fretless Bass Improvisation

Jamming at Home with Siemy Di

This is a video I shot at my house with my good friend Siemy Di. We didn’t prepare anything, we just turned on the camera and jammed. I’m using my fretless Warwick Thumb SC and a loop pedal.

Siemy Di and I have worked together since 2006 and we have a fantastic musical relationship. We were introduced when I was in my early twenties by a mentor, Lucky Ranku, leader of the African Jazz All-stars.

In the video I’m using my 6-string Warwick Thumb SC and I’m playing it through a loop pedal. The piece is entirely improvised on the spot.

Around the time this was filmed, Siemy Di and I were performing live regularly around East London at venues such as The Servant Jazz Quarters, The Vortex, Open The Gate and The Passing Clouds. The gigs were almost entirely improvised and we deliberately did very little preparation for each gig. Some performances were better than others but it was always great fun to play with a great musician like Siemy. This video captures a little taste of what those performances were like. Not perfect but always interesting.

Siemy Di and I are still close friends but we don’t do those gigs anymore. We both have young children now, so spending our evenings at jazz clubs is out of the question these days. Maybe one day in the future we’ll do something similar, although I imagine it will be quite different. This video captures a moment in time that was an important time for both musicians.

Check out Siemy Di’s Drumeo video here. I recorded all the bass and guitar parts for both the first and last pieces.

Warwick Thumb SC Fretless with Warwick Hellborg Rig

Warwick Thumb SC Fretless

In this video, I’ll demonstrate my fretless Warwick Thumb Single Cut 6-string bass guitar. I’m playing one of my own compositions and the bass is being played through my Warwick Hellborg Amplifier rig, including the Hellborg preamp.

Why Fretless?

I’m a jazz musician at heart, so I love fretless bass guitars. My Warwick Thumb SC is now the only fretless bass I own, for the simple reason that it’s so good there was no point in keeping any of the others I’d owned previously. I owned two fretless basses before I purchased my Thumb SC and I sold them both on eBay within months of it arriving.

The tone of the bass is absolutely beautiful and the build quality and the quality of the wood are second to none. The body is made from Swamp Ash with a one inch Bubinga Pommele top. The neck is Flamed Maple and the fingerboard is Tigerstripe Ebony, which is a very hard wood, so even round wound strings won’t chew up the fingerboard.

It features full line inlays on the fretboard which is a custom shop option. All Warwick’s custom shop basses have their own page on their website. You can see mine by clicking on this link.

Johnny Cox’s Warwick Thumb SC 6

Why Fret Lines?

In my opinion, all fretless bass guitars should come with fret lines. I’ve never met anyone who has perfect intonation  without them. Really no one, and I’ve met many of the worlds best bassists. So, choosing not to have lines is just macho nonsense, there is no benefit to not having the lines. Jaco Pastorius had fret lines on his bass.

I’ve heard many people say, “double bass players don’t need lines on their fingerboards”. I know, and it’s not relevant because bass guitar necks are nothing like double bass necks. There are much more notes in a smaller space on a bass guitar neck which makes them almost impossible to hit accurately at high speed without markers. Also, double bass necks start narrow and get wider, so it’s much easier to feel where you are on the neck than it is on bass guitar.

In Conclusion

The Warwick Thumb SC is quite simply the best fretless bass I’ve ever played. In fact it’s the best bass I’ve ever played and that includes Fodera’s. It’s not cheap, but you get what you pay for. Don’t forget, if you want to go fretless, get the full line inlays.

Warwick Thumb SC fretless
Johnny Cox’s Warwick Thumb SC fretless


Roland GR-55 and a Warwick “Steve Bailey” Artist Series Bass

Using a Roland GR-55 Guitar Synth with a Bass

I always wanted to experiment with synth sounds on my bass. When the Roland GR-55 came out and the GK-3B divided pickup for 6-string bass. I knew I had to try it out.

This video is actually an effort from very early on in my Roland GR-55 use. However, when I listen to it now I really like it, and it’s proved popular on Youtube with nearly 20,000 views. That’s a lot for an instrumental bass video. All the sounds in the video apart from drums are made using the bass played through the Roland GR-55. I programmed the drums in Protools. You can make drum sounds with the bass and the Roland GR-55, but that doesn’t interest me so I didn’t.

For a long time I’ve wanted to try out playing my bass through a Roland guitar synth. And having looked at the Roland GR-55 I was convinced that the technology was good enough. So, I installed a Roland GK-3B divided MIDI pickup onto my new Warwick “Steve Bailey” Artist Series bass a few weeks ago and bought the GR-55. Here’s a video of what I’ve come up with so far, hopefully there will be plenty more from me using this in the near future. So far I’m extremely impressed with the potential of the GR-55 and I love the Warwick as well.

I hope you like my compositions and I hope you have as much fun watching this as I had making it!

7-string Bass Demo

7-string bass demo

This is my 7-string bass. It says Mazeti on the headstock, which doesn’t mean a lot to me. I don’t really know anything about who made it, but it seems to be custom made.

How I came to own a 7-string bass

I bought it very cheaply on eBay more than 10 years ago, and I wasn’t expecting a lot given what I paid for it. Every other 7-string bass on eBay at that time was a lot more expensive. Surprisingly, what I got was not only a nice sounding and very playable instrument, but also one that has stood the test of time. It’s still going strong and sounding great today even though it spends most of the time in my loft now.

Why did I want to sell it?

At the time I shot the video I was in the process of selling all of my non Warwick basses. I’ve always played Warwick’s as my first choice but I had basses made by Fender, Steinberger  and Gibson and I also had another custom made 7-string bass which I sold, it was fretless.

The 7-string bass you see in the video was the only bass that didn’t sell on eBay. So I decided to make the video to help give it a push. I did receive a few enquiries, but nothing that tempted me to sell. I couldn’t seem to convince people that it was a decent bass and I wasn’t that desperate for the money.

Is it still for sale?

No. I’ve since decided not to sell the 7-string bass. It’s worth more to me, than the relatively small amount of money I’d get for selling it. I haven’t taken the video down because people keep telling me how much they like the video, I never intended for the video to be particularly entertaining, I just wanted to show that it was a decent bass. But, obviously people like it so I’ve left it on Youtube.

Enjoy!

Left Hand Techniques for Bass Guitar

Learn Left Hand Techniques on Bass Guitar

In this video lesson, I’ll teach you the best and most efficient techniques for your left hand on the bass. I’ll explain the one finger per fret technique and how you can extend the range even further by changing how you use your left hand index finger.

Use the most efficient left hand technique possible

For me practicing techniques is all about learning to play in the most efficient way possible. Whether I’m working on my left or right hand technique, I’m always trying to find the simplest way to play the notes that involves the least amount of movement in my hands. As far as I’m concerned all unnecessary movement slows me down.

One finger per fret

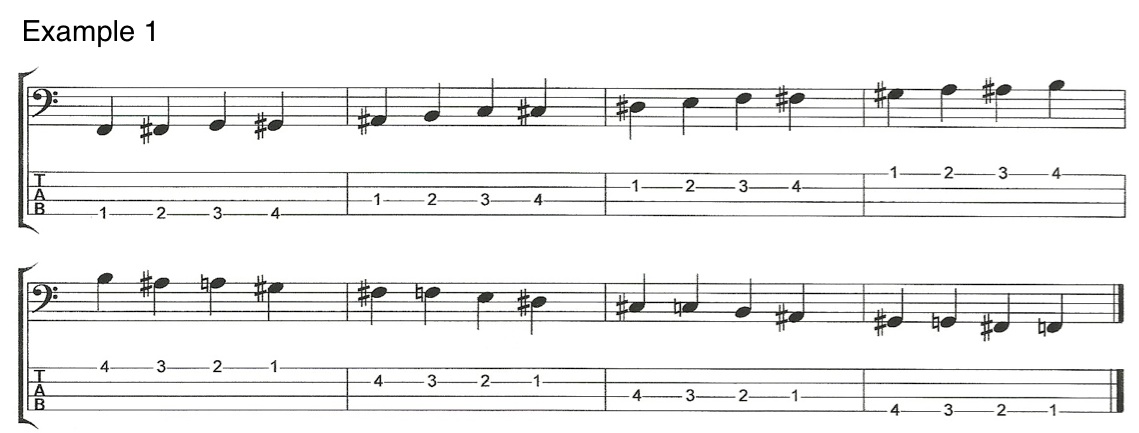
For my left hand I like to use the “one finger per fret” system. You can practise and master this technique by using the following exercise.

V5E1 Left Hand Techniques for BassThis is a very common exercise that bass players (and guitar players) have been using for decades. If you add the open strings to this exercise as shown in Example 2 then you can play the chromatic scale from the open E string to the B on the 4th fret of the G string without shifting position. V5E2 Left Hand Techniques for BassExample 3 shows how to practice the “one finger per fret system” on a single string, and you can practice this way on each string individually. The benefit of this exercise is that it teaches us to shift positions up and down the neck whilst maintaining good technique in our left hand. V5E3 Left Hand Techniques for BassYou can alter this exercise by changing the order of the fingering. For example instead of playing 1st, 2nd, 3rd then 4th finger you could try 1st, 3rd, 2nd, 4th as in Example 4, or any other pattern you can come up with. V5E4Scales and arpeggios played using one finger per fret

Spend some time working on the above examples until you get used to the “one finger per fret” system. Once you get used to the system, use it to practice some scales and arpeggios. They’re great for mastering left hand techniques. The following examples are just a few scales and arpeggios you can use.

V5E5 Left Hand Techniques for Bass V5E6 Left Hand Techniques for Bass V5E7 Left Hand Techniques for Bass V5E8 Left Hand Techniques for BassV5E10 Left Hand Techniques for BassTake your left hand technique a step further

If you want to take your left hand technique a step further then there is another thing you can do. As you get further up the neck of the bass the frets get closer together. Which means that the stretches needed to play “one finger per fret” get smaller.

It occurred to me that I shouldn’t restrict myself to “one finger per fret” in areas of the fingerboard where my finger span could be much greater than 4 frets. So when I get above the 5th fret of the bass I use my 1st finger to cover 2 different frets while my 2nd, 3rd & 4th fingers still play “one finger per fret”. This allows me to cover 5 frets in a single position. Which gives me access to the entire chromatic scale without having to change position.

Example 9 demonstrates how I play a Eb major scale starting on the 6th fret of the A string. In this case my 1st finger can play the 6th or 7th frets. My 2nd finger plays the 8th fret, my 3rd finger the 9th fret and my 4th finger the 10th fret.

V5E9 Left Hand Techniques for Bass

If you’d like to improve your right hand technique as well then check out this video lesson. Improve Your Right Hand Technique on Bass Guitar.


Playing Chords on the Bass – Part 4 – Chord Extensions

In Part 4 we’re going to look at chord extensions.

In this video lesson you’re going to learn how to play chords with chord extensions on the bass.  I’ll also explain what notes you can leave out and why, in order to make your chords sound more interesting.

What are chord extensions?

Extended harmony is where chords get a lot more interesting sounding but it’s also where the theory gets more complicated. Chord extensions are notes that we can add to basic chords like triads. Having established how to play triads in Part 3, we can now look at adding chord extensions to them.

The most common chord extension by far is the seventh. In Part 3 we looked at how triads are made up of a root, a third and a fifth. And there is an interval of a third between each of these notes. In order to make a triad into a seventh chord we just continue this pattern of stacking intervals of a third. We add a note that is a third above the fifth and we call this note the seventh. Seventh chords have four notes in them root, third, fifth and seventh.

Four types of seventh chords

If you watched my video about “Intervals” then you’ll know that there are two types of sevenths, major and minor just like there are major and minor thirds. Fifths however are not major or minor and so the fifth is the same in both major and minor chords. For this reason, it’s the third and seventh notes of each chord that define what type of chord it is.

For example if you have a chord with a major third and a major seventh in it, it’s called a major seventh chord and a chord with a minor third and a minor seventh is called a minor seventh chord. The word used to describe a chord that has a major third and a minor seventh in it is “dominant” and dominant seventh chords are very common.

The chord symbol for a dominant seventh chord is just the number 7 (eg. G7, A7, C7 etc.) minor seventh chords are written m7 (eg. Gm7, Am7, Cm7 etc.) and major seventh chords can be written a number of ways such as with a small triangle or sometimes with an upper case M, but most commonly they are written maj7 (eg. Gmaj7, Amaj7, Cmaj7 etc.)

These three types of seventh chords are by far the most common but there are others that I’ve also listed at the end of Example 1. For example, a chord with a minor third and a major seventh is called minor with a major seventh (min/maj7).

What notes can you leave out?

When we play extended chords we usually can’t play all the notes within the chord because we only have a finite number of strings on the bass. The more chord extensions we have means the more options we have, but it also means the more decisions we have to make in terms of what notes to leave out. In the case of seventh chords the decision is simple, I’ve already mentioned that the fifth is the same for major and minor chords so the fifth doesn’t fulfill a very important function in the chord (unless we alter it as in diminished and augmented chords). So if we leave out the fifth we have three notes left, the root, third and seventh.

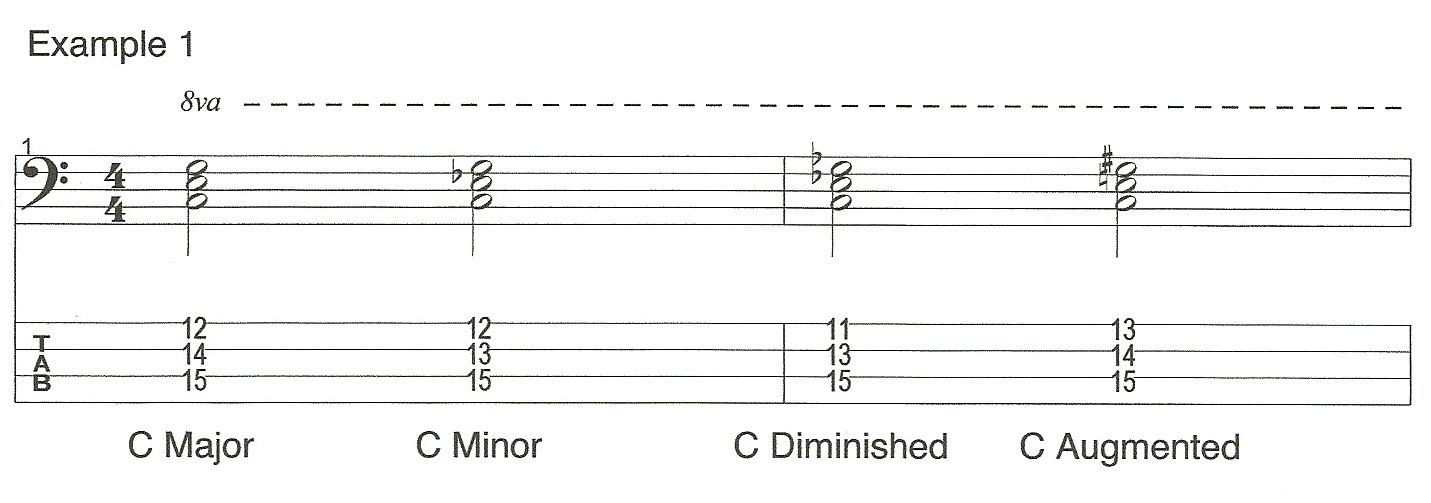
Example 1 demonstrates two different ways of voicing major seventh, dominant seventh, minor seventh and minor with a major seventh chords. The first way is to play the root on the A string, the third on the D string and the seventh on the G string. The second way is to play the root on the E string, leave out the A string and play the seventh on the D string and the third up an octave on the G string.

Video 4 Example 1 Chord extensionsAltering the fifth

Just because the fifth is the same for both major and minor chords doesn’t mean we can’t alter it. You can flatten the fifth (lower by a semi-tone) to give you a diminished chord or sharpen it (raise it by a semi-tone) to give you an augmented chord. In order to play a diminished or augmented chord you need to include the fifth because the fact that it’s been altered makes it a key element in the chord. That is why I have included all four notes in the augmented and diminished examples in Example 1.

Sixths

Another common chord extension that we can use instead of a seventh is a major sixth. We can add a major sixth to a major triad or a minor triad. The chord symbol for a major chord with a major sixth is just the number 6 (eg. G6, A6, C6 etc.) and the chord symbol for a minor chord with a major sixth is m6 (eg. Gm6, Am6, Cm6 etc.) Example 2 demonstrates how to play these two types of chords. Again, I’ve left out the fifth in both cases.

Video 4 Example 2 Chord extensions

Harmonising D major in seventh chords

If we harmonise any major scale into seventh chords we get seven different chords, two major seventh chords (chords I & IV, three minor seventh chords (chords II,III & VI), one dominant seventh chord (chord V) and one half-diminished chord (a chord with a minor third, a minor seventh and a flattened fifth) (chord VII). In example 3 I’ve harmonised a D major scale into seventh chords.

Video 4 Example 3 Chord extensions

Ninths

After the seventh, the next extension we can add to a chord if we keep stacking intervals of a third is a ninth. A full ninth chord has five notes in it, root, third, fifth, seventh and ninth. Example 4, demonstrates how to play a few common ninth chords by adding a ninth to a major seventh chord, a dominant seventh chord, a minor seventh chord and even a major sixth chord. As before I’m leaving out the fifth in each chord.

Video 4 Example 4 Chord extensions

More chord extensions

If we keep up this idea of stacking intervals of a third we end up with an eleventh and then a thirteenth. By the time you reach the thirteenth you have seven notes. Most scales have seven notes. So a seven note chord would effectively be equivalent to playing all the notes from a scale simultaneously. Which is usually a bad idea. Also, you can alter (either sharpen or flatten) the upper extensions (ninth, eleventh and thirteenth). Just like I altered the fifth earlier. This gives you a huge amount of options in terms of extending chords.

So, we have to exercise some judgement over which chord extensions we can add to which chords. And that all comes down to what we think sounds good. For example, you normally wouldn’t want to add an eleventh to a chord with a major third in it (major or dominant). Because the eleventh clashes with the third but you can add a sharpened eleventh. If you want to add an eleventh to a major chord then you would normally leave out the third. That would change the chord to what we call a “sus” chord. A sus chord is a chord that omits the third and usually replaces it with the fourth. The fourth is the same note as the eleventh. Check out my video on “intervals” if you don’t understand why the fourth and the eleventh are the same note.

Example 5 demonstrates some common chord extensions that we can play over major or minor chords on the bass.

Video 4 Example 5 Chord extensions

Chord extensions on 5 and 6 string basses

For Example 6 I’ve had to switch onto my six string bass to play some of these extensions. The ability to play more extended harmony is one of the main reasons I choose to play six string basses. If you don’t have a six string bass, many of these chords can be adapted onto a five string bass.

Video 4 Example 6 Chord extensions

Playing Chords on the Bass – Part 3 – Triads

Learn to Play Chords on the Bass – Part 3 – Triads

In this video lesson you’ll learn how to play triads on bass guitar. There are four different types of triad. I’ll explain what they are and then how to play them.

Triads, what are they and how do you play them?

In part 3 we’re going to look at how to play triads on the bass. They are simple three note chords that form a foundation for a lot of extended harmony. Before we can go on to explore chord extensions it’s really important to understand triads.
There are essentially four types of triad. Major, minor, diminished and augmented. So, example 1 contains an example of each triad. In this example they all have the root note C.

Video 3 Example 1 TriadsOf these four, major and minor are by far the most common and will be the ones we use the most.

Harmonising scales using triads

We can harmonise scales into triads. In part one we harmonised scales into intervals of a third. A triad is two intervals of a third stacked together. By which I mean, you take a root note, find a note that is a third above it and then another note which is a third above again. The three notes of a triad are often referred to as the root, the third(an interval of a third above the root) and the fifth (an interval of a third above the third and an interval of a fifth above the root).

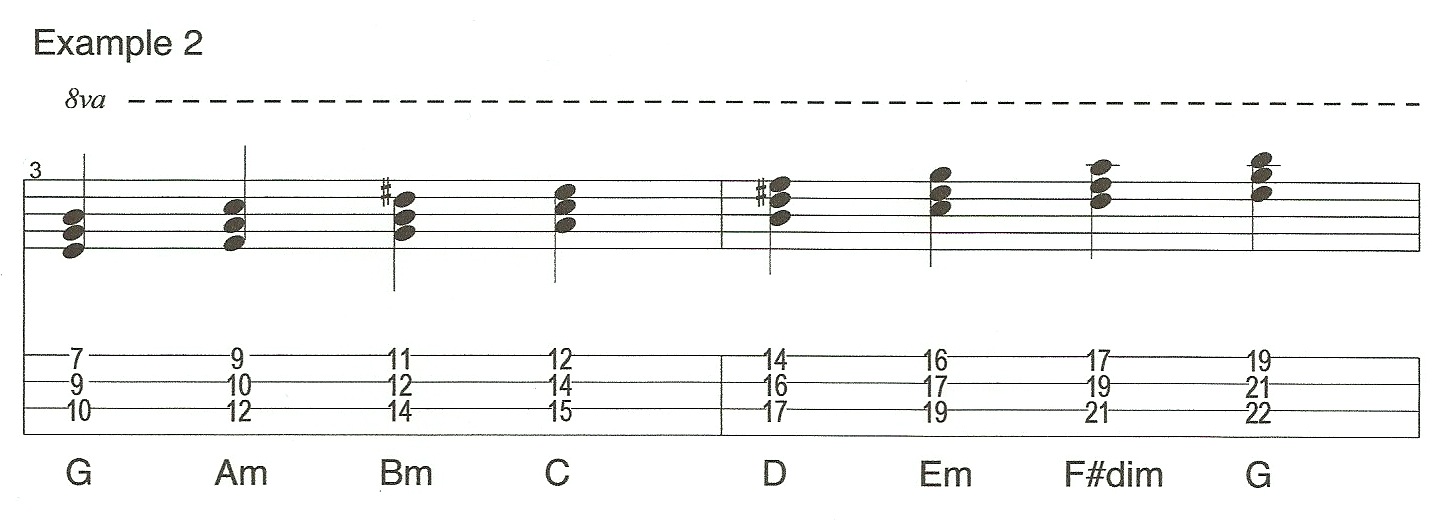
You’ll find that when you harmonise a major scale into triads you’ll get seven chords, three major (chords I, IV & V), three minor (chords II, III and VI) and one diminished triad (chord VII). In example 2 there’s a G major scale harmonised into triads played in root position. Meaning that the root note is the lowest of the three notes.

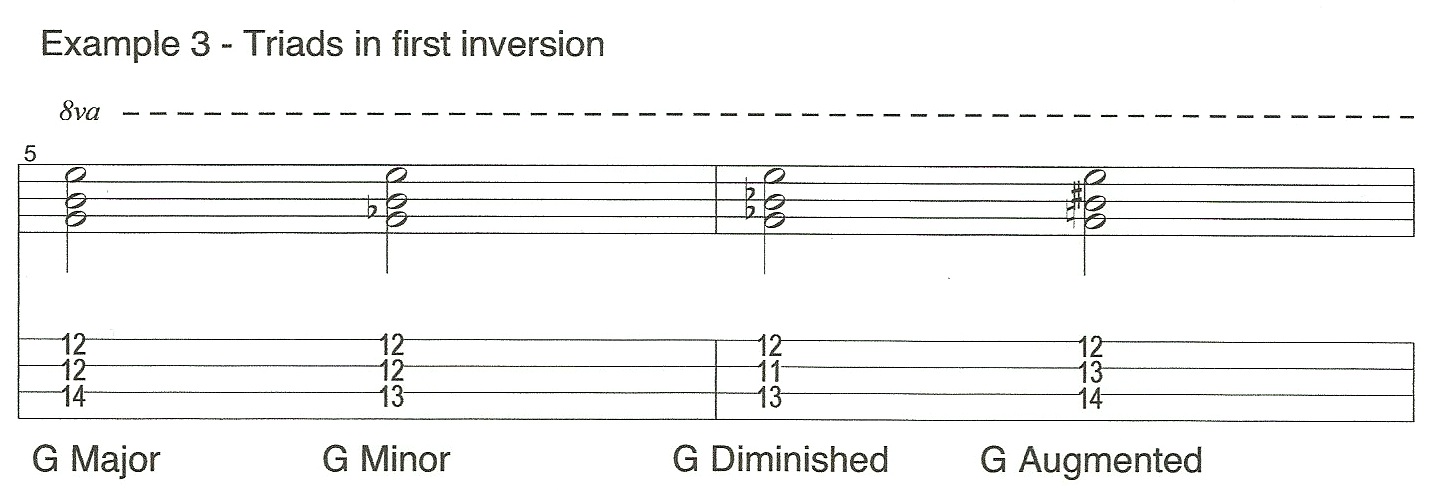
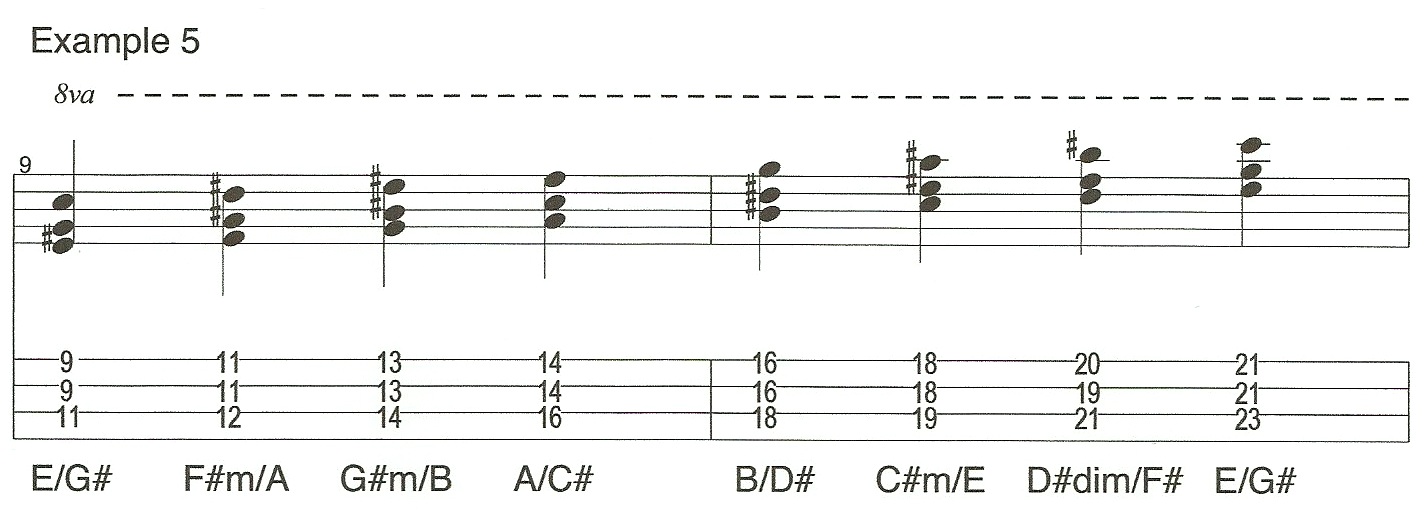
Video 3 Example 2 TriadsIn the previous example we refer to these chords as root position because we’ve arranged each triad in a neatly stacked order with the root at the bottom and the third and the fifth stacked on top of it. If we change the order of these notes to make either the third or the fifth the lowest note then we have what we call an “Inversion”. There are only two possible ways to invert a triad. First of all put the third at the bottom as in Example 3.

Video 3 Example 3 Triads

Triad inversions

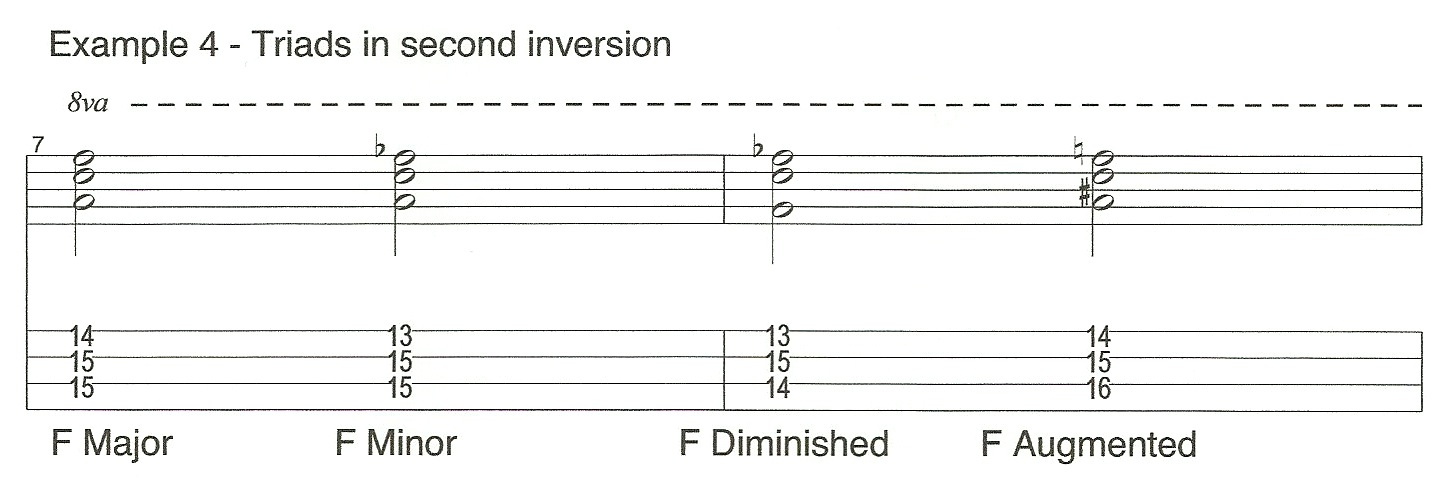
Then put the fifth at the bottom as in Example 4.

Video 3 Example 4 TriadsExample 5 is an E major scale harmonised in first inversion triads.

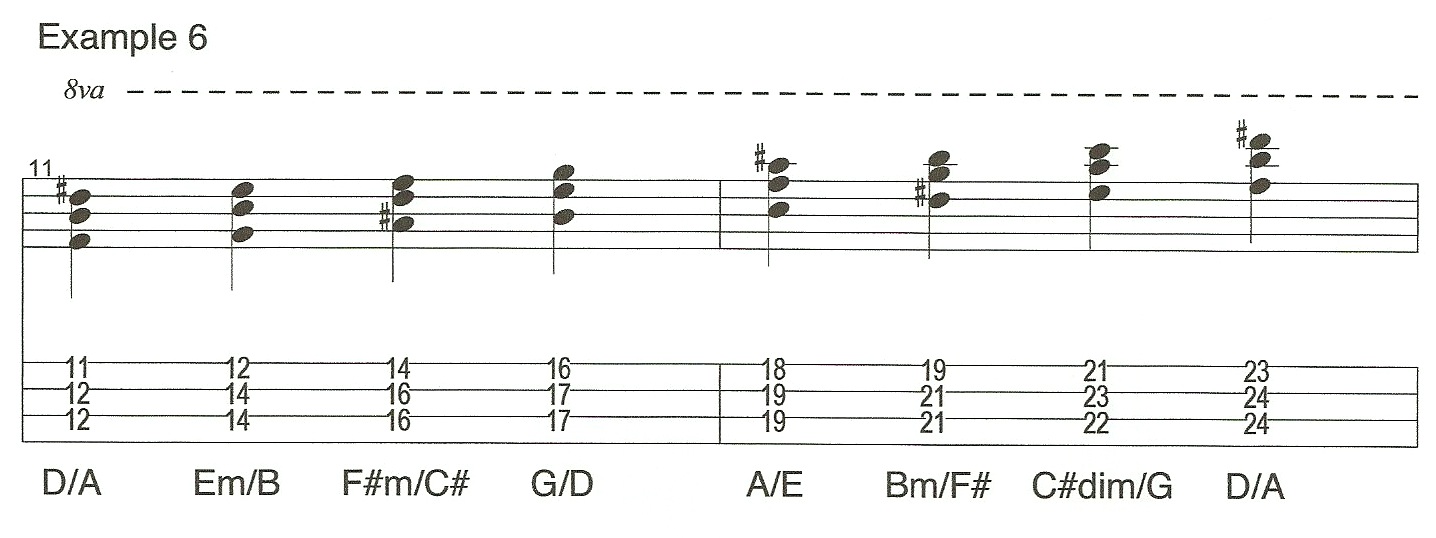
Video 3 Example 5 TriadsFinally example 6 is a D major scale harmonised using the second inversion.

Video 3 Example 6 Triads

Harmonising minor scales

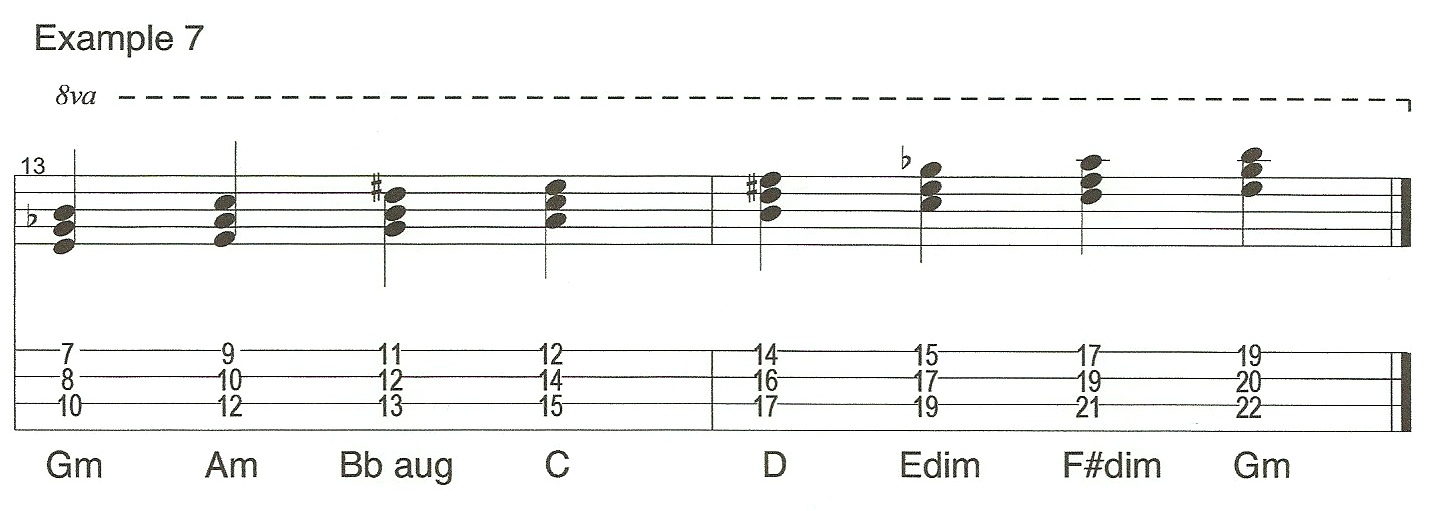
If you harmonise a melodic minor scale into triads you get two minor chords, two major chords, two diminished chords and one augmented triad. So, in example 7 there’s a G melodic minor scale harmonised using root position triads.

Video 3 Example 7 Triads

Now move on to Playing Chords on the Bass – Part 4 – Chord Extensions. You’ll learn how we can add extensions to the triads so you can make more interesting sounding chords.


Improve Your Right Hand Technique on Bass Guitar

Right Hand Techniques on Electric Bass

As I was posting some of my previous videos I started thinking that I should add a new one describing some of the right hand techniques you’ve seen me using, so here it is.

Conventional Right Hand Technique

When I was learning to play I was taught to place the thumb of my right hand on either a pickup or on the bottom string. Then pluck the strings with my index and middle fingers. It’s a very common right hand technique for the bass and one that I still use a lot. The downside of this technique in my opinion is that it doesn’t make enough use of the thumb. The thumb is probably our most versatile and dextrous digit, so some time ago I decided that my two finger technique wasn’t versatile enough for everything I wanted to play on the bass and I started working on some right-hand techniques that use my thumb more.

String Damping

A simple way to use your thumb with the two finger right hand technique is to use it to dampen and mute the lower strings. Damping is a key issue for bass players especially with the lower strings because they have a tendency to ring and create unwanted noise when we’re not using them.

If you position your thumb so that it touches these strings when you’re not using them it will mute them and stop any unwanted noise coming from them. This is a simple adaptation to the technique that can make an important difference to your playing, especially if you have a low B string on your bass. It will involve some practice because you will need to get used to constantly moving your thumb as you change strings but if you’re conscientious about listening out for unwanted noise from your lower strings when you practice then it should become instinctive fairly quickly.

Use the right hand thumb

Now let’s change the technique altogether and get our thumb playing notes instead of just damping. The first thing we need to look at is how can we combine using our fingers and thumb. Example 1 is a simple demonstration of how we can play notes by alternating between our thumb and first finger. In the example T means play the note with your right hand thumb and i means play the note with your right hand index finger. As you can see from the example we should be able to use this technique to play across strings as in bar one, on adjacent strings as in bar two and on the same string as in bar three.

Example 1 Right Hand Technique

What are the benefits of playing notes with your right hand thumb

The advantage of this right hand technique over the two finger technique is that it’s much easier to play across strings. There’s much more independence (and physical distance) between your index finger and thumb between your index and middle fingers. I also find it much more natural to keep a constant tempo at high speeds.
Muting Strings

A third benefit of using this right hand technique is damping, particularly palm-muting. When I use this right hand technique I rest the palm of my hand on the lower strings near the bridge to dampen them and stop any unwanted noise. In effect my palm is functioning in the same role my thumb was in the previous right hand technique.

I can take this technique a step further and use my palm to mute the strings I’m playing as well. If you rest your palm on the string close enough to the bridge then you’ll still hear the note. However, it will have a muted and staccato sound. It’s a good approximation to the classic Motown sound that James Jameson used to get by putting bits of foam under his strings in front of the bridge.

Anthony Jackson is another great bass player who uses this muted sound a lot in his playing. Try playing through Example 1 both with and without the palm muting. Then when you get used to it, try applying the same techniques to other areas of your practice.

Right Hand Middle Finger and Ring Finger

The next obvious thing to do with this right hand technique is start using more fingers on your right hand. Example 2 is a demonstration of how to use your thumb, index and middle fingers to play chords. Similar to the way a guitarist finger picks. (T, i & m = Thumb, Index and Middle)

Right Hand Technique Example 2You can also add your third finger (and even your little finger) to this technique especially if you’re playing chords that use more than just three strings. Again this is similar to how a guitarist would finger pick.

Other right hand techniques

Another simple right hand technique you can apply to playing chords is raking. With either your index or middle finger or both.

Example 3 is a demonstration of this right hand technique.

Right Hand Technique Example 3You might think that the next logical place to take our right hand technique would be to try and use our thumb and three fingers and then our thumb and four fingers. And you might well be right. A lot of bass players have explored right hand techniques using all the fingers on their right hand. And I would encourage you to explore it, as I have, to find out what works best for you.

The thumb, index and ring right hand technique

My personal favourite right hand technique is a little simpler. I prefer to use my thumb with my index and third finger. It sounds a little odd because I’m not using my middle finger. However, after years of experimenting with three and four finger right hand techniques. I’ve found this one to be the most efficient for me.

I think it’s because my index and third fingers are almost the same length whereas my middle finger is longer. When I try and use those three fingers all together, it works, but it’s less comfortable than when I leave the middle finger out. This right hand technique has proved very versatile. It’s fast, it’s easy to cross strings. It’s easy to keep a constant rhythm even at high speeds without getting tired. And it works well for both triplet and sixteenth note rhythms.

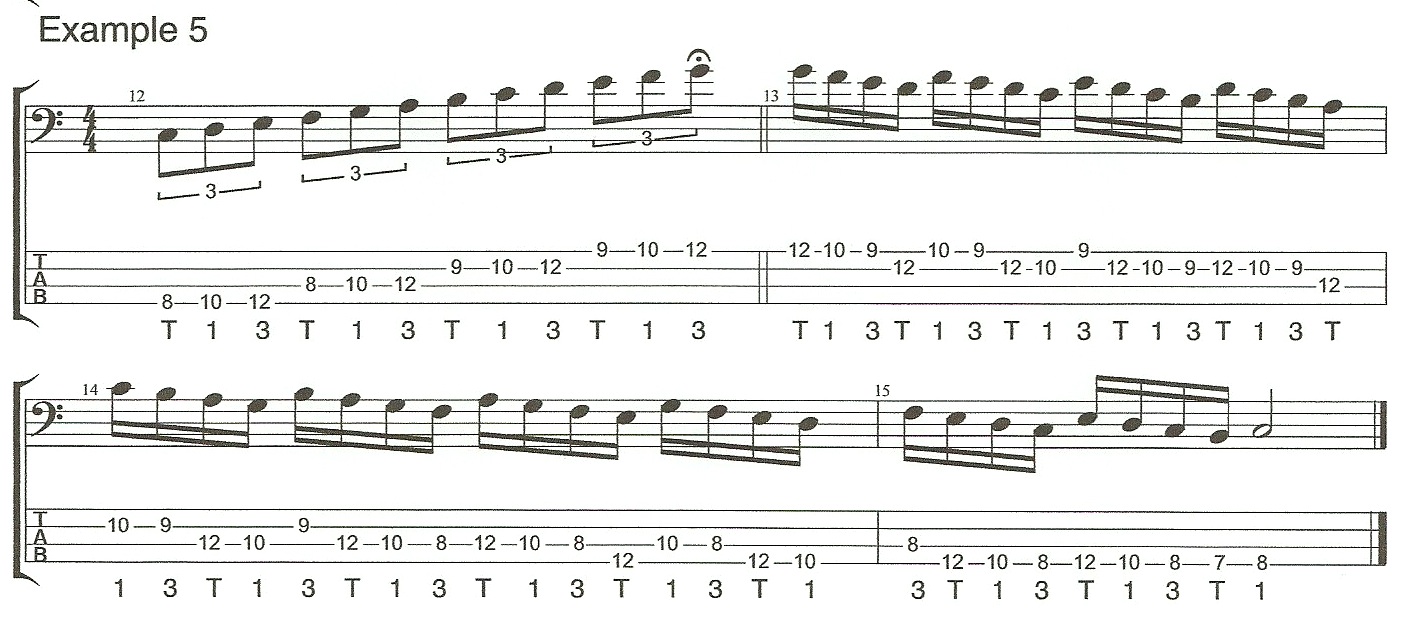
Example 4 is a demonstration of how we can use this right hand technique to play across strings in bar 1, on adjacent strings in bar 2 and on a single string in bar 3. (In this example T=thumb, 1=index & 3=third finger)

Right Hand Technique Example 4Once you’ve found a technique, or several techniques that work well for you then try applying them in all areas of your practice. For instance, Example 5 is a demonstration of how I might apply my technique demonstrated in Example 4 to practicing a C major scale.

Right Hand Technique Example 5


Creative Bass Playing Blog