Tag Archives: bass lessons

Searching, Finding on fretted and fretless 6 string bass – Bass Practice Diary 61

Practising John Patitucci’s Searching, Finding – Bass Practice Diary – 18th June 2019

Searching, Finding was written by John Patitucci and it featured on his self titled debut album. This week I was reading through a book of John Patitucci transcriptions. It’s an unusual bass book, from the point of view that most of it is written in the treble clef rather than the bass clef. But if you can cope with the treble clef reading, then there are great tunes in it, like this one.

I should point out that the only part of the transcription that I’m playing in the video is the melody. The solos are all improvised by me and I’ve written out one of the choruses of my solo in bass TAB.

How I practice tunes on bass

One of the reasons why I’m posting this video is because it gives an insight into the way that I practice learning tunes. When I say “learning tunes” I don’t just mean learning the melody, I mean melody, bass line, chord progression, structure etc. Everything that’s involved in learning a composition.

The first thing I’ll do is make myself a simple backing track, usually involving drums and chords. I’ll programme the drums in ProTools and add chords on either piano, guitar or six string bass. In this case I played the chords on piano.

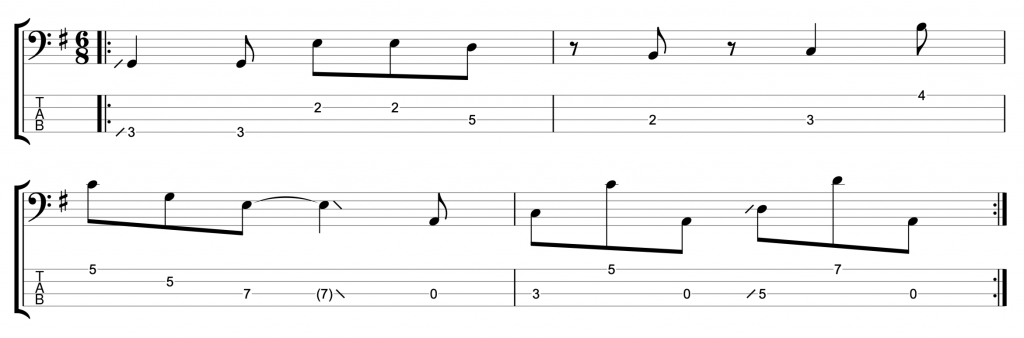
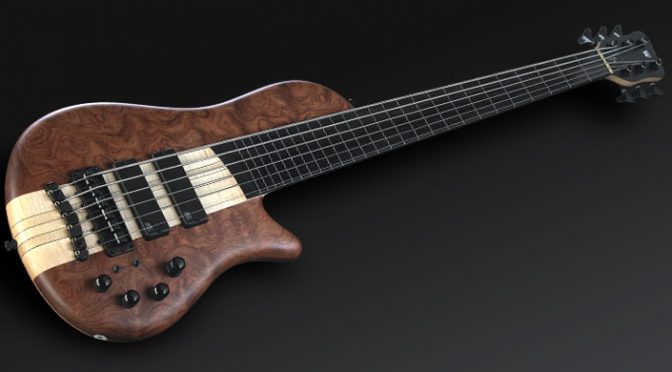
When I have my simple backing track I’ll loop it and practice playing the melody, bass line and improvised solos on it. And that’s what you can see me doing in the video. I’m using my fretless six string bass to play a walking bass line and improvise on the modal section. While my fretted six string bass is used to play the bass figure in the modal section and the melody and solos during the choruses.

My solo chorus on Searching, Finding

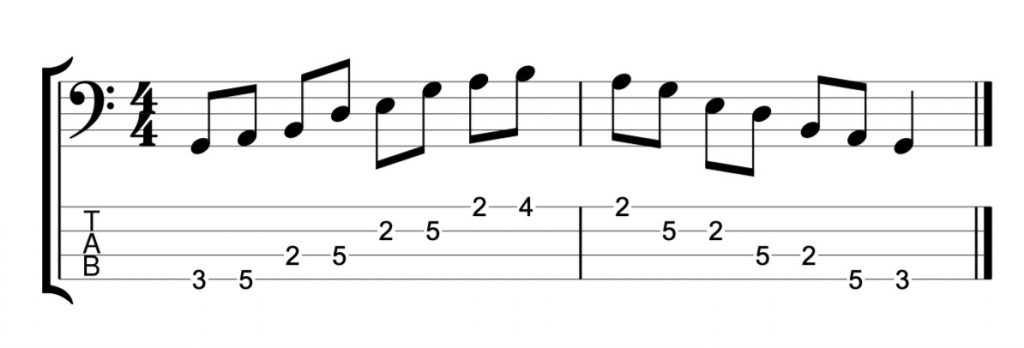
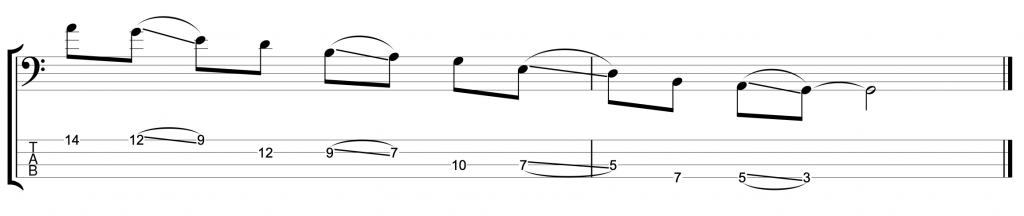
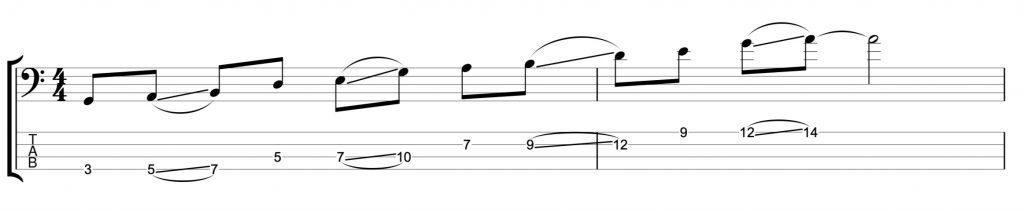
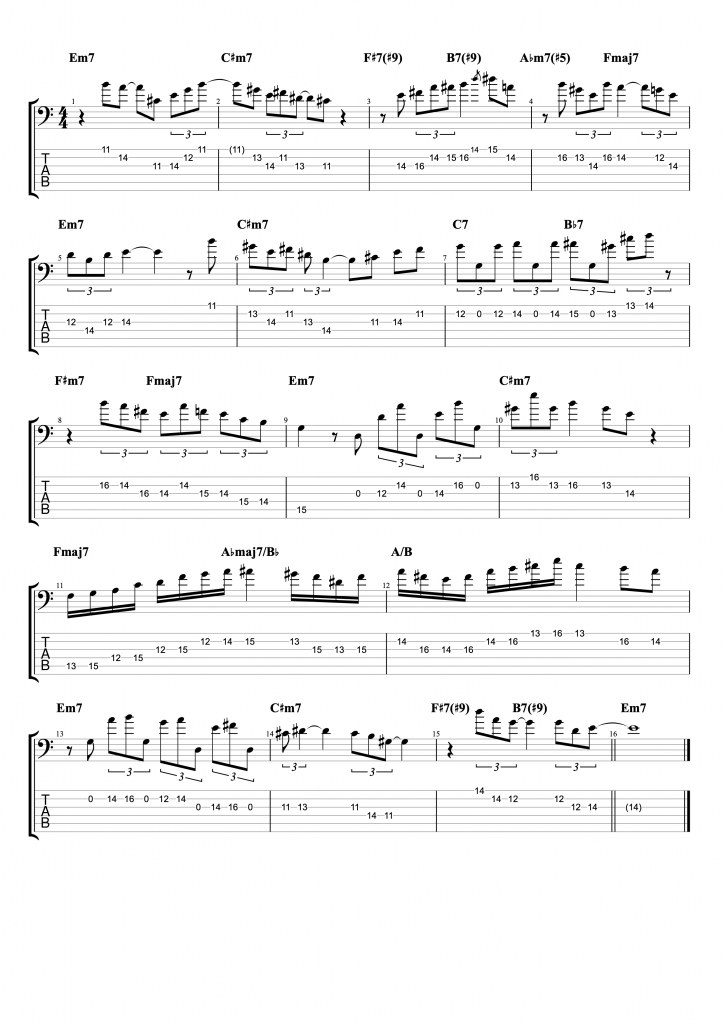
When I study an artist’s transcription, like John Patitucci’s solo on Searching Finding. I don’t do it so that I can perform his solo or rip off his licks. I do it so that I can study the notes and the phrasing that he uses over the harmony. So that I can then use the information to assist my own improvisation. Before I start improvising I will often write out some lines that fit over some of the trickier harmonic sections. In the first solo chorus in the video, starting at 0:59, you can see me putting some of my ideas into practice. Here is the transcription of that chorus.

Six String Bass Solo on the changes of John Patitucci's Searching, Finding
Six String Bass Solo on the changes of John Patitucci’s Searching, Finding

Once I’ve analysed an artists solo and tried to assimilate what I can into my own ideas. I will then try to improvise in the purest sense of the word. Meaning that I will try not to think about any pre planned ideas and just improvise off the cuff. This is what you can see me doing in the second chorus of solo starting at 2:24 in the video.

Hopefully at this point I’ve started to internalise the melody, harmony and structure of the composition. And this information will come out in my improvisation without me having to consciously work it out in advance. The solo I played in the video partly demonstrates this, although it isn’t perfect yet.

Quartal Chord Voicings on Bass Guitar – Bass Practice Diary 45

Quartal Chord Voicings on Bass Guitar – Bass Practice Diary – 26th February 2019

I haven’t done a video about bass chord voicings for a while. So, this week I’ve decided to practice some of my favourite jazz chords, quartal chord voicings. Quartal harmony is a jazz term which means harmonising chords in intervals of a fourth.

4th Intervals

I did a video recently about playing modern jazz lines using 4th intervals. But I thought after making that video that I wasn’t telling the full story about using 4ths in modern jazz. The quartal chord voicings themselves create a very distinctive modern jazz sound. It’s instantly recognisable once you become familiar with the sound.

Chords are traditionally voiced in intervals of a third. Using quartal voicings in jazz became popular in the 1960’s after Miles Davis made quartal chord voicings a feature of his composition So What from the 1959 album Kind of Blue.

Quartal harmony was a sound that then became associated with the great John Coltrane Quartet of the early to mid 1960’s. The chords were supplied by pianist McCoy Tyner, who is synonymous with quartal harmony, and one of my all time favourite jazz pianists.

McCoy Tyner was using these voicings at a time when the Coltrane Quartet was playing a lot of modal jazz. Meaning that there weren’t lots of chord changes. And the emphasis was more on scalic improvisation over static harmony. So What is also a modal jazz piece. So, if you’re looking to apply some of these quartal chord voicings, then modal jazz tunes are a good place to start.

Quartal Harmony on Bass

The bass is setup for playing quartal chord voicings because the strings are tuned in intervals of a fourth. Which is why it amazes me that more bass players don’t use quartal chord voicings. Many of the chord voicings in the video can be played with just one finger. But despite this simplicity, they create a sophisticated jazz harmony sound.

Here is an A major scale harmonised in 4ths.

A major scale - quartal chord voicings
A major scale – quartal chord voicings

In the video, I’ve used the open A string as a root note underneath all of these voicings.

When you play this, it doesn’t sound like a typical major scale harmonisation. That’s what’s so great about quartal harmony. You can take simple harmony, like a major scale, and completely change it’s character, without needing to change or add any notes.

It works for all of the modes of the major scale. Here is the Dorian mode harmonised in 4ths.

A dorian - quartal chord voicings
A dorian – quartal chord voicings

Applying Quartal Harmony to Jazz

I’ve already mentioned that quartal chord voicings are extremely well suited to modal jazz. If, for example, you’re playing a modal jazz composition with long periods on a minor seventh chord. Like So What or John Coltrane’s Impressions. Then you’re faced with a challenge of how to make just one chord sound interesting.

One solution would be to apply the dorian chord voicings that I’ve written out in the example above. It gives you seven different options for voicings that you could play over a single minor seventh chord (Am7 in the example above). You could use any or all of these voicings to help create a feeling of movement in the otherwise static harmony.

You can apply quartal harmony to virtually any scale or mode. In this next example I’ve applied it to an A harmonic minor scale.

A harmonic minor - quartal chord voicings
A harmonic minor – quartal chord voicings

The same chord voicings can also be applied to any of the modes of the harmonic minor scale, which includes the altered scale.

One of the fourth intervals in the harmonic minor scale actually comes out as a major third. So, some of the voicings in the example above are not strictly quartal. Because they mix fourths with a third. But it still creates some interesting sounds and you can do your own experimenting to decide which of the voicings are useful.

How to Practice Sliding Notes on a Fretless Bass – Bass Practice Diary 40

Sliding Notes on a Fretless Bass – Bass Practice Diary – 22nd January 2019

Sliding between notes is an integral part of phrasing on a fretless bass. This video features an exercise to help you practice sliding accurately between notes by using the pentatonic scale.

When you slide between notes on a fretless bass, the first thing that you need to concentrate on, is keeping the notes in tune. When you slide, it’s very easy to slide too far and go sharp, or not quite far enough and the note will be flat. So my first advice is to start slowly and use a backing track.

Backing tracks are very easy to find for free on Youtube. Here is an example of a backing track in G major that you could use to help you practice this exercise. When you practice with a backing track it’s so much easier to hear when you go a little bit out of tune.

Use the Pentatonic Scale to Practice Sliding Notes on Fretless Bass

The easiest way to play a pentatonic scale is by playing two notes on each string like this.

G major pentatonic – two notes per string

The reason it’s easy is because it doesn’t involve any position shifts. But it offers very little opportunity to slide between notes.

In order to incorporate slides, you need to keep shifting position, which involves playing at least three notes per string like this.

Sliding Notes with 1st Finger in G major Ascending
Sliding Notes with 1st Finger in G major Descending

You can also practice this on a fretted bass. It’s easier on a fretted bass because you don’t need to be as accurate. But position shifting is an important skill for any bass player to practice.

The idea of the exercise is that you always slide with your 1st finger (index finger). Playing three notes on each string, you play the first of the three notes with your 1st finger and then slide up to the second note. You can play the third note on each string with either your third finger or little finger.

Slide Notes With Any Finger

It’s easiest to use your 1st finger to slide. But you want to be able to slide accurately with all of the fingers on your left hand. So come up with your own variations of this exercise and use different fingers to play the slides. Here’s a variation that I demonstrated in the video which uses your 4th finger (little finger) to play the slides.

Sliding Notes with 4th Finger in G major Ascending

Another variation that I demonstrated in the video, is to break the exercise down into small sections. Don’t feel like you need to practice the whole scale all at once. Work on each position shift one at a time. Like this.

I think that practicing like this actually replicates what you will play in a real musical situation better than playing the whole scale all at once. You could use the example above as a fretless bass fill on a G major chord. And the example below which starts on a D could also be a fill when you’re playing in the key of G.

Just like any scale exercise, don’t forget to practice this exercise in different positions and different keys. And try to adapt the idea of sliding and position shifting to any other scales, arpeggios or technical exercises that you practice.

Learn a Fretless Bass Groove with Bass TAB – Bass Practice Diary 39

Fretless Bass Groove with Bass TAB – Bass Practice Diary – 15th January 2019

This week during my bass practice, I’ve been composing bass grooves in 6/8. This video features one fretless bass groove that I’ve written. I choose to feature this one because it fits nicely on 4, 5 or 6 string bass. So hopefully all bass players will be able to have a go at playing it.

Fretless Bass Groove

The bassline is in G major. I’ve written some phrasing, by marking some of the slides on the TAB. But my advice is to focus on the rhythm more than the phrasing.

Once you’ve got the rhythm of the groove, I think you’ll find that the phrasing comes quite naturally. And I don’t mind if you phrase it differently to me. I think phrasing is very personal and I rarely try to imitate another musicians phrasing too closely.

Start by practicing slowly. The full speed is 110BPM and I’ve included a slower version at 70BPM. But I would probably advise starting even slower than that. And make sure that the rhythm is accurate. The rhythm in bar two is particularly tricky. It’s like playing on all of the off beats in a bar of 3/4, but the feel is still 6/8.

Six Eight (6/8) Time Signature

I’ve written before that 6/8 is one of my favourite meters to play in. You can find my guide to playing 6/8 basslines here. I’ve also written about 6/8 in my upcoming book for Fundamental Changes which will be published this year.

Hammer Ons and Pull Offs on Bass – Left Hand Technique Lesson – Bass Practice Diary 32

Hammer Ons and Pull Offs – Left Hand Technique Lesson – Bass Practice Diary – 27 November 2018

Someone asked me recently to do a video with some Hammer Ons and Pull Offs exercises. I don’t usually do videos based on suggestions, but this time I thought it was a good idea. Because practising Hammer Ons and Pull Offs is a great way to improve your Left Hand Technique.

Having said that, I believe that there are a few basic things that you need to get right if you are going to improve your technique by practicing hammer ons and pull offs.

Left Hand Techniques

The first thing is to come up with exercises that use four fingers on your left hand. If you want to play with good technique in your left hand then you need to be able to play evenly between all of your fingers.

I see so many beginner and intermediate bass players favouring certain fingers and trying to avoid other fingers on their left hand. It’s very natural to play like that because when you start, everyone has stronger index and middle fingers than ring finger and little finger. But that’s the reason you practice left hand techniques, in order to overcome that.

If you play hammer ons and pull offs using the same two fingers every time, then you are actually making your left hand technique more uneven when you practice.

So, Rule One of left hand technique is practice with four fingers. The only exception to this is when you are specifically working on strengthening a weak finger. As I demonstrated in the video with my third finger.

Hammer Ons

The second thing that you need to get right is, when you hammer on, you need to hammer on to the fret and not in between two frets. For example, if you want to play the fifth fret on the first string, you need to hammer onto the fifth fret, not in between the fourth and fifth fret.

You need to be very accurate because if you go even a little bit in front of the fret, you will lose the note. The sound is created by striking the string against the fret. So, if you don’t hammer on accurately then the sound will be weak and quiet.

Many bass players struggle with this because they don’t spread out their fingers on the left hand. If you play with your fingers too close together, you won’t be able to reach the frets with your third and fourth fingers and your hammer ons will be weak.

So, Rule Two is spread you fingers wide and hammer on accurately onto the frets.

Pull Offs

The pull off technique is a bit easier. But make sure you don’t just lift your fingers off the strings. You need to excerpt a gentle pull on the string as you pull off. If you don’t, the notes will die out as you repeat the exercises. If you pull too hard, the notes will sound uneven as your pull offs will be much louder than your hammer ons.

When you get the pull off technique right, you should be able to keep all of these exercises going continuously without needing to play any notes with your right hand. The pull off technique is easiest to execute on the first string.

So, Rule Three is practice these exercises on all strings, not just on the first string.

The Hammer On and Pull Off Exercises with Bass TAB

This is the first exercise that I played in the video.

Hammer Ons and Pull Offs Example 1

I would recommend that you don’t spend too much time playing the same exercise the same way. You should keep coming up with your own little variations. And try to focus on the things that you find difficult.

If you practice the same exercise too much, you will become very good at playing that one exercise. But if you keep varying the exercise you will eventually become very good at the technique, which is what you want.

Here is the second exercise from the video.

Hammer Ons and Pull Offs Example 2

In this example you keep your first finger held down continuously. Now here is a variation in which you hold your second finger down continuously.

Hammer Ons and Pull Offs Example 3

Make sure you hold your second finger down on a string that you’re not using. Because you won’t be able to pull off with your first finger if your second finger is held down on the string you’re playing. You can vary this exercise again by holding down your third and then fourth fingers. It gets harder each time.

Rule Four

Rule four is the most important rule, and it should apply to everything you practice. The rule is, focus on timing and not speed. Use a drum beat or a metronome and practice everything you do by playing in time.

Hammer ons and pull offs are relatively easy to play fast, but they’re much harder to play in time, and it’s hard to get all the notes to sound even. So my best recommendation is start slow, play in time, make it even and then gradually increase the tempo.